
A lot of people associate the word “development” and KNIME Analytics Platform with creating workflows with nodes. But what exactly is a node and where do nodes come from?
A node is the smallest programming unit in KNIME. Each node serves a dedicated task, from very simple tasks - like changing the name of a column in a table - to very complex tasks - such as training a machine learning model. A node is contained in an extension. One of the jobs a developer does at KNIME is create new extensions or nodes for existing extensions. However, as openness is very important for us at KNIME, everyone can contribute to our platform.
There are lots of ways to extend KNIME, but node development, i.e. writing extensions, to add the specific functionality you or your company needs, is probably the most common.
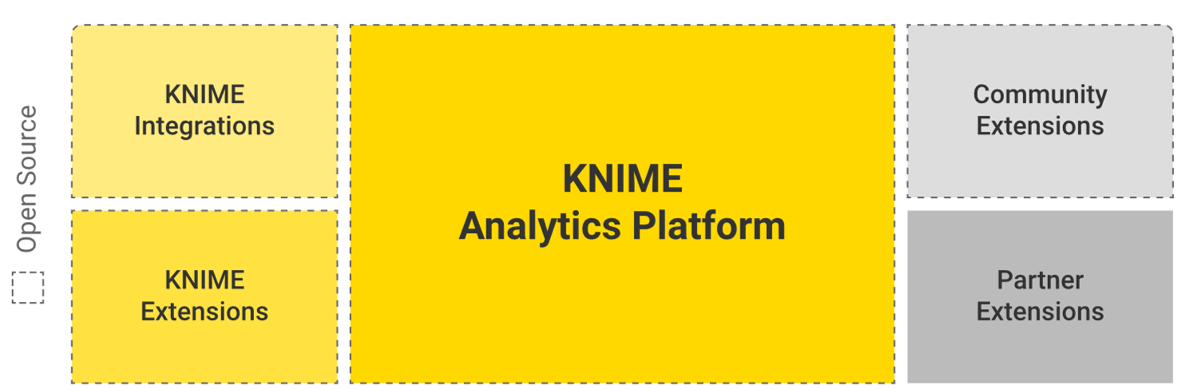
What kinds of extensions do you find in KNIME Analytics Platform, and where do they come from?
KNIME Integrations - open source integrations for KNIME which are also developed and maintained by KNIME. They provide access to large open source projects such as Keras for deep learning, H2O for high performance machine learning, Apache Spark for big data processing, Python and R for scripting, and more.

KNIME Extensions - developed and maintained by us, here, at KNIME, to provide additional functionalities such as access to and processing of complex data types as well as the addition of advanced machine learning algorithms
Community Extensions - created and made available in KNIME Analytics Platform for free by the KNIME community. Sometimes community extensions become supported and further developed by KNIME. At KNIME, we check that all Community Extensions function properly, also putting the Trusted Community Extensions through even more stringent checks

Partner Extensions - these are the nodes developed by other companies for their own use, for example to access in-house databases or resources. Sometimes these companies decide to share their nodes with the community. Check out these extensions provided by Continental or Erl Wood Cheminformatics, for example.
So, if you’ve found yourself thinking “It would be great if there was a special node to solve a particular problem”, in this blog post we show you how quickly you can actually start writing your own extensions. Note that this article is intended to be an overview of our Create a New KNIME Extension Quickstart Guide. There you’ll find a detailed manual and further explanations of all involved steps. Think of this blog post as the first stepping stone to getting started.
The Five Steps to Write an Extension
- Set up a KNIME SDK
- Create a New KNIME Extension Project
- Implement the Extension
- Test the Extension
- Deploy your Extension
Example KNIME Extension Project - Number Formatter
We have created a reference extension you can use as orientation.You can find it in the
org.knime.examples.numberformatterfolder of theknime-examplesrepository
The project contains all required project and configuration files and an example implementation of a simple Number Formatter example node, which performs number formatting of numeric values of the input table. This example implementation is used in the Create a New KNIME Extension Quickstart Guide which walks you through all the necessary steps involved in creating a new KNIME Extension.
1. Set Up a KNIME SDK
First you’ll need to set up a KNIME SDK. The KNIME SDK is a configured Eclipse for RCP and RAP Developers installation which contains KNIME Analytics Platform dependencies. As KNIME Analytics Platform itself is built upon Eclipse, you can directly spin up a KNIME Analytics Platform development version from within the KNIME SDK. Another nice thing is that Eclipse is also a fully fledged IDE. Hence, you can directly use it to write the actual source code.
To set up a KNIME SDK, you can follow the steps described in the readme on the knime-sdk-setup GitHub page in the SDK Setup section. The important steps you have to go through are:
- Install Java
- Install Eclipse
- Install Git and Git LFS
- Configure Eclipse/Target Platform
The rest of the readme is also worth a read as it gives a lot of useful background information.
2. Create a New KNIME Extension Project
In order to create an extension, you need to create a new KNIME Extension Project in Eclipse, which is easily done using the KNIME Node Wizard as it automatically generates all necessary files.
To do so, first install the KNIME Node Wizard as follows:
- Open your Eclipse Installation Wizard at
Help → Install New Software… - Enter the KNIME update site location
- Search for KNIME Node Wizard and install the entry that is found.
- Restart Eclipse
Now you’re ready to start the KNIME Node Wizard to create your new KNIME Extension Project. The wizard automatically generates the project structure, the plug in manifest, and all required Java classes. You just have to enter a name for your new project and node, and the wizard embeds it in the KNIME framework. This process is explained in detail in the Create a New KNIME Extension Project section of the Quickstart Guide.
After the wizard has finished, the new project is displayed in the Package Explorer view of Eclipse with the project name you gave it in the wizard dialog. At this point you should take a moment to review the structure of the project. This is explained in detail in the Project Structure section of the Quickstart Guide, showing all the necessary parts that make up a node (e.g. project files, Java classes).
3. Implement the Extension
Finished reviewing your project’s structure? Now it’s time to check some implementation details. Conveniently, the KNIME Node Wizard automatically includes the example code of the Number Formatter node from the knime-examples repository in the generated KNIME Extension Project.
This implementation is further explained in the Number Formatter Node Implementation section of the Quickstart Guide. The example code also contains detailed descriptions of the implemented methods at each line of code.
At this point your project is already ready to run. So you can either directly try out the example node or adapt the implementation to your needs by changing the implementation of the relevant classes. How to spin up KNIME Analytics Platform from your KNIME SDK is explained in the next section.
4.Test the Extension
To test your extension, follow the instructions provided in the Launch KNIME Analytics Platform section of the SDK Setup. After you have started KNIME Analytics Platform from Eclipse, the Number Formatter (or your own implementation) node will be available at the root level of the node repository. Create a new workflow using the new extension, i.e. your new node, inspect the input and output tables, and play around with the node. This is now the perfect opportunity to test whether the node behaves as you want it to. E.g. you can now find any bugs or test it to make sure you have thought about all of the possible edge cases in the implementation.
5.Deploy your Extension
The final step, after implementation and testing your node, is to deploy the extension, i.e. make it available to other people. This can be done manually by creating a local Update Site directly from Eclipse. For this you first need to create a so-called "Feature" that contains your extension. A feature simply defines a set of extensions that should be bundled together as one installable unit. Next, the feature is added to an Update Site. Again, the Update Site can contain several features that should be installable via said Update Site. The Update Site has to be built by Eclipse so that it can be used to install the contained Extensions from within KNIME Analytics Platform. See the Deploy your Extension section of the Quickstart Guide for a detailed walk through the procedure.
However, in a real world scenario this process should be done automatically. If you think your new node or extension could be valuable for others, KNIME provides the infrastructure to host and automatically deploy your Extension by becoming a Community Contributor and providing a Community Extension. This way, your extension will be installable via the Community Extension update site.
For more information about Community Contributions and how to become a contributor please see the Community section on our website or contact us.
Wrapping Up...
This blog post is designed to give a rough overview about node development, which is why we haven’t looked at more advanced topics such as streaming, custom port types or views. For a full walk-through, please follow the Quickstart Guide. If you want to start with KNIME Analytics Platform development, it’s a good idea to use the described example as a reference point and adapt it to your needs to develop the functionality you want to implement.
The open source community makes KNIME the great tool it is today. If you have a node that is worth sharing, then we encourage you to become a Community Contributor. The nodes of community contributors are available for everyone via the Community Extension update site.
Reference Materials:
- Want to access KNIME source code? See the Developers Section of the KNIME website. Or go directly to GitHub
- If you have questions regarding development, reach out to us in the KNIME Development section of our forum.
- For more information about Community Extensions please see the Community Section on the KNIME website.
- The Extension Development Quickstart Guide
- KNIME Examples at Bitbucket
- KNIME SDK Setup on GitHub
- General guidelines on how a node should behave can be found in the KNIME Noding Guidelines
We hope you’ve enjoyed this little introduction to KNIME Analytics Platform node development. Happy KNoding!