
Use this short guide to find out how to use KNIME Analytics Platform together with Amazon Elastic MapReduce. Learn how to connect to Amazon EMR and experiment using a real workflow. The example workflow demonstrates how to create a Spark context via Apache Livy and execute a simple Spark job on a cluster. The dataset behind the workflow is the NYC taxi datset.
Learn how to:
What is Amazon EMR?
Amazon EMR (Elastic MapReduce) is a managed cloud-based platform that provides big data frameworks, such as Apache Hadoop, or Apache Spark.
The benefits of this platform are:
- Easy, fast, and cost-effective processing and analysis of vast amounts of data across dynamically scalable Amazon EC2 instances
- Availability of other popular distributed frameworks such as Apache HBase, Presto, and Flink in Amazon EMR
- Interaction with data in other AWS data stores such as Amazon S3
What are the KNIME Amazon Cloud Connectors?
KNIME Analytics Platform includes a set of nodes to interact with Amazon Web Services (AWS). They allow you to create connections to Amazon services, such as S3, AWS Comprehend, or AWS Translate.
The KNIME on Amazon EMR Guide
- Note: To use this guide, you need an Amazon AWS account
Set up an EMR cluster
Prerequisites before launching an EMR cluster:
- An Amazon AWS account. To sign up please go to this link and follow the instructions.
- An Amazon S3 bucket. The bucket is needed to exchange data between KNIME and Spark and to store the cluster log files. To create an Amazon S3 bucket, please follow this guide.
For this guide, we recommend creating the cluster and the S3 bucket in the region eu-east-1, because later on we will read a dataset from the AWS Registry of Open Data which is located in that region. Having the cluster and data in the same region will avoid cross-region data transfer fees.
Now that all the prerequisites are fulfilled, it’s time to set up the EMR cluster:
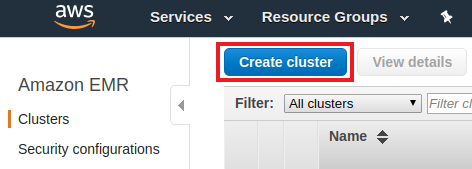
1. In the AWS web console, go to EMR
2. Click the Create cluster button at the top of the page
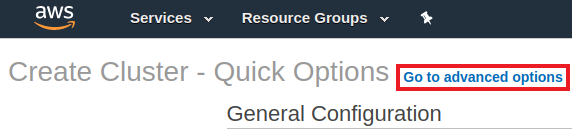
3. While you’re in the cluster creation page, navigate to the Advanced options
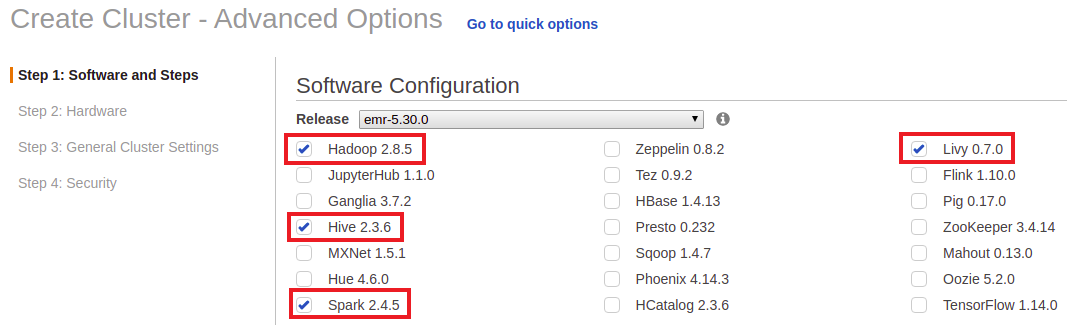
4. Under Software Configuration, you can choose the software to be installed within the cluster. For this guide, let’s check at least Hadoop, Hive, Spark, and Livy.
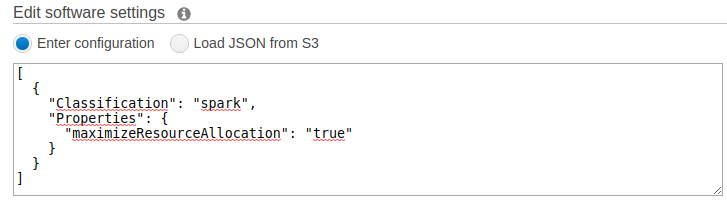
- Go to Edit software settings. Here, you can override the default configurations of applications, such as Spark. In the example below, the spark property maximizeResourceAllocation is set to true to allow the executors to utilize the maximum resources possible on each node in a cluster. Please note that this feature works only on a pure Spark cluster (without Hive running in parallel).
- You can keep the rest of the settings in this page by default and go to the next page.
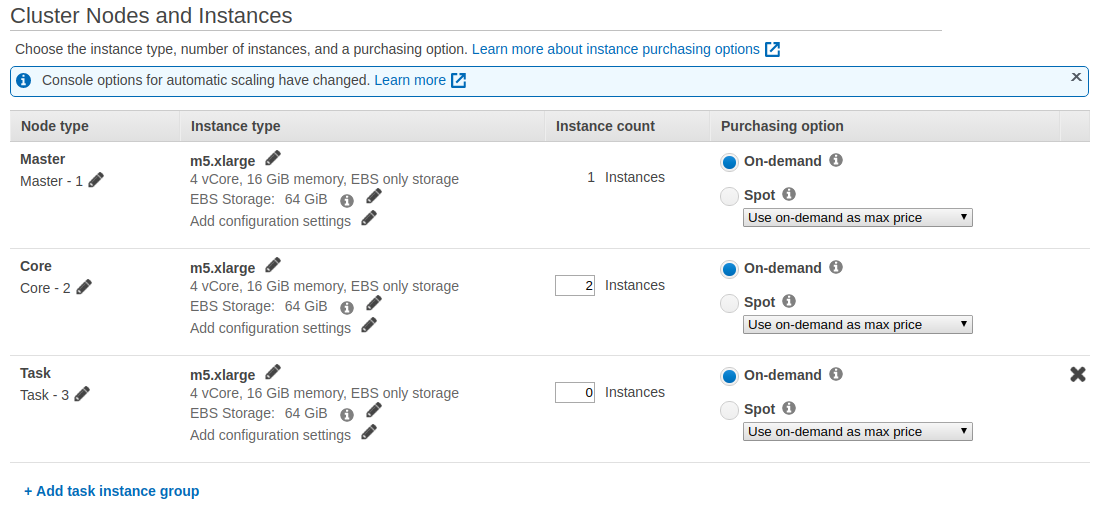
5. Under Hardware Configuration, you can specify the EC2 instance types, number of EC2 instances to initialize in each node, and the purchasing option, depending on your budget. For this guide, it is enough to use the default configuration. The rest of the settings we can keep by default values, or adjust them according to your needs.
- For more information on the hardware and network configuration, please check the EMR documentation. For a more in-depth guidance about the optimal number of instances, please check the guidelines as well.
6. Under General Options, enter the cluster name. Termination Protection is enabled by default and is important to prevent accidental termination of the cluster. To terminate the cluster, you must disable termination protection.
7. Go to Security options, where there is an option to specify the EC2 key pair. For this guide we can proceed without an EC2 key pair, but if you do have one and you want to SSH into the EMR cluster later, you can provide it here.
- Further down the page, you can also specify the EC2 security group. It acts as a virtual firewall around your cluster and controls all inbound and outbound traffic of your cluster nodes. A default EMR-managed security group is created automatically for your new cluster, and you can edit the network rules in the security group after the cluster is created. Follow the instructions in the documentation on how to work with EMR-managed security groups.
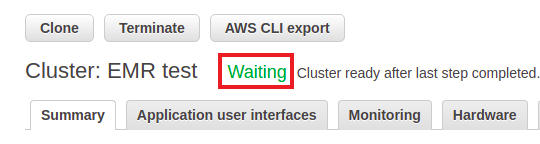
8. Click Create cluster and the cluster will be launched. It might take a few minutes until all the resources are available. You know the cluster is ready when there is a Waiting sign beside the cluster name (see Figure 6).
- Now that we have a running EMR cluster, and an S3 bucket, we can go to KNIME Analytics Platform and start connecting!
Connect to S3
The Amazon S3 Connection node configures and creates a connection to Amazon S3. In the node configuration dialog, you need to specify:
- The authentication credentials. We strongly recommended using the access key ID and secret key. Follow the instructions in the documentation to get your credentials.
- The IAM role name and account - if you want to switch to an IAM Role as well. For more information on switching to a role, please see the documentation.
- The S3 region to store the buckets.
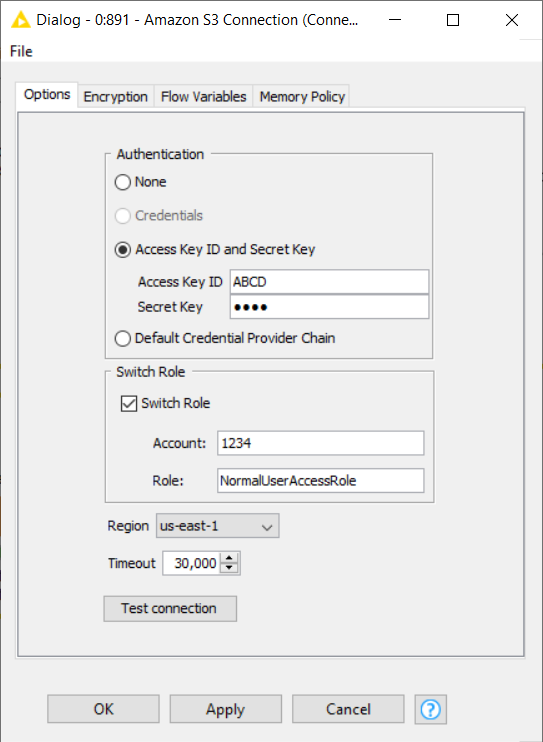
After filling in all the information, test the connection by clicking the Test connection button in the configuration dialog. A new pop-up window will appear showing the connection information in the format of s3://accessKeyId@region and whether a connection was successfully established.
Executing this node will establish a connection to Amazon S3. You can then use a variety of KNIME remote file handling nodes to manage files on Amazon S3.
The KNIME remote file handling nodes are available under IO > File Handling > Remote in the node repository.
Run a Spark job on the EMR cluster
Before we are able to run a Spark job on our new EMR cluster, we first need to create the Spark context. To create a Spark context via Livy in KNIME Analytics Platform, we can use the Create Spark Context (Livy) node.
Create Spark Context (Livy) node
This node creates a Spark context via Apache Livy. The node has a remote connection port (blue) as input. The idea is that this node needs to have access to a remote file system to store temporary files between KNIME and the Spark context.
A wide array of file systems are supported:
- HDFS, webHDFS, httpFS, Amazon S3, Azure Blob Store, and Google Cloud Storage
However, please note that using, e.g HDFS is complicated on a remote cluster because the storage is located on the cluster, hence any data that is stored there will be lost as soon as the cluster is terminated.
- The recommended and easy way is to use Amazon S3.
In this guide we will use Amazon S3. For that, simply use the Amazon S3 Connection node as explained in the previous section and connect the output port of the Amazon S3 Connection node to the input port of the Create Spark Context node.
- Further remote connection nodes are available under IO > File Handling > Remote > Connections in the node repository.
Moving on to the node configuration dialog. In this window you have to provide some information, the most important are:
- The Spark version. The version has to be the same as the one used by Livy. Otherwise the node will fail. You can find the Spark version in the cluster summary page, or in the Software configuration step during cluster creation (see Figure 3) on the Amazon EMR web console.
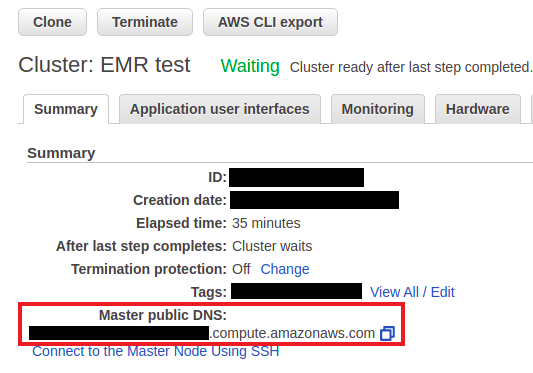
- The Livy URL including protocol and port e.g. http://localhost:8998. You can find the URL in the cluster summary page on the Amazon EMR web console (see Figure 8). Then simply attach the default port 8998 to the end of the URL.
- Usually no authentication is required, so you can skip this part.
- Under Advanced tab, there is an option to set the staging area for Spark jobs. For Amazon S3, it is mandatory to provide a staging directory.
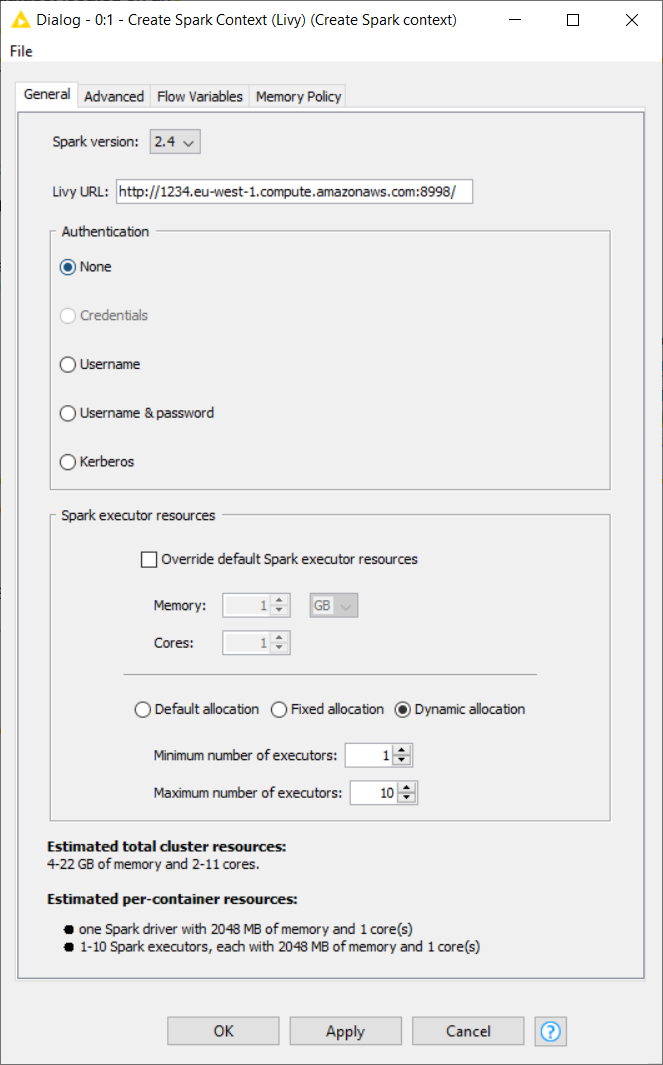
After the Create Spark Context node is executed, the output Spark node (gray) will contain the newly created Spark context. It allows you to execute Spark jobs via the KNIME Spark nodes.
Example workflow: Connecting to Amazon EMR
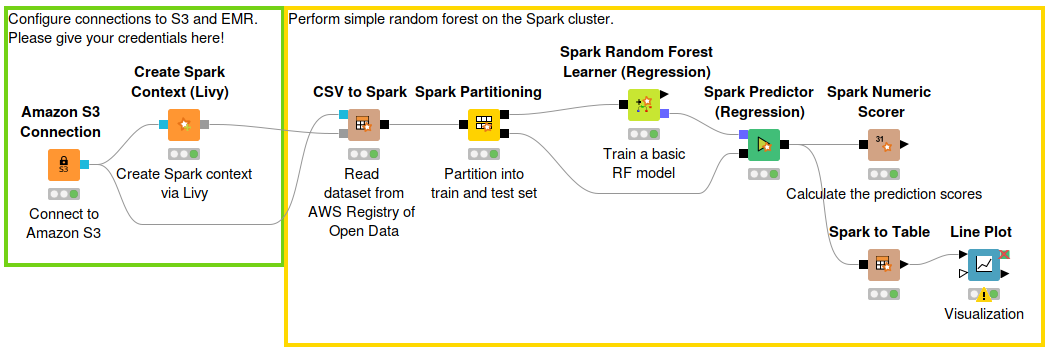
As an example, we can directly import the Taxi dataset located in a public S3 bucket from the Registry of Open Data on AWS into a Spark DataFrame, and perform some simple machine learning model training and prediction.
In the previous post of one of our cloud articles, KNIME on Databricks, we explained in more detail how to read and write data between a remote file system and Spark DataFrame via KNIME Analytics Platform.
Now that we have learned how to create an EMR cluster and execute a Spark job on it, let’s check out another Amazon service that utilizes Amazon S3 and can be used as a powerful data analytics tool.
In the next section, we will talk about Amazon Athena, an interactive query service for all your data that resides on S3.
Work with Amazon Athena within KNIME Analytics Platform
Amazon Athena is a query service where users are able to run SQL queries against their data that are located on Amazon S3. It is serverless and extremely fast. Athena runs standard SQL and supports standard data formats such as CSV, JSON, ORC, Avro, and Parquet. It is very important to note that Athena only reads your data, you can’t add or modify it.
The idea of Athena is that basically databases and tables contain not the actual data, but only the metadata for the underlying source data. For each dataset, a corresponding table needs to be created in Athena. The metadata contains information such as the location of the dataset in Amazon S3, and the structure of the data, e.g. column names, data types, and so on.
Connect to Amazon Athena
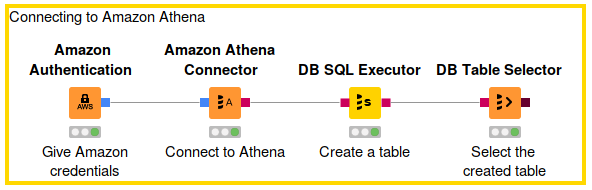
Connecting to Athena via KNIME Analytics Platform is fairly simple:
- Use the Amazon Authentication node to create a connection to AWS services. In this node please provide the AWS access key ID and secret access key. For more information about AWS access keys, see the AWS documentation.
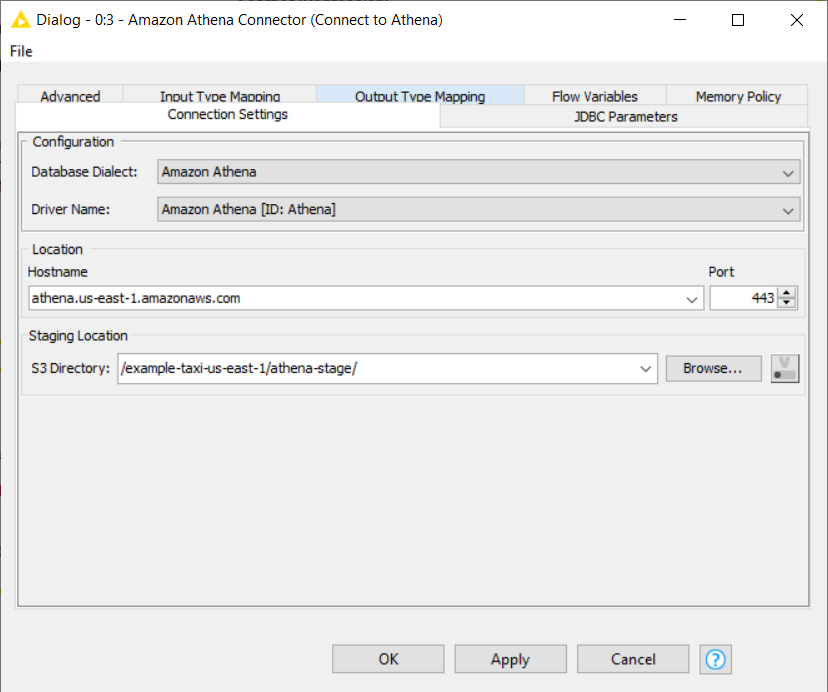
- The Amazon Athena Connector node creates a connection to Athena through the built-in Athena JDBC driver. You just have to provide two information in the node configuration dialog:
- The hostname of the Athena server. It has the format of athena.<REGION_NAME>.amazonaws.com. For example: athena.eu-west-1.amazonaws.com.
- Name of the S3 staging directory where you want to store the query result. For example, s3://aws-athena-query-results-eu-west-1/.
After we execute this node, a connection to Athena will be established. But before we can start querying data located in S3, we have to create a corresponding Athena table.
In this example, we will use the Amazon CloudFront log dataset which is a part of the public example Athena dataset made available at:
s3://athena-examples-<YOUR-REGION>/cloudfront/plaintext/
If your region is, let’s say, us-east-1, then the dataset would be available under:
s3://athena-examples-us-east-1/cloudfront/plaintext/.
Create an Athena table
To create an Athena table in KNIME Analytics Platform, simply enter the following CREATE TABLE statement in the node configuration dialog of DB SQL Executor node.
Once the node is executed, the corresponding Athena table that contains metadata of the log files is created. Now you can query the files using the standard KNIME database nodes.
If you are not familiar with SQL and prefer to do it interactively, you can also create the table using the Athena web console. This way, you can even let AWS Glue Crawlers detect the file schema (column names, column types, etc) automatically instead of entering them manually.
- Follow the tutorial in the Athena documentation for a more in-depth explanation on using AWS Glue Crawlers
Wrapping Up
We have learned how to create an Amazon EMR Spark cluster, connect to it via Apache Livy, and execute a Spark job on top of the cluster from within KNIME Analytics Platform. We also learned about Amazon Athena and showed how to work with Athena via KNIME Analytics Platform.
Hopefully this guide can help you get a quick start into Amazon EMR and Amazon Athena.
Tune in to more articles in this series on KNIME and cloud connectivity. See links to further blog articles on this topic below.