
This blog post is an introduction of how to use KNIME on Databricks. It's written as a guide, showing you how to connect to a Databricks cluster within KNIME Analytics Platform, as well as looking at several ways to access data from Databricks and upload them back to Databricks.
A Guide in 5 Sections
This "how-to" is divided into the following sections:
- How to connect to Databricks from KNIME
- How to connect to a Databricks Cluster from KNIME
- How to connect to a Databricks File System from KNIME
- Reading and Writing Data in Databricks
- Databricks Delta
What is Databricks?
Databricks is a cloud-based data analytics tool for big data management and large-scale data processing. Developed by the same group behind Apache Spark, the cloud platform is built around Spark, allowing a wide variety of tasks from processing massive amounts of data, building data pipelines across storage file systems, to building machine learning models on a distributed system, all under a unified analytics platform. One advantage of Databricks is the ability to automatically split workload across various machines with on-demand autoscaling.
The KNIME Databricks Integration
KNIME Analytics Platform includes a set of nodes to support Databricks, which is available from version 4.1. This set of nodes is called the KNIME Databricks Integration and enables you to connect to your Databricks cluster running on Microsoft Azure or Amazon AWS cluster. You can access and download the KNIME Databricks Integration from the KNIME Hub.
Note: This guide is explained using the paid version of Databricks. The good news is: Databricks also offers a free community edition of Databricks for testing and education purposes, with access to 6 GB clusters, a cluster manager, a notebook environment, and other limited services. If you are using the community edition, you can still follow this guide without any problem.
Connect to Databricks
Add the Databricks JDBC driver to KNIME
To connect to Databricks in KNIME Analytics Platform, first you have to add the Databricks JDBC driver to KNIME with the following steps.
1. Download the latest version of the Databricks Simba JDBC driver at the official website. You have to register to be able to download any Databricks drivers. After registering, you will be redirected to the download page with several download links, mostly for ODBC drivers. Download the JDBC Drivers link located at the bottom of the page.
Note: If you’re using a Chrome-based web browser and the registration somehow doesn’t work, try to use another web browser, such as Firefox.
2. Unzip the compressed file and save it to a folder on your hard disk. Inside the folder, there is another compressed file, unzip this one as well. Inside, you will find a .jar file which is your JDBC driver file.
Note: Sometimes you will find several zip files inside the first folder, each file refers to the version of JDBC that is supported by the JDBC driver. KNIME currently supports JDBC drivers that are JDBC 4.1 or JDBC 4.2 compliant.
3. Add the new driver to the list of database drivers:
- In KNIME Analytics Platform, go to File > Preferences > KNIME > Databases and click Add
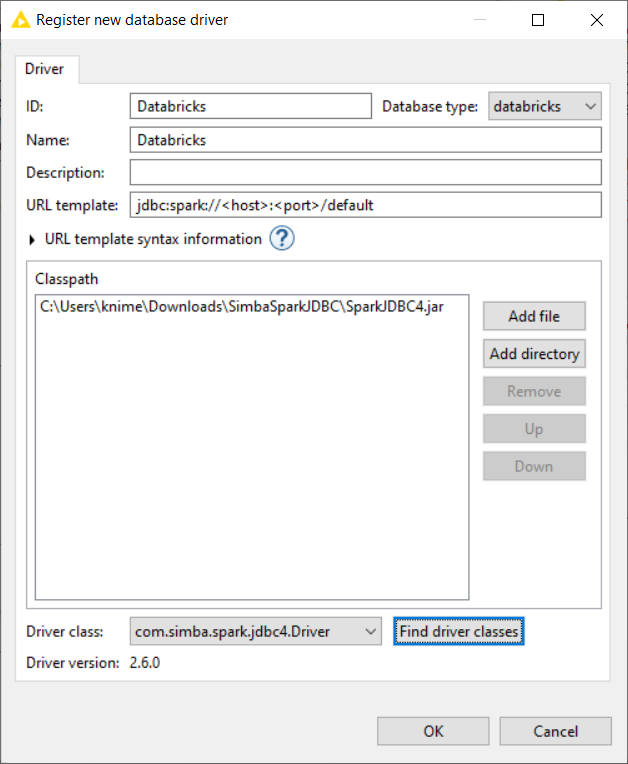
- The “Register new database driver” window opens.
- Enter a name and an ID for the JDBC driver. For example, ID=Databricks, and name=Databricks
- In the Database type menu select databricks.
- The URL template should be automatically detected. If not, enter the following URL template jdbc:spark://<host>:<port>/default. The <host> and <port> placeholder will be automatically replaced with your cluster information. This URL points to the schema default, which will be the standard schema for the database session. If you want to change the sessions standard schema, replace the default part in the URL with your own schema name. You can always access other schemas as well by entering the schema name in the node dialogs when working with database objects.
- Click Add file. In the window that opens, select the JDBC driver file (see item 2 of this step list)
- Click Find driver classes, and the field with the driver class is populated automatically
- Click OK to close the window
- Now click Apply and close.
If you are somehow not able to download and add the official JDBC driver, don’t despair! KNIME Analytics Platform provides an open source Apache Hive driver that you can directly use to connect to Databricks. However, it is strongly recommended to use the official JDBC driver provided by Databricks. If you do want to use the open source Apache Hive driver, you can skip this section and go directly to the next section.
If you are somehow not able to download and add the official JDBC driver, don’t despair! KNIME Analytics Platform provides an open source Apache Hive driver that you can directly use to connect to Databricks. However, it is strongly recommended to use the official JDBC driver provided by Databricks. If you do want to use the open source Apache Hive driver, you can skip this section and go directly to the next section.
Connect to a Databricks cluster
In this section we will configure the Create Databricks Environment node to connect to a Databricks cluster from within KNIME Analytics Platform.
Note: The Create Databricks Environment node is part of the KNIME Databricks Integration, available on the KNIME Hub.
Before connecting to a cluster, please make sure that the cluster is already created in Databricks. For a detailed instruction on how to create a cluster, follow the tutorial provided by Databricks. During cluster creation, the following features might be important:
Autoscaling: Enabling this feature allows Databricks to dynamically reallocate workers for the cluster depending on the current load demand.
Auto termination: You can specify an inactivity period, after which the cluster will terminate automatically.
The autoscaling and auto termination features, along with other features during cluster creation might not be available in the free Databricks community edition.
The autoscaling and auto termination features, along with other features during cluster creation might not be available in the free Databricks community edition.
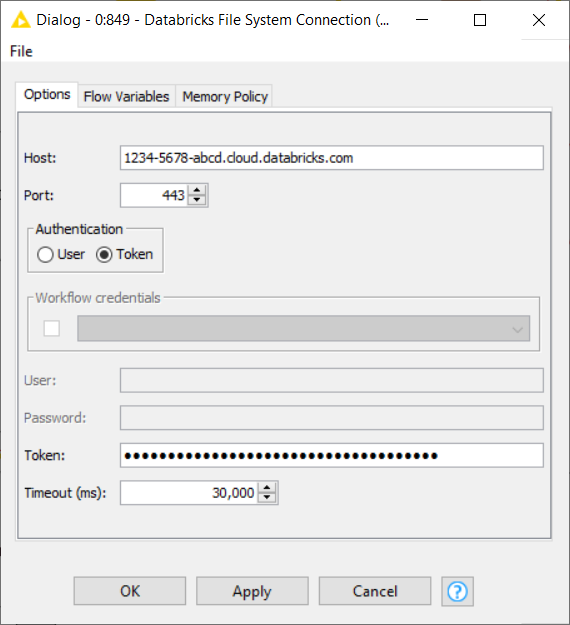
After the cluster is created, open the configuration window of the Create Databricks Environment node. The information we have to provide when configuring this node are:
- The full Databricks deployment URL
- The URL is assigned to each Databricks deployment. For example, if you use Databricks on AWS and log into https://1234-5678-abcd.cloud.databricks.com/, it is your Databricks URL
- Warning: The URL looks different depending on whether it is deployed on AWS or Azure.


In the free Databricks community edition, the deployment URL is https://community.cloud.databricks.com/.
The Cluster ID
Cluster ID is the unique ID for a cluster in Databricks. To get the cluster ID, click the Clusters tab in the left pane and then select a cluster name. You can find the cluster ID in the URL of this page
The examples below show how to find the cluster ID on both AWS and Azure Databricks.
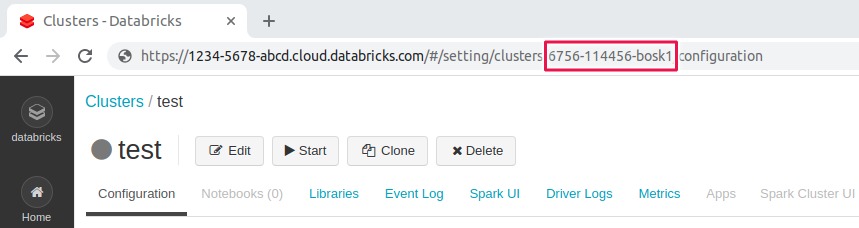
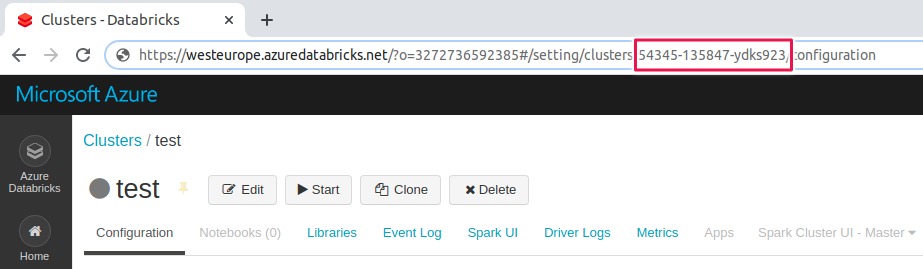
- The URL in the free Databricks community edition is similar to the one on Azure Databricks (see Figure 5).
Workspace ID
Workspace ID is the unique ID for a Databricks workspace where you can create Spark clusters or schedule workloads. It is only available for Databricks on Azure, or if using the free Databricks community edition. If you’re using Databricks on AWS, just leave it blank.
You can find the workspace ID also in the deployment URL. The random number after o= is the workspace ID, for example, https://<databricks-instance>/?o=3272736592385
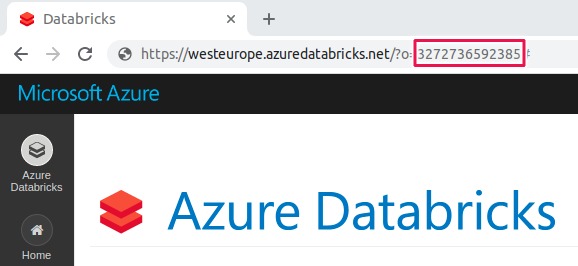
Figure 6. Workspace ID on Azure Databricks
Note: For more information on URLs and IDs please check the Databricks documentation.
Authentication
Token is strongly recommended as the authentication method in Databricks. To generate an access token:
1. In your Databricks workspace, click on the user profile icon on the upper right corner and select User Settings.
2. Navigate to the Access Tokens tab.
3. Click Generate New Token as shown in Figure 7, and optionally enter the description and the token lifetime.
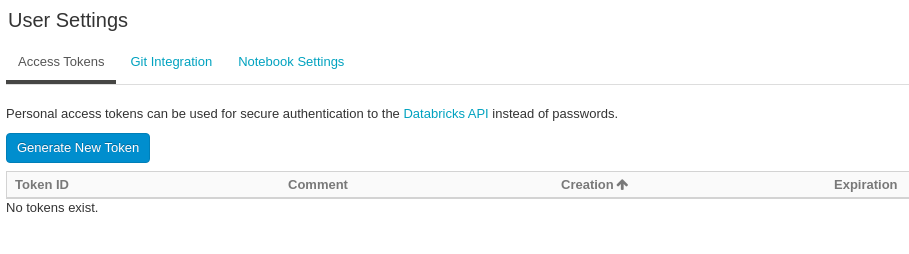
4. Finally, click the Generate button, as shown in Figure 8.

5. Store the generated token in a safe location.
Note: For more information on Databricks access token, please check the Databricks documentation.
Access token is unfortunately not available in the free Databricks community edition. Use the username and password option as an alternative.
To configure more advanced options, you can check the Advanced tab in the Create Databricks Environment node. For example, the following settings might be useful:
- Create Spark context checkbox is enabled by default to run KNIME Spark jobs on Databricks. However, if your cluster runs with Table Access Control, you have to disable this option because TAC doesn’t support a Spark execution context.
- Enabling the Terminate cluster on context destroy checkbox will terminate the cluster when the node is reset, when the Destroy Spark Context node is executed, or when the workflow or KNIME is closed. This might be important if you need to release resources immediately after being used. However, use this feature with caution! Another option is to enable the auto termination feature during cluster creation, where the cluster will auto terminate after a certain period of inactivity.
Additionally, the DB Port tab contains all database-related configurations, which are explained in more detail in the KNIME database documentation.

That’s it! After filling all the necessary information in the Create Databricks Environment node, you can execute the node and it will automatically start the cluster if required and wait until the cluster becomes ready. This might take some minutes until the required cloud resources are allocated and all services are started.
The node has three output ports:
- Red port: JDBC connection which allows connecting to KNIME database nodes.
- Blue port: DBFS connection which allows connecting to remote file handling nodes as well as Spark nodes.
- Gray port: Spark context which allows connecting to all Spark nodes.
The Remote File Handling nodes are available under IO > File Handling > Remote in the node repository.
These three output ports allow you to perform a variety of tasks on Databrick clusters via KNIME, such as connecting to a Databricks database and performing database manipulation via KNIME database nodes or executing Spark jobs via KNIME Spark nodes, while pushing down all the computation process into the Databricks cluster.
Connect to the Databricks File System
Another node in the KNIME Databricks Integration package is called the Databricks File System Connection node. It allows you to connect directly to Databricks File System (DBFS) without having to start a cluster as is the case with the Create Databricks Environment node, which is useful if you simply want to get data in or out of DBFS.
In the configuration dialog of this node, you have to provide the domain of the Databricks deployment URL, e.g 1234-5678-abcd.cloud.databricks.com, as well as the access token or username/password as the authentication method. Please check the Connect to a Databricks cluster section for information on how to get the Databricks deployment URL and generate an access token.
- Note: The Databricks File System Connection node is a part of the KNIME Databricks Integration, available on the KNIME Hub.
Reading and Writing Data in Databricks
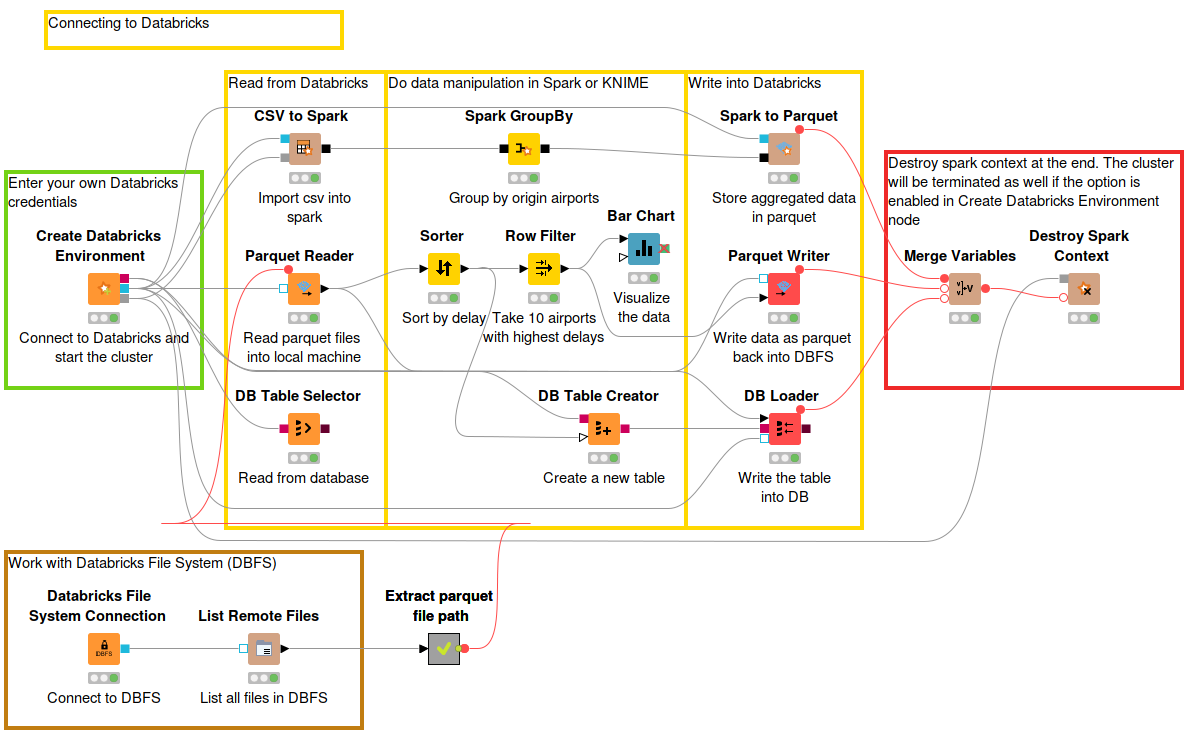
Now that we are connected to our Databricks cluster, let’s look at the following KNIME example workflow to read data from Databricks, do some basic manipulation via KNIME, and write the result back into Databricks. You can access and download the workflow Connecting to Databricks from the KNIME Hub.
We are going to read an example dataset flights provided by Databricks. The dataset contains flight trips in the United States during the first three months in 2014.
Because the dataset is in CSV format, let’s add the CSV to Spark node, just after the Create Databricks Environment node by connecting it to the DBFS (blue) port and Spark (gray) port. In the configuration window, simply enter the path to the dataset folder, for the flights dataset the path is /databricks-datasets/flights/departuredelays.csv, and then execute the node.
The dataset is now available in Spark and you can utilize any number of Spark nodes to perform further data processing visually. In this example, we do a simple grouping by origin airports and calculate the average delay using the Spark GroupBy node.
To write the aggregated data back to Databricks, let’s say in Parquet format, add the Spark to Parquet node. The node has two input ports, connect the DBFS (blue) port to the DBFS port of the Create Databricks Environment node, and the second port to the Spark GroupBy node. To configure the Spark to Parquet node:
1. Under Target folder, provide the path on DBFS to the folder where you want the Parquet file(s) to be created.
2.Target name is the name of the folder that will be created in which then the Parquet file(s) will be stored.
3. If you check the option Overwrite result partition count, you can control the number of the output files. However, this option is strongly not recommended as this might lead to performance issues.
4. Under the Partitions tab you can define whether to partition the data based on specific column(s).
KNIME supports reading various file formats into Spark, such as Parquet or ORC, and vice versa. The nodes are available under Tools & Services > Apache Spark > IO in the node repository.
It is possible to import Parquet files directly into a KNIME table. Since our large dataset has now been reduced a lot by aggregation, we can safely import them into KNIME table without worrying about performance issues. To read our aggregated data from Parquet back into KNIME, let’s use the Parquet Reader node. The configuration window is simple, enter the DBFS path where the parquet file resides. Under the Type Mapping tab, you can control the mapping from Parquet data types to KNIME types.
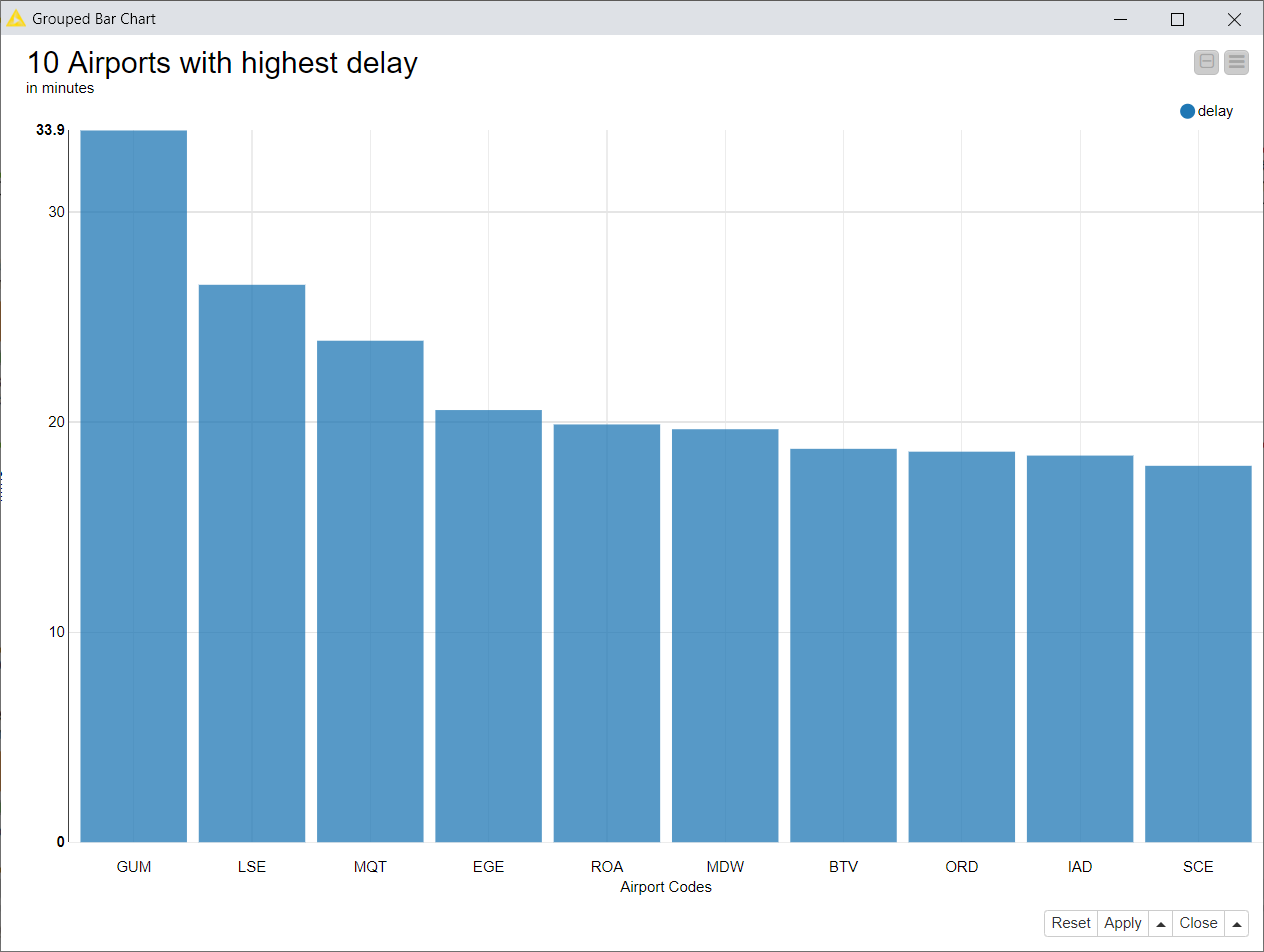
Now that our data is in a KNIME table, we can create some visualization. In this case, we do further simple processing with sorting and filtering to get the 10 airports with the highest delay. The result is visualized in a Bar Chart.
Now we would like to upload the data back to Databricks in Parquet format, as well as write them to a new table in the Databricks database. The Parquet Writer node writes the input KNIME table into a Parquet file. To connect to DBFS, please connect the DBFS (blue) port to the DBFS port of the Create Databricks Environment node. In the configuration window, enter the location on DBFS where the Parquet file will be written to. Under the Type Mapping tab, you can control the mapping from KNIME types to Parquet data types.
To create a new table, add the DB Table Creator node and connect the DB (red) port to the DB port of the Create Databricks Environment node. In the configuration window, enter the schema and the table name. Be careful when using special characters in the table name, e.g underscore (_) is not supported. Append the DB Loader node to the DB Table Creator with the KNIME table you want to load, and connect the DB (red) port and the DBFS (blue) port to the DB port and DBFS port of the Create Databricks Environment node respectively. Executing this node will load the content of the KNIME table to the newly created table in the database.
At the end there is an optional step to execute the Destroy Spark Context node to delete the Spark context, and if the option is enabled in the Create Databricks Environment node, the cluster will also be terminated to save resources. However, use this method with caution especially if you share the cluster with other people!
Note: Parquet Reader and Parquet Writer nodes are part of the KNIME Extension for Big Data File Formats, available on the KNIME Hub.
To summarize, there are several ways to read data from Databricks:
- To read from a data source and convert them to Spark, you can choose any node under Tools & Services > Apache Spark > IO > Read in the node repository, depending on your choice of data source. KNIME supports a variety of data sources, such as Parquet, ORC, CSV, etc.
- To import Parquet or ORC dataset into a KNIME table, use the Parquet Reader or ORC Reader node, respectively.
- To read from Databricks database, you can use the DB Table Selector node, where you can select a table and perform some processing with the KNIME database nodes. Additionally, the node Hive to Spark, and Spark to Hive support reading database data from/to Spark.
Note: Always connect the input DBFS (blue) port to the DBFS port of the Create Databricks Environment node.
As with reading, there are also several ways to write data back into Databricks:
- To convert Spark DataFrame back into a certain data source format, you can select any node under Tools & Services > Apache Spark > IO > Write in the node repository.
- The Parquet Writer node allows you to convert a KNIME table into Parquet files and write them locally or on a remote file system.
- To write into a Databricks database, one way to do it is with a DB Loader node to bulk load the data if you have a large amount of data.
Databricks Delta
Databricks Delta Lake is a storage layer between the Databricks File System (DBFS) and Apache Spark API. It provides additional features, such as ACID transactions on Spark, schema enforcement, time travel, and many others.
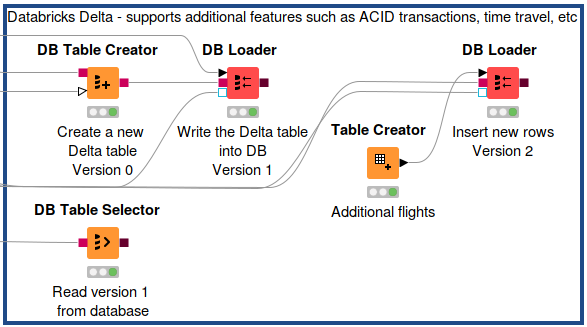
To create a Delta table in KNIME using DB Table Creator node:
1. Connect the first port to the DB port (red) of the Create Databricks Environment node, and the second port to the KNIME table you want to write into the Databricks database.
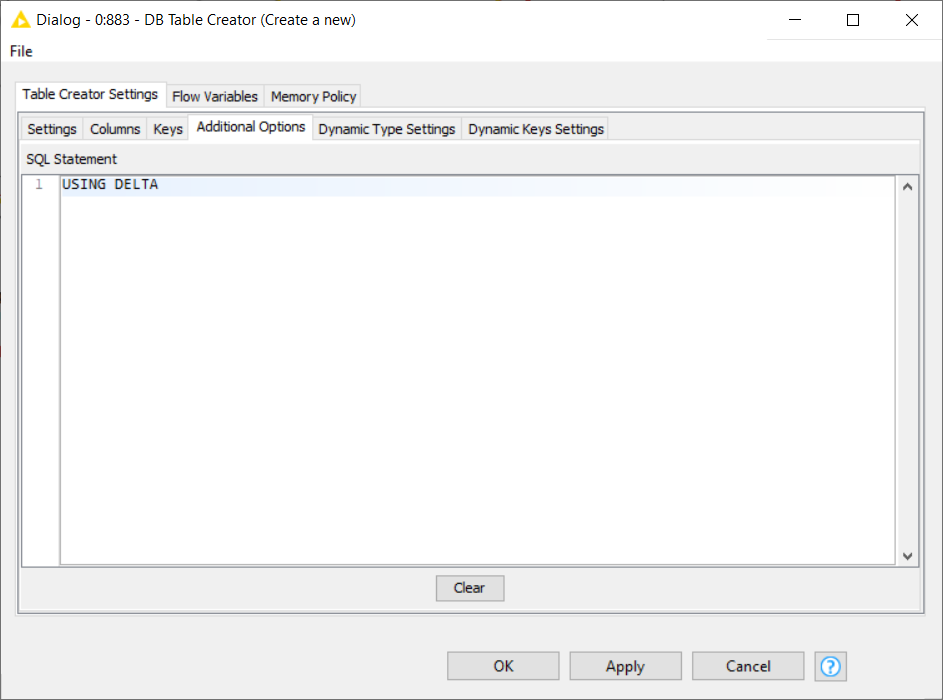
2. In the configuration window, enter the table name and schema as usual, and configure the other settings as according to your need. The important addition to make this table become a Delta table, is to insert a USING DELTA statement under the Additional Options tab (see Figure below).
3. Execute the node and you will have a newly created empty Delta table. Fill the table with data using e.g the DB Loader node.
Time Travel on Databricks Delta
Databricks Delta offers a lot of additional features to improve data reliability, such as time travel. Time travel is a data versioning capability allowing you to query an older snapshot of a Delta table (rollback).
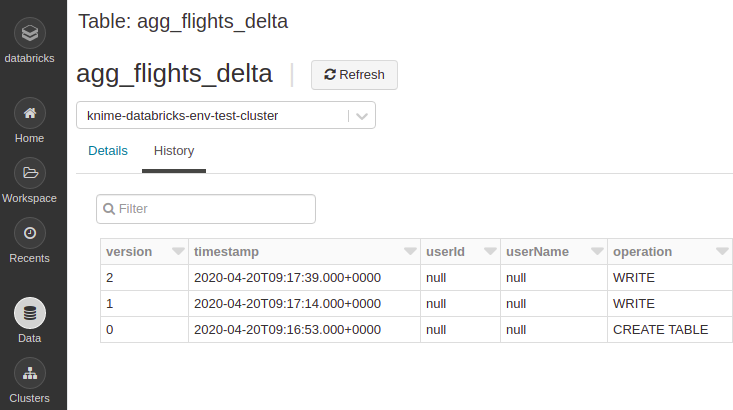
To access the version history in a Delta table on the Databricks web UI:
1. Navigate to the Data tab in the left pane.
2. Select the database and the Delta table name.
3. The metadata and a preview of the table will be displayed. If the table is indeed a Delta table, it will have an additional History tab beside the Details tab (see Figure below).
4. Under the History tab, you can see the versioning list of the table, along with the timestamps, operation types, and other information.
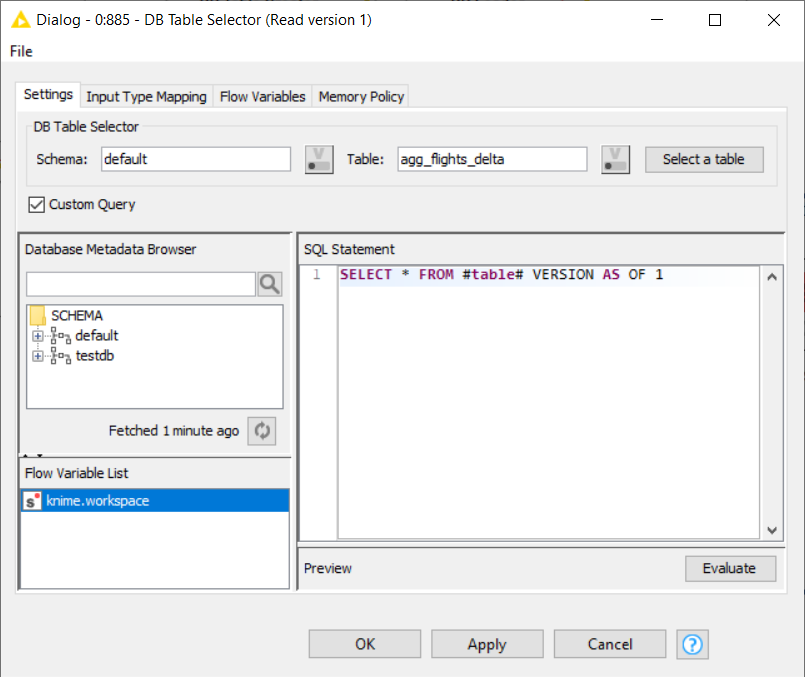
In KNIME, accessing older versions of a Delta table is very simple:
1. Use a DB Table Selector node. Connect the input port with the DB port (red) of the Create Databricks Environment node.
2. In the configuration window, enter the schema and the Delta table name. Then enable the Custom query checkbox. A text area will appear where you can write your own SQL statement.
a) To access older versions using version number, enter the following SQL statement:
Where
b) To access older versions using timestamps, enter the following SQL statement where
3. Execute the node. Then right click on the node, select DB Data, and Cache no. of rows to view the table.
Wrapping up
We hope you found this guide on how to connect and interact with Databricks from within KNIME Analytics platform useful.
by Andisa Dewi (KNIME)
Summary of the resources mentioned in the article
- Example workflow on KNIME Hub: Connecting to Databricks
- KNIME Databricks Integration
- KNIME Extension for Apache Spark
- Databricks Documentation