You have just downloaded KNIME Analytics Platform, what next?
Here are seven steps for a fast and practical, learning-by-doing start to using it. After you’ve got started, take a look at more educational material, like for example one of our e-learning courses, onsite courses, cheat sheets, e-books, videos, local meetup events, and more. Our “sat nav” for finding the educational resources that most suit your skills and time constraints is here in the blog article Get on Board and Navigate the Learning Options at KNIME!
The 7 Things to Do After Installation
- Explore the welcome page
- Learn from a pre-built workflow
- Get familiar with the workbench of KNIME Analytics Platform
- Find more resources on the KNIME Hub or EXAMPLES server
- Install extensions
- Customize a workflow in the LOCAL workspace
- Become part of the KNIME community!
1. Explore the welcome page
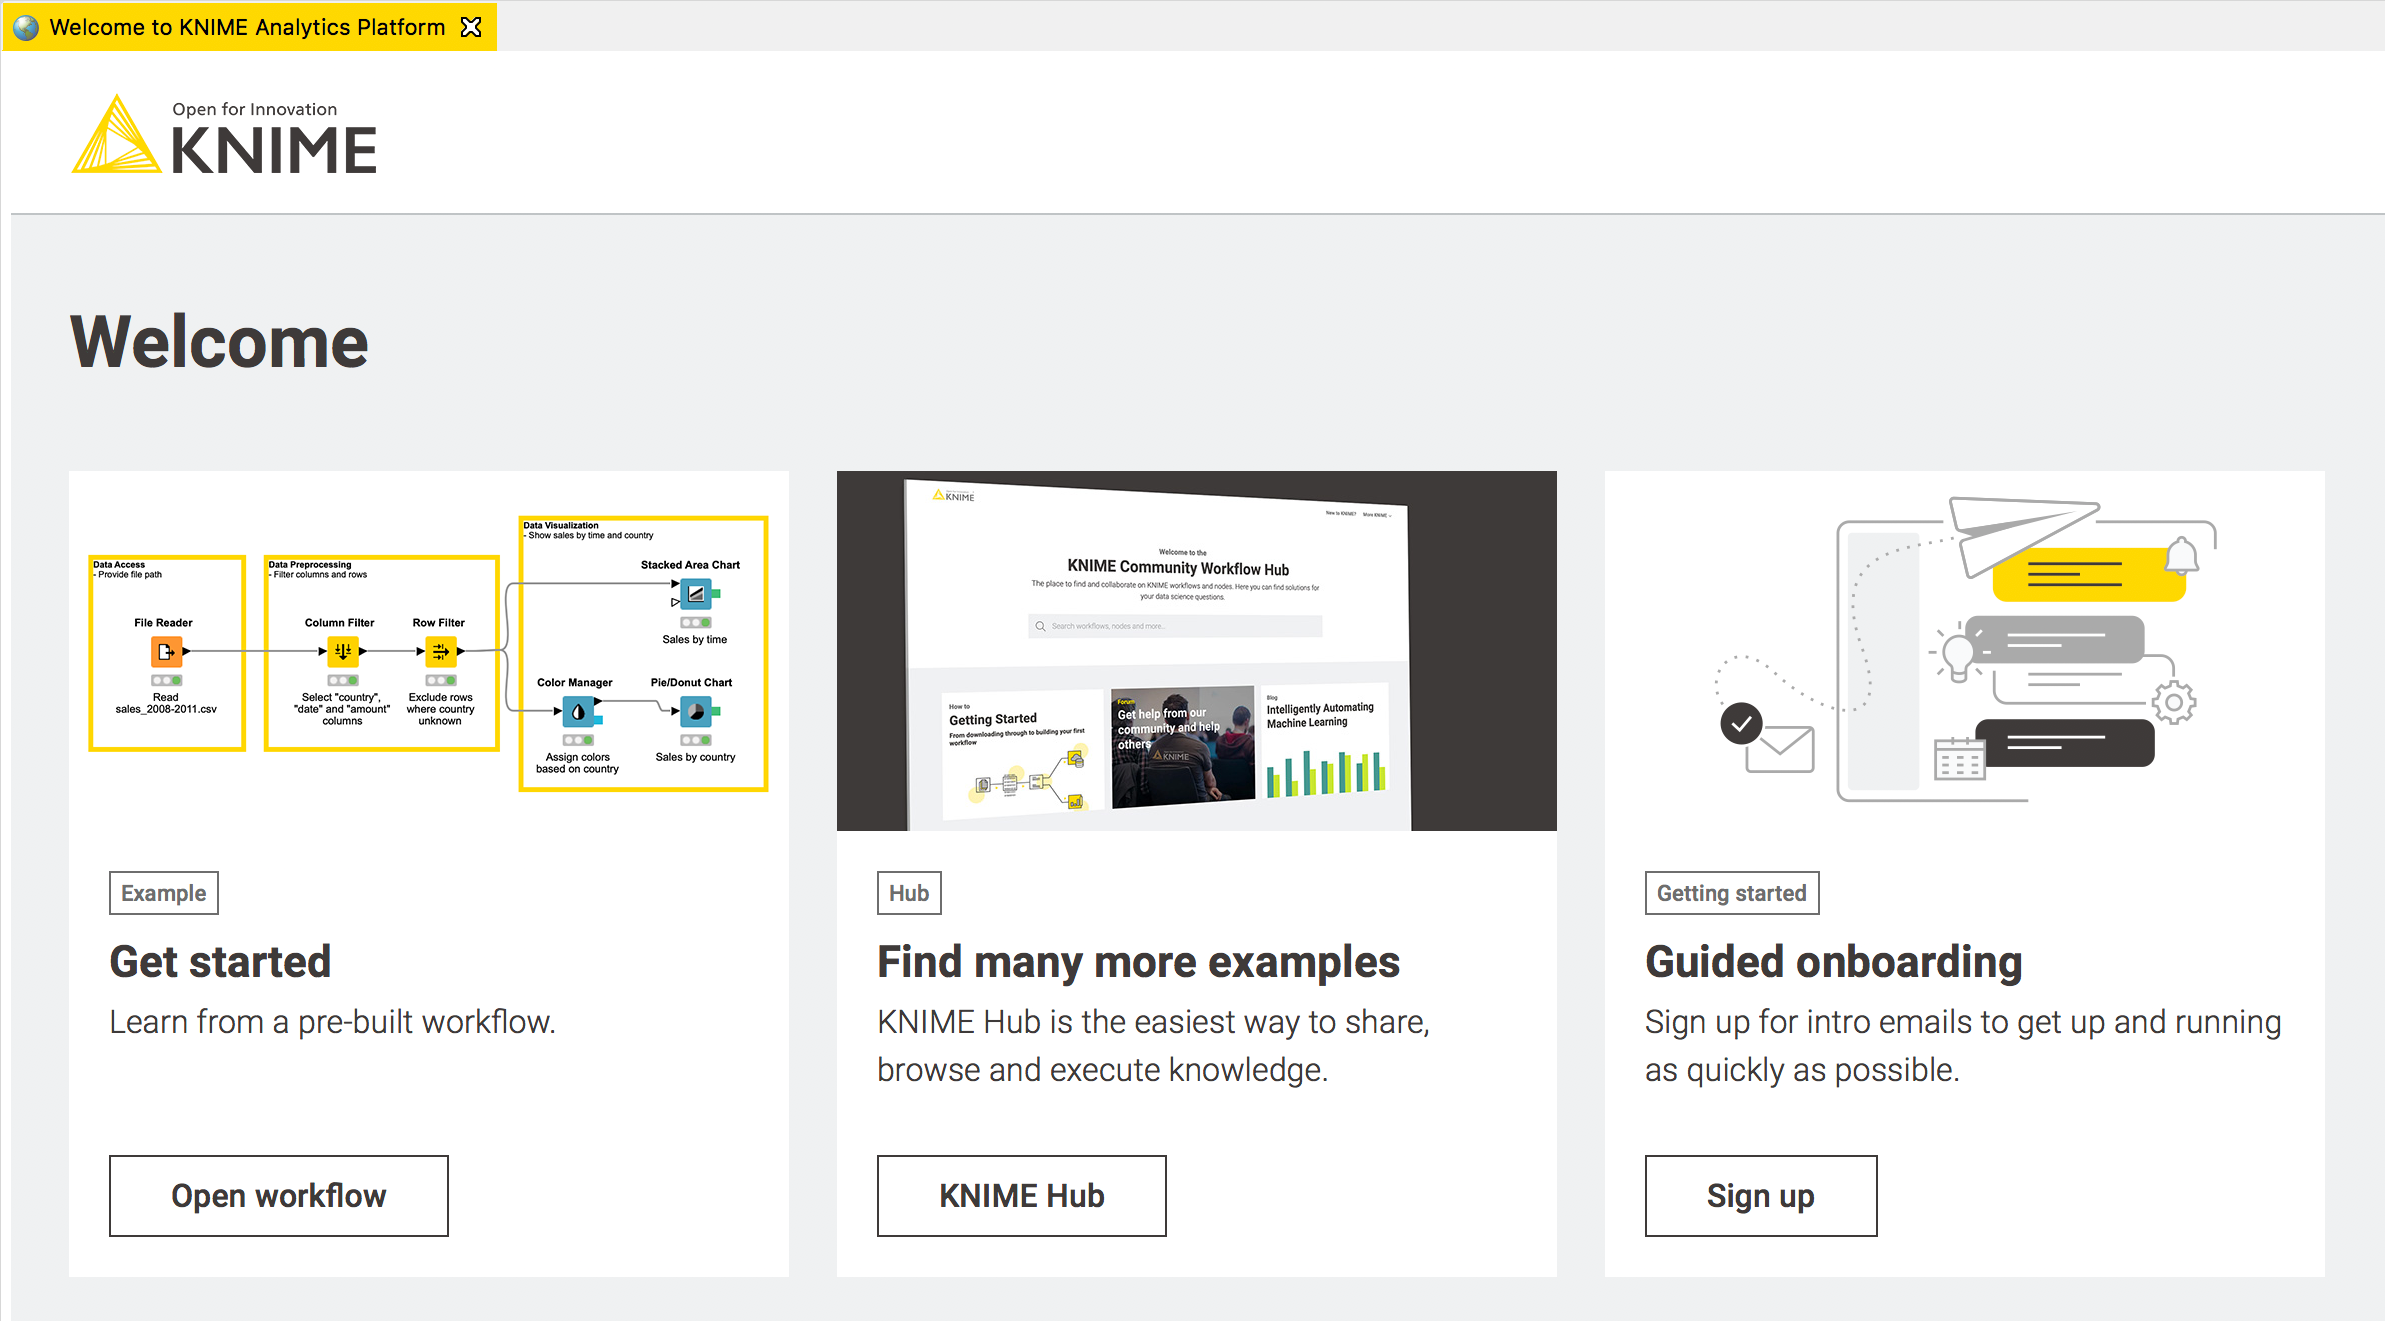
Fig. 1. First-time KNIMEr welcome page. This special welcome page opens when you start KNIME Analytics Platform.
Start the KNIME application from the folder where KNIME Analytics Platform was installed or from the shortcut on the desktop or in the start menu. Select the workspace folder (the default folder “knime-workspace” is automatically created in the installation folder) that stores all your work in KNIME Analytics Platform and click Launch!
When you start the software for the first time, you are asked whether or not to allow KNIME to collect anonymous usage data. These data are used exclusively to improve the usability of the platform (particularly the Workflow Coach - see step 3 for more information).
After that, the KNIME workbench opens to show the Welcome to KNIME page (in the middle). The very first time you open KNIME this welcome page shows tiles that lead you to resources specifically designed to help someone who is using KNIME for the first time. Via this page you can:
- Get started: explore a pre-built demonstrative workflow, to familiarize with the concept of workflows and nodes for a practical start
- Find many more examples: investigate the KNIME Hub to find the example workflow that best fits your needs. The KNIME Hub is an external space provided to the KNIME community to host and share workflows and other resources. It is a great place to search for starting examples.
- Try some Guided Onboarding: sign up for some basic tutoring from Emil, our teacher bot.
The next time you open KNIME Analytics Platform, we assume you have already explored the basics, and the welcome page now points you to interesting blog articles, news, new updates to extensions, and useful tips & tricks instead!
If you are reading this post, you are probably a first-time KNIMEr. So, we will ignore the welcome page for repeat KNIMErs and follow the steps proposed in the welcome page, as you can see above in Fig. 1.
2. Learn from a pre-built workflow
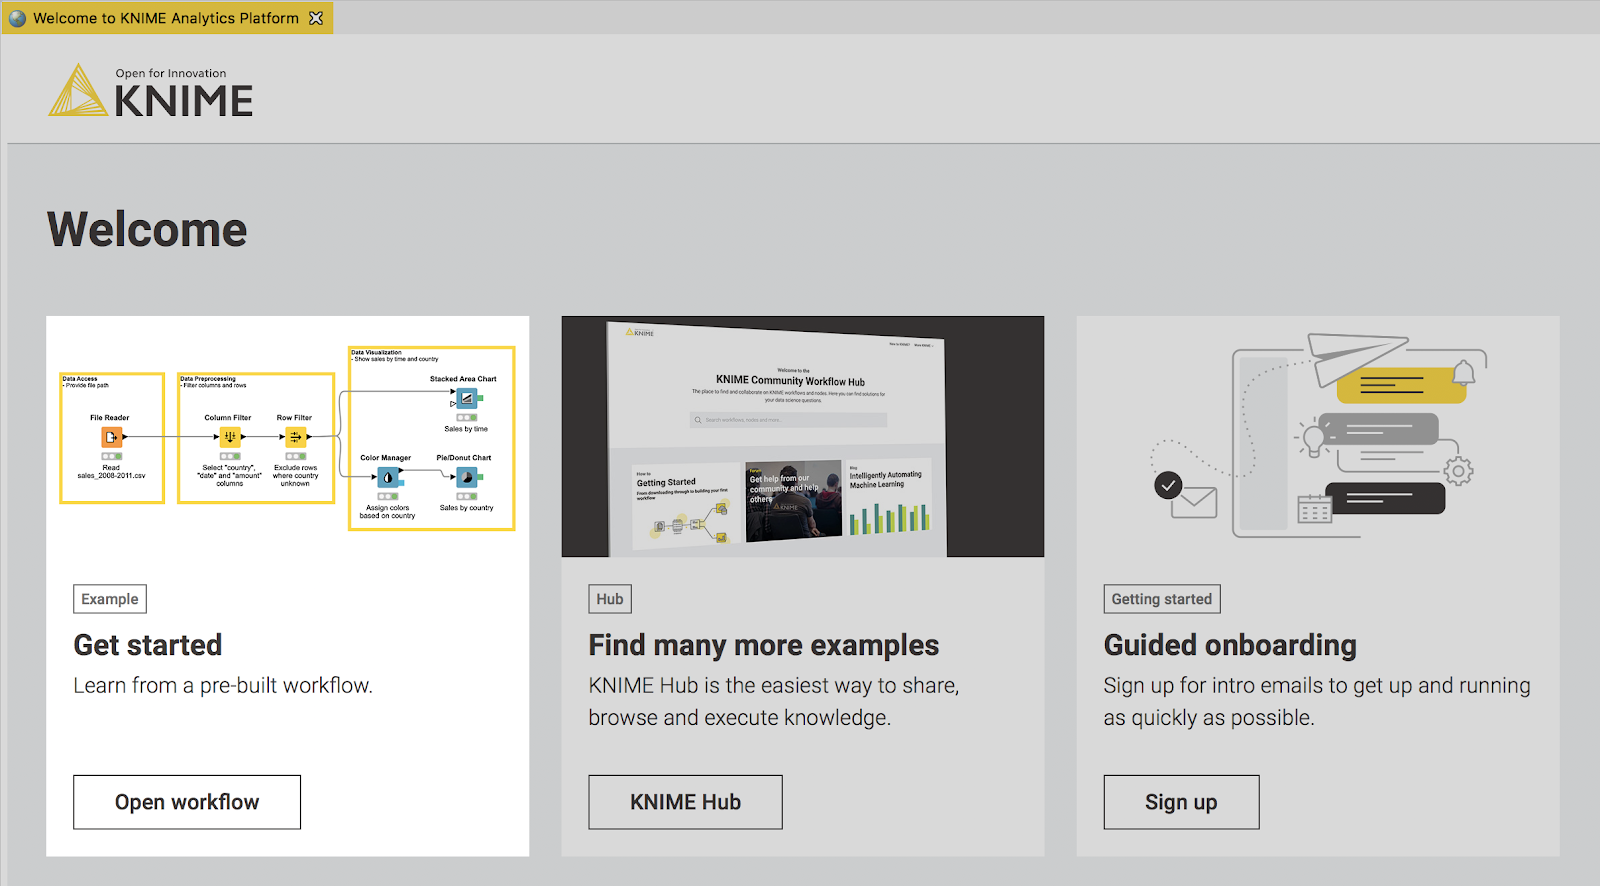
Fig. 2. First-time KNIMEr welcome page: Get started.
Get started. Let’s start from the first advised step: let’s click the Open workflow button in the Get started tile and learn from a pre-built workflow.
After clicking Open workflow, the welcome page closes and an example workflow opens in the centre of the workbench in your so-called Workflow Editor. As you see, KNIME Analytics Platform is not script based, but GUI-based; that is a graphical user interface helps you to build your application (a workflow), i.e. a pipeline or sequence of operations, which we call nodes.
Each node carries out a task to implement a particular operation: read data, visualize data, train a machine learning algorithm, change the data structure, normalize the data, and so on. Nodes are those colorful blocks you see in the workflow editor panel.
Can you see the traffic lights below each node? Each light represents the status of the node, starting with red on the left, through to yellow in the centre, and green on the right.


In the example workflow we have prepared for you, all the nodes you can see are already successfully executed, and therefore show the green status. If you were building the workflow from scratch, the status of each new node would be red, since it is neither configured to run a task nor successfully or unsuccessfully executed. Let’s see now how to change a node status.
Right-click a node in the workflow, to open its context menu with a number of useful commands (Fig. 3).
Let’s right-click the first node in the pipeline: the File Reader node. In the context menu you can see the Reset option. This returns the node to its state before it had been executed. Select Reset. The node status should return to yellow: configured but not executed. Notice that resetting the first node in the workflow, resets all subsequent nodes as well.
The next command to select in the context menu is Configure. Configure opens the node configuration dialog where you can make the settings required for the node task. For example, open the context menu of the Color Manager node and select “Configure”. The node configuration dialog opens. Try changing some settings, for example the color map.
Selecting Execute runs the node’s task. If it executes successfully, the node status changes from yellow to green. Notice that only configured nodes can be executed.
The last items in the context menu differ depending on the node, but all of them lead to the output data table(s) produced when you execute the node. In the File Reader node, for example, the last menu item is File Table and shows the data table read from the input file. In the Color Manager node the menu item is Table with Colors and shows the input table with the assigned color to each data row. Try to change the color map in the configuration window of the Color Manager node and see how the output data table changes.
Notice that this is a very useful debugging option. You can execute each individual node and check here whether the node has produced the data according to the workflow design.
The menu items Delete, Cut, Copy, and Paste do what their name suggests: delete, cut, copy, and paste the selected node.
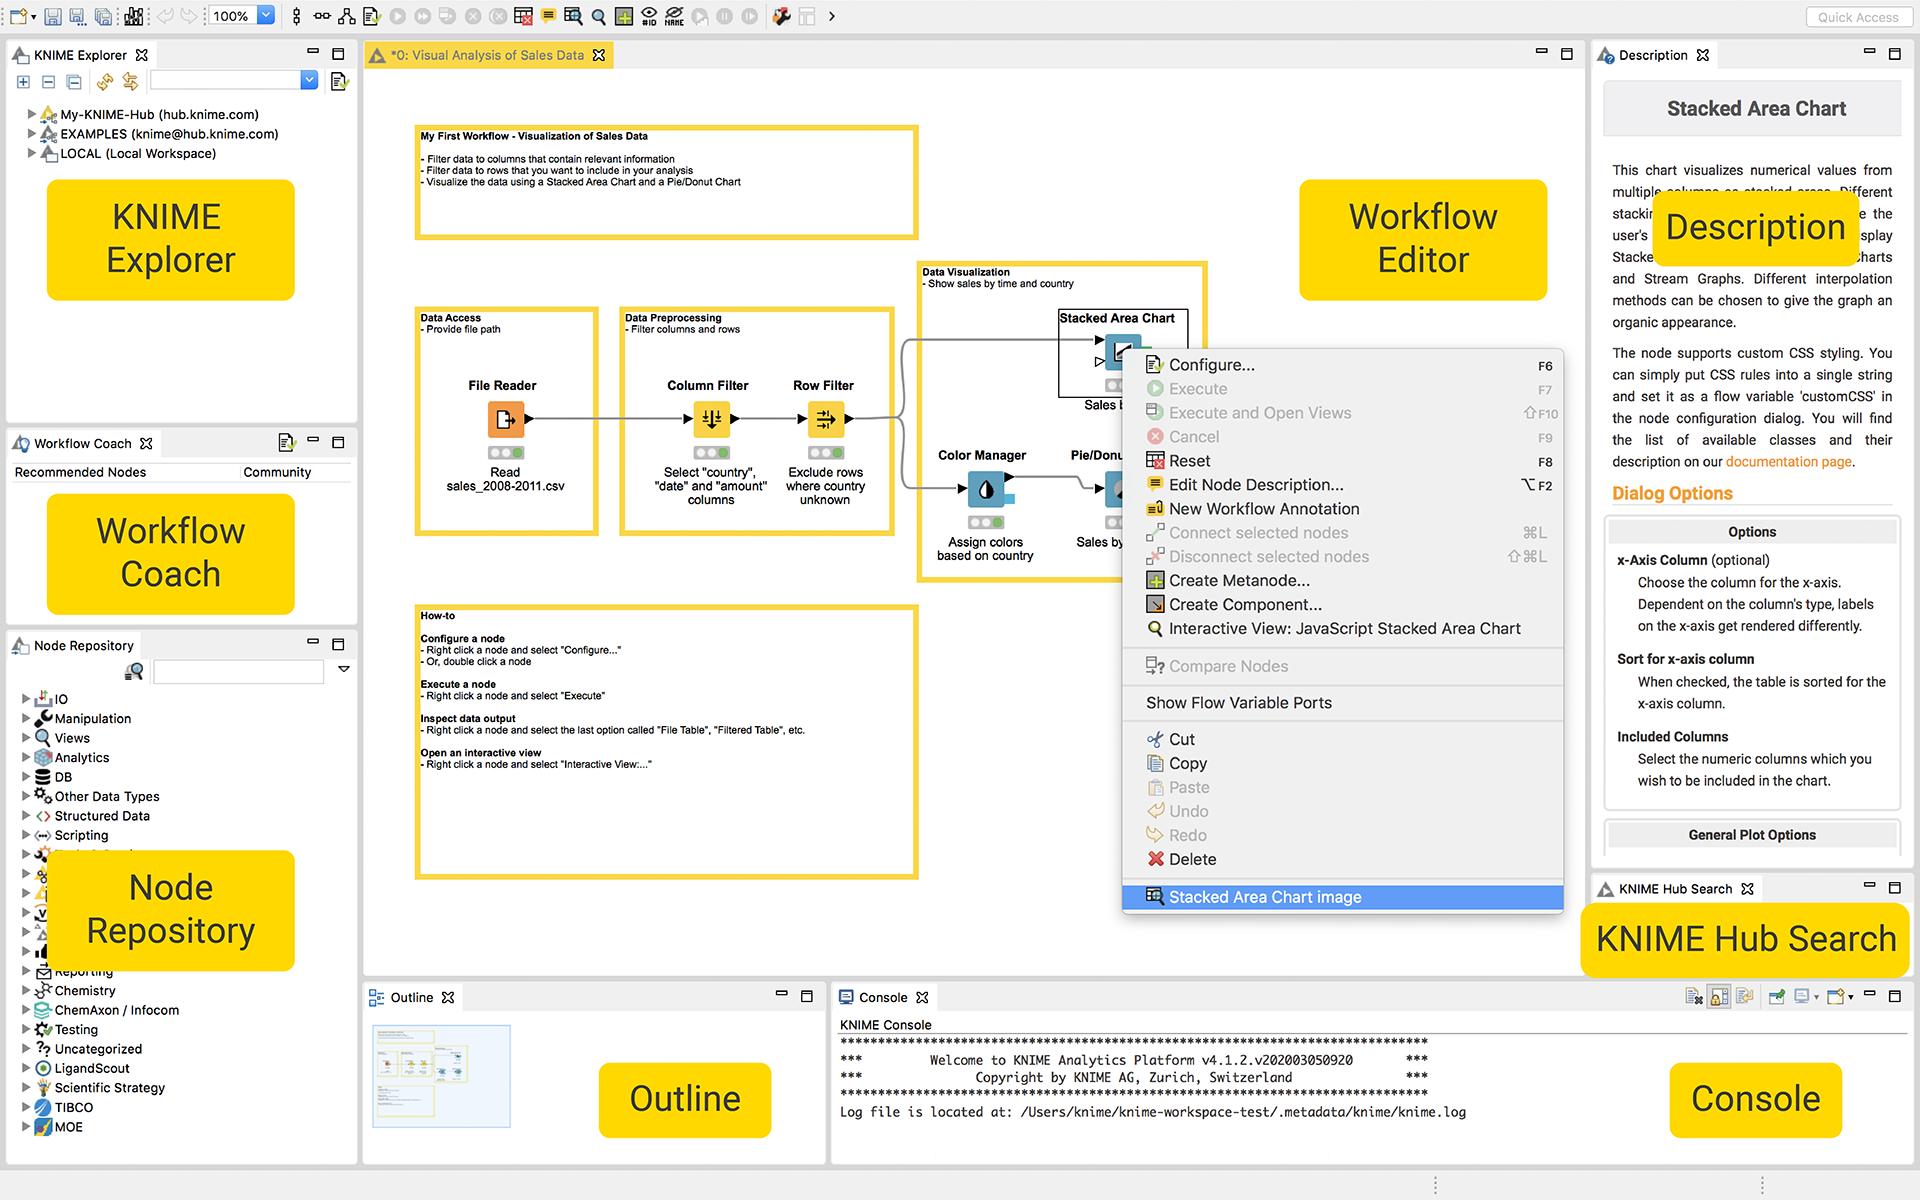
Fig. 3. The workbench of KNIME Analytics Platform. The Getting started workflow is open in the workflow editor. Notice the options in the context menu (right-click) of a node.
3. Get familiar with the KNIME Workbench
As we mentioned in the last step, the Workflow Editor is a part of the KNIME workbench. Let’s explore this some more. All you need to analyze your data is probably here. It is important to discover where everything is.
In the top left corner is the KNIME Explorer. It displays the list of workflows available in the selected local workspace (LOCAL), in the KNIME Hub spaces (private and public), and the list of available KNIME Servers you can connect to.
- LOCAL refers to the content in the selected workspace. If you just started it is probably empty besides the folder Example Workflows. This folder contains a few basic examples for generic data science tasks and common case studies. This is a great resource to learn more about what KNIME Analytics Platform can do.
- My-KNIME-Hub is the space automatically assigned to you when you set up an account at knime.com. After you have logged in to your account, you can upload your workflows to this public space and make them available to the community via the KNIME Hub, or simply store them in your private space for easy remote access.
- The only server available that you will see in the KNIME Explorer view the first time you start KNIME is the EXAMPLES Server, a public server with many example workflows produced at KNIME as examples for specific functionality or customizable solutions to case studies (in 50_Applications). Note that all of the example workflows you see on this server are also available via the KNIME Hub.
Using the KNIME Explorer
Double-click a workflow in the KNIME Explorer view to open it in the workflow editor. If the workflow is hosted on a server, you will need to save it locally (i.e. save it to your local workspace via File -> Save As...) if you want to save any changes you make in it.
Right-click a workflow to open its context menu. Here you have the options to import/export/deploy, and reset/execute your workflow (plus more). This is also where you find the options to create a new workflow and a new workflow group (folder).
The Workflow Coach
Underneath the KNIME Explorer, you will find the Workflow Coach. This is a recommendation engine. When you select a node in your workflow, the Workflow Coach will suggest the next most likely node to add, based on the world-wide statistics of KNIME users. You can add nodes from the workflow coach to the workflow editor in the same way as you would from the node repository - by drag and drop, or by a double-click.
Node Repository
Below the Workflow Coach is the Node Repository view. It contains all the nodes available for this installation of KNIME Analytics Platform. Nodes are organized by categories, from IO to Analytics, from Scripting to Views, and Workflow Control. The category KNIME Labs deserves a few additional words. This category contains all the most recently developed nodes.They are fully functional, but still in their infancy, in their 1.0 version: they might change. This is where you can preview new features and plug-ins before they are added to the full version of KNIME.
The Node Repository contains a very high number of nodes. The search box at the top helps you find them, either via exact match (default) or via fuzzy match (after clicking the lens on its left).
Description
On the right side of the workbench is the Description view. It gives you information about the currently active workflow, or about an individual node selected either in the Node Repository or in the workflow editor. So, if you encounter a mysterious node, do not despair! The Description view explains what the node does, the settings required in the configuration dialog, the data specs for the node’s input and output, and the scientific reference for the algorithm implemented (if any).
KNIME Hub Search
Under the Description, you find one more reference to the KNIME Hub: the KNIME Hub Search box. This allows you to search for workflows on the KNIME Hub from within the workbench.
Console
Finally, the Console view hosts all warnings and errors related to your workflow execution and configuration and the Outline view shows a full picture of your workflow
If you have been following my instructions so far, there is a good chance that you have been clicking around randomly and involuntarily closing a view or two. No worries! Go to the View menu which you’ll find in the horizontal main menu bar at the very top of the workbench.
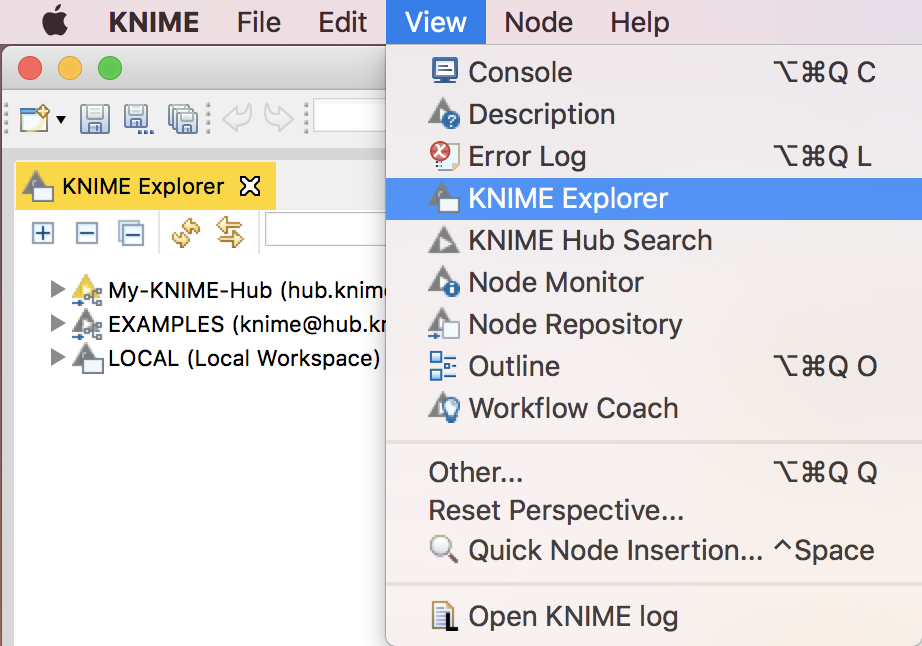
Fig. 4. The View menu selected in the horizontal main menu bar in KNIME Analytics Platform.
Here you can find the missing view and reinstate it into the workbench. The item Reset Perspective… brings the views in the KNIME workbench to their default layout.
Now that you are there, explore all the other commands of the Main menu. In particular, under File, notice Import Workflow and Export Workflow to import workflows created by other users and export your workflows for further usage.
Tool Bar
Right below the Main Menu is the Tool Bar.

Fig. 5. The tool bar at the top of KNIME Analytics Platform.
Here you’ll find the tool buttons for creating a new workflow, saving an existing one, executing selected nodes, executing all nodes, resetting selected nodes, and resetting all nodes. Also worthy of notice is the grid button (penultimate button): it’s responsible for the grid and its properties in the workflow editor.
4. Find more resources on the KNIME Hub or EXAMPLES server
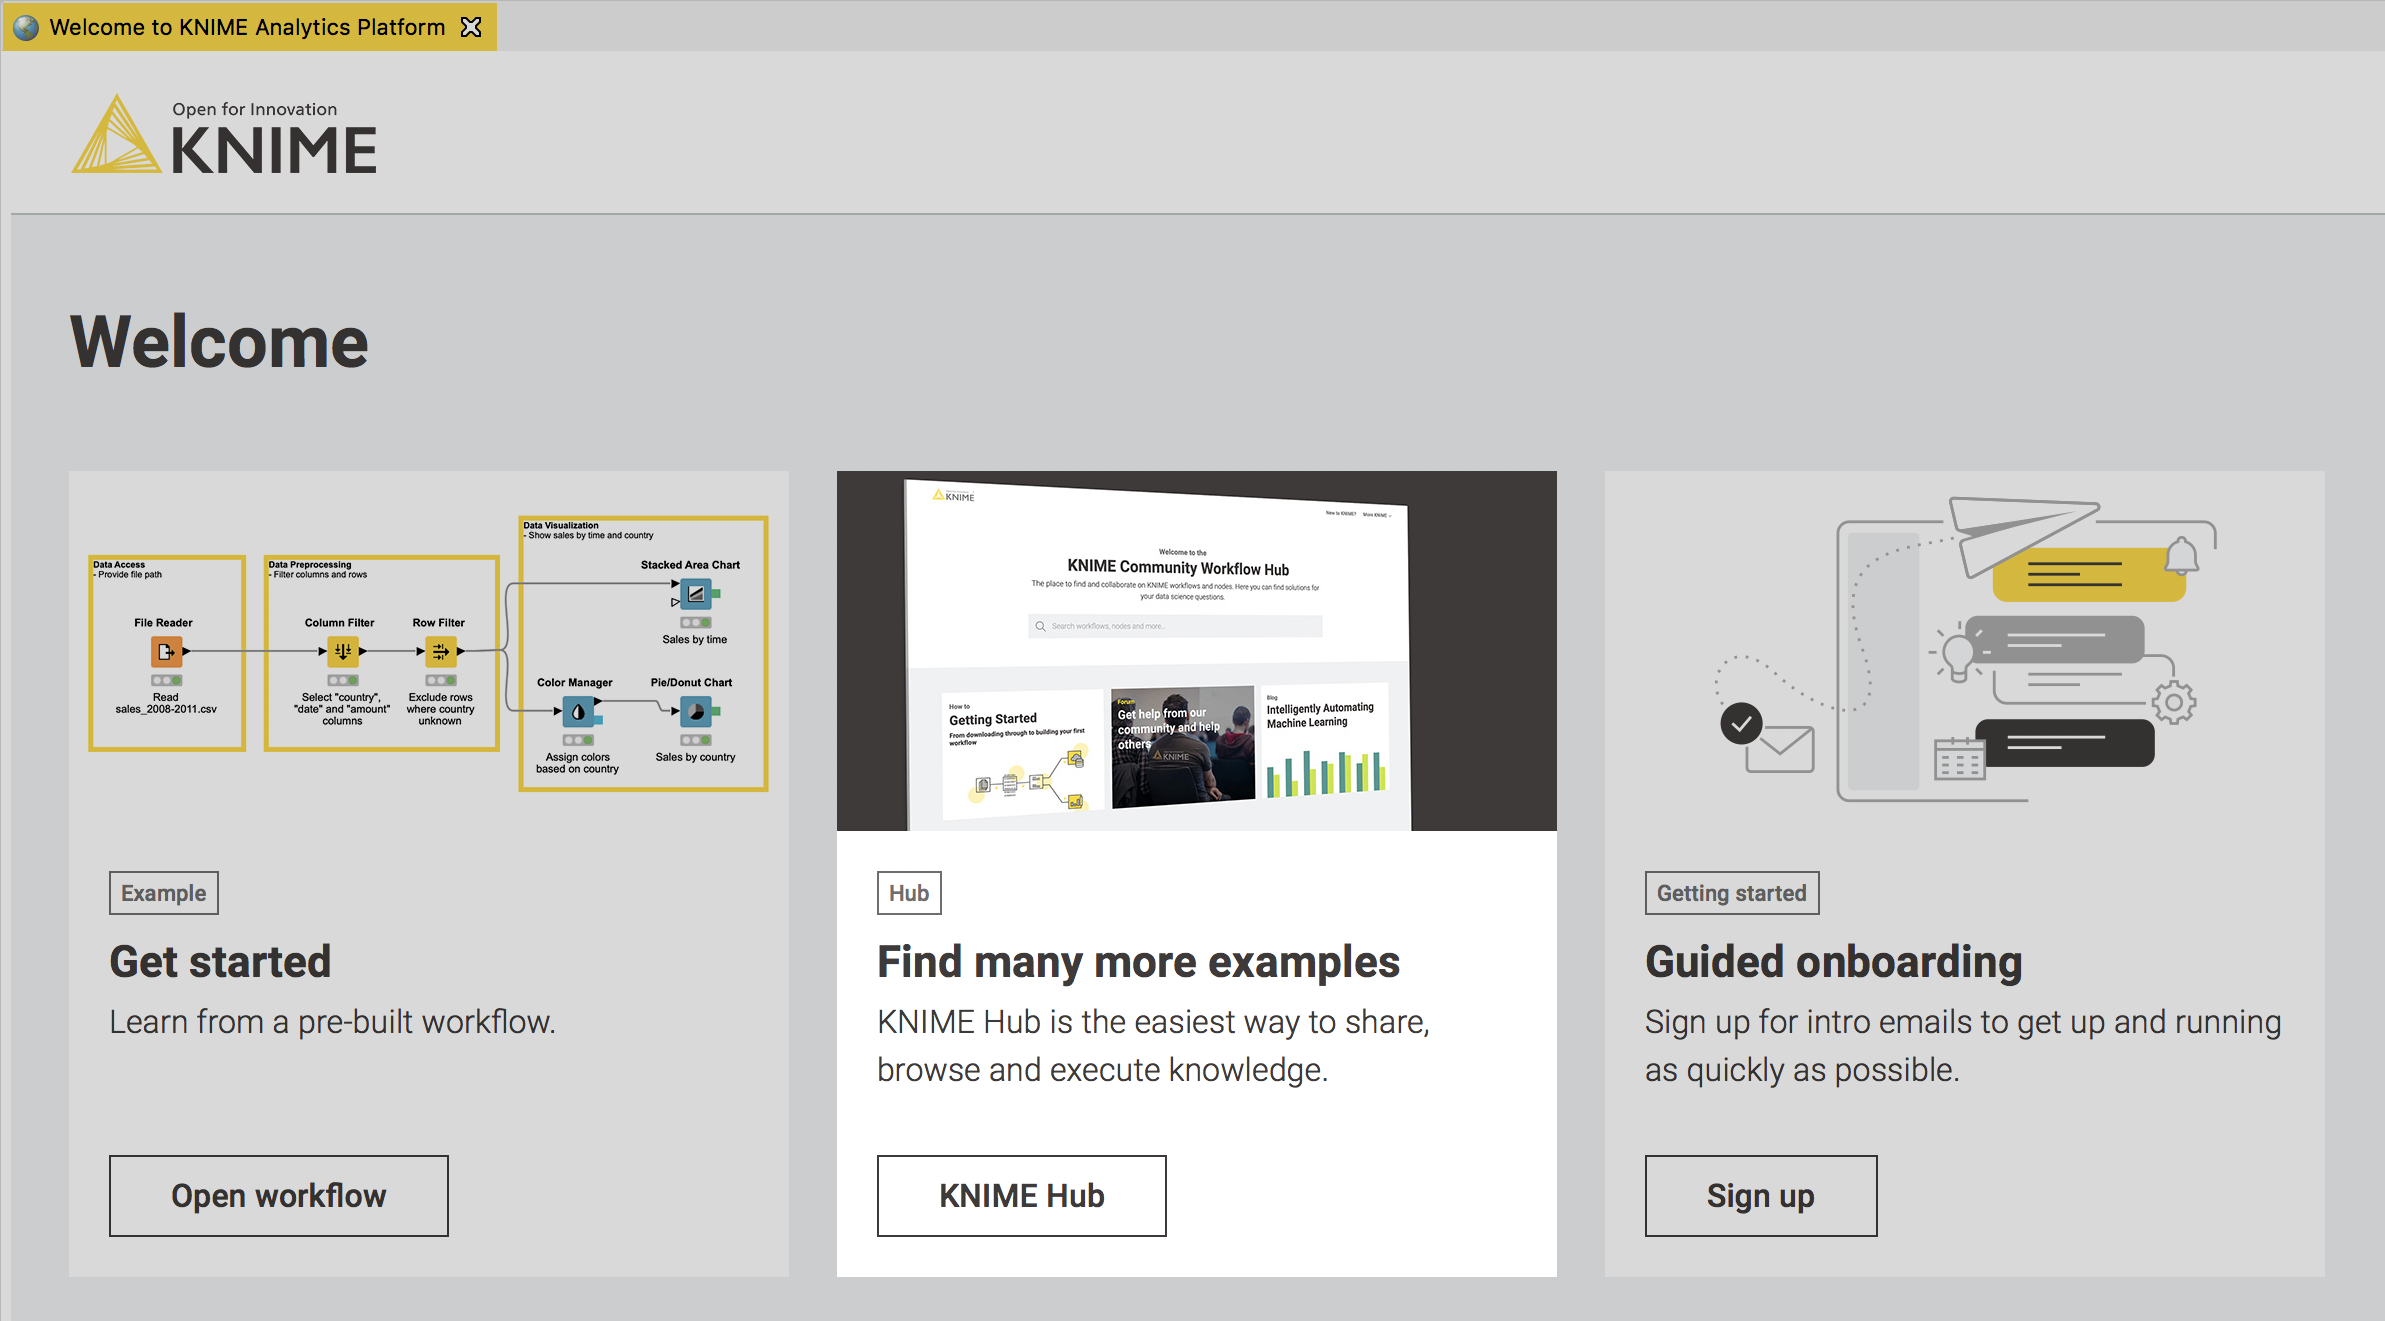
Fig. 6. First-time KNIMEr welcome page: Find many more examples.
By now you have heard "KNIME Hub" quite a few times. The KNIME Hub is a public repository where you can find and download workflows, nodes, components, and extensions produced and shared by the KNIME community. It is a great resource to jump start your practice in KNIME Analytics Platform.
Notice that the KNIME Hub requires a username and password to log in. Use the username and password you set, when you sign up for the KNIME Forum.
Another great source of example workflows is the EXAMPLES server, available in the KNIME Explorer panel inside the workbench.
How to search for examples on the KNIME Hub
From a web browser
The easiest way to access the KNIME Hub is to go to the URL https://hub.knime.com/ from any web browser. There you can type the terms for your search. Entering “my first workflow”, for example, will take you to all the available first-time example entities. Searchable entities are (for now): nodes, components, workflows, and extensions. To restrict the beam of your search, select the entity-tab you are interested in from the top bar, for example “Workflows” (Fig. 7). The search now returns you a list of workflows related to your search term. Select the workflow you are interested in. This takes you to the workflow’s page. Click Open workflow or Download workflow to respectively open the workflow in KNIME Analytics Platform or download the .knwf file to your machine.
Try entering “time series” or “logistic regression” in the search box and then explore all related nodes, components, workflows, or extensions.
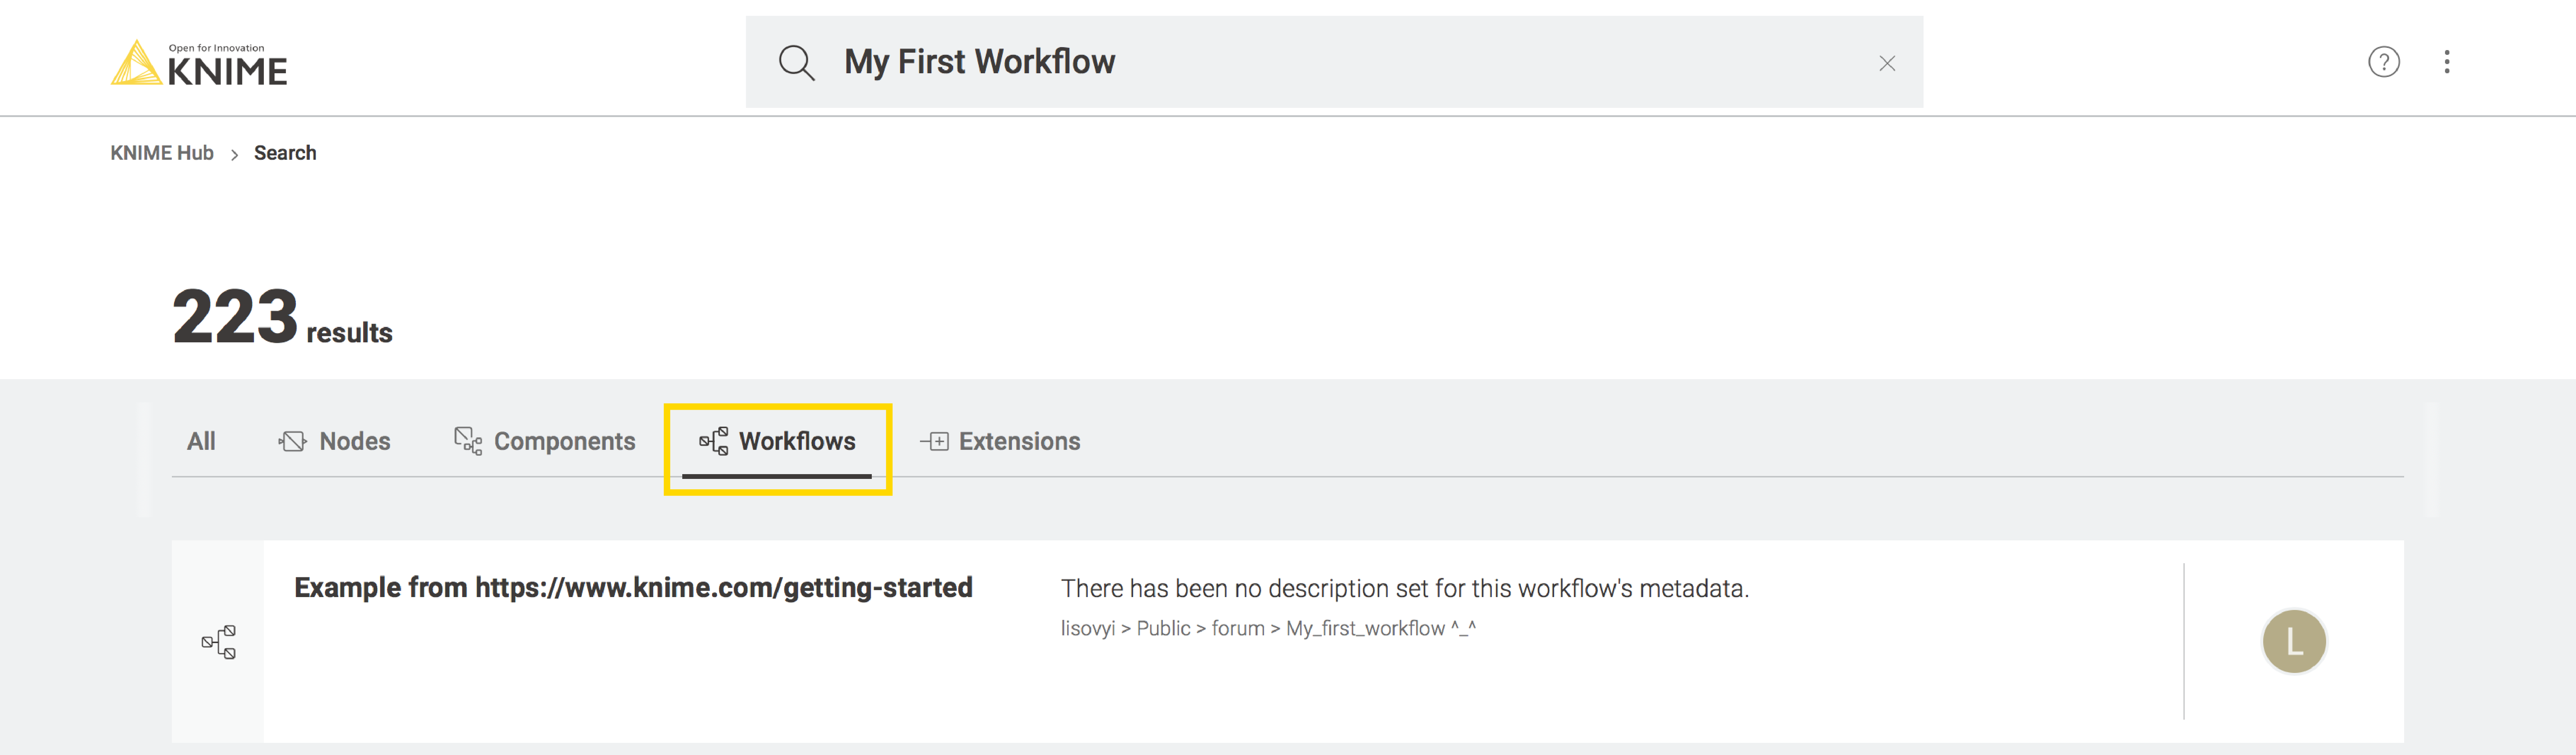
Fig. 7. Searching for workflows according to key-terms “my first workflow” on the KNIME Hub.
From within KNIME Analytics Platform
Within KNIME Analytics Platform, you can type your search terms into the KNIME Hub Search box under the Description view. The search query will then open a web browser to show the results in the KNIME Hub page.
From the first-time KNIMEr Welcome Page
You can access the KNIME Hub from the first-time KNIMEr welcome page. The Find many more examples tile takes you straight there.
How to share resources on the KNIME Hub
This is a tip for when you will want to share your experience and knowledge with other KNIMErs in the community. You can share your work from the folder My-KNIME-Hub -> Public in the KNIME Explorer view. Just place your workflows or components in that folder and they will be automatically available to others for searching, viewing, and downloading on the KNIME Hub.
How to find examples on the EXAMPLES server
In the KNIME Explorer view, double-click EXAMPLES. The EXAMPLES server now opens in read-only mode, offering hundreds of example workflows. Most of them describe a function in KNIME Analytics Platform. However, in folder 50_Applications you can find solutions to real-world use cases. A search box is available at the top of the KNIME Explorer panel, allowing you to search for workflows on specific topics. Type for example “customer” to get all example workflows related to customer analysis tasks.
- Want to find a churn prediction workflow? Navigate to “50_Applications/_18_ChurnPrediction”
- Want to build a graph to visualize a social network? Navigate to “08_Other_Analytics_Types/05_NetworkMining/07_Pubmed_Author_Network_Analysis”.
- Interested in Market Basket Analysis? Navigate to “50_Applications/_16_MarketBasketAnalysis”.
- Does the problem you are trying to solve concern sentiment analysis? Navigate to “08_Other_Analytics_Types/01_Text_Processing/03_SentimentClassification”
Now: drag & drop (or copy & paste) the example workflow to your LOCAL workspace in the KNIME Explorer panel. Double-click the newly created copy in the LOCAL workspace to open it and change it accordingly.
As in the KNIME Hub, you can search for the workflow that is closest to your current task, download it by drag & drop to your LOCAL workspace, and from there adapt it to your data and your business problem.
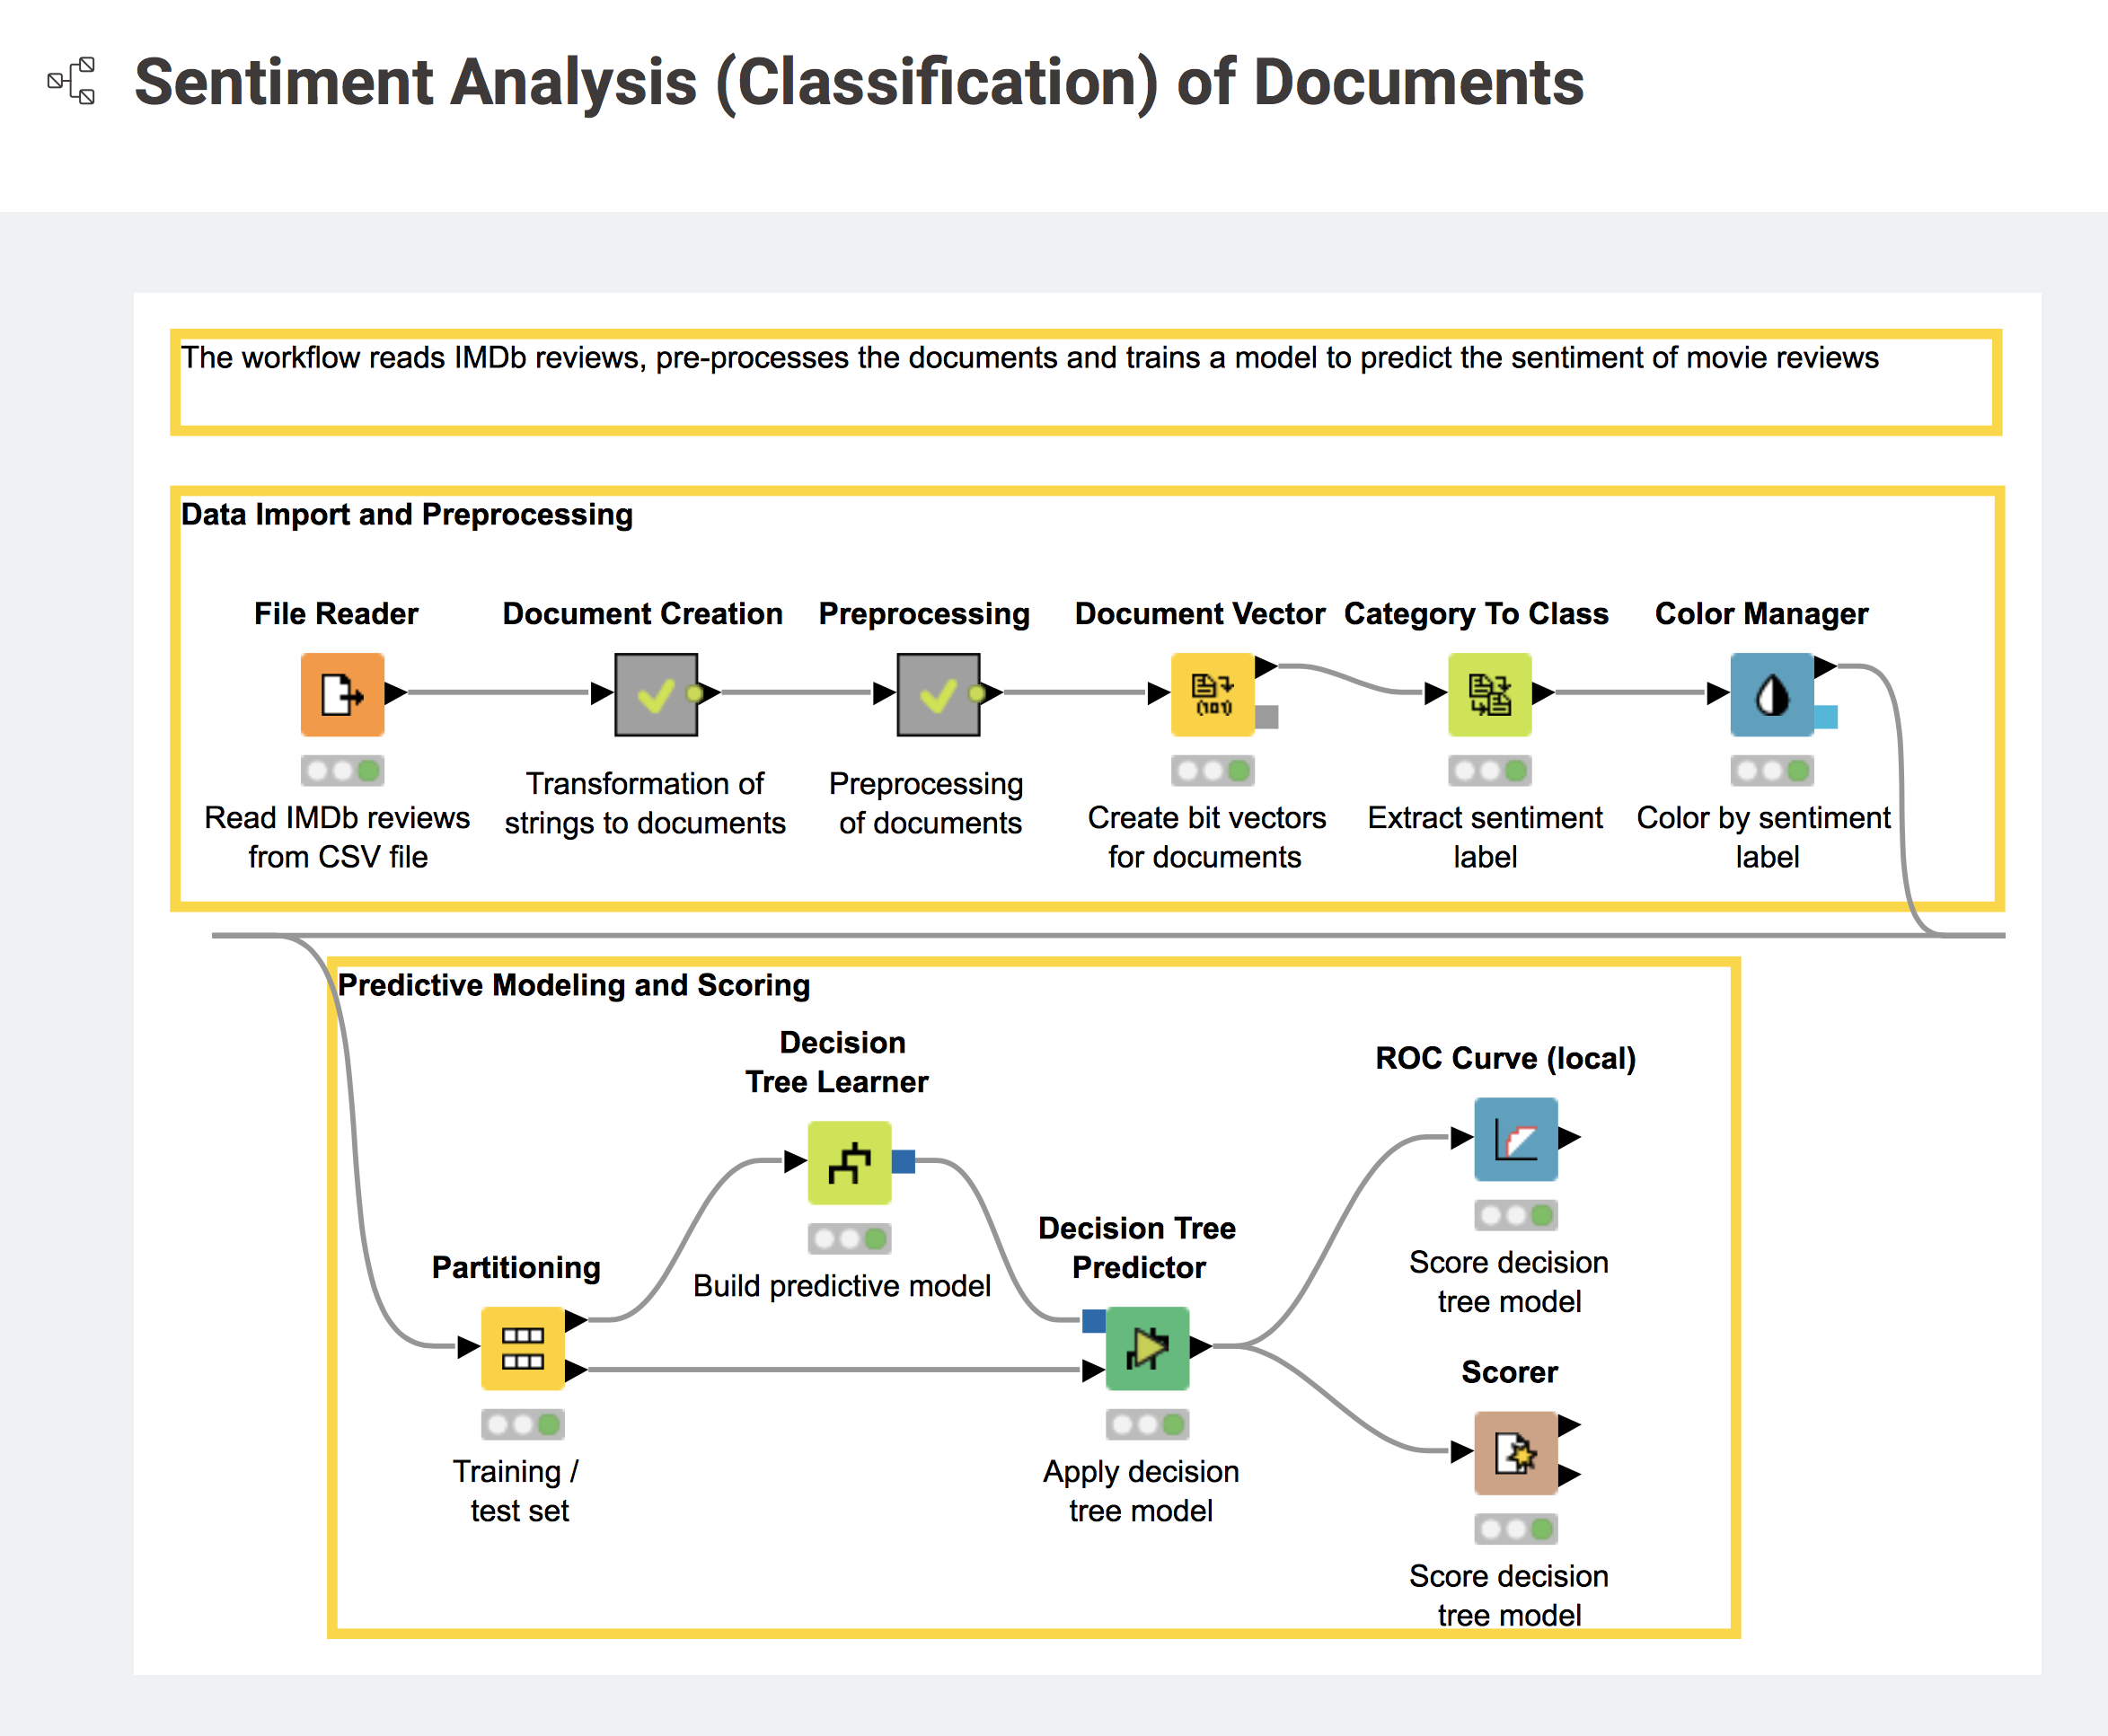
Fig. 8. Workflow 08_Other_Analytics_Types/01_Text_Processing/03_SentimentClassification also available on the KNIME Hub.
5. Install Extensions
The basic KNIME Analytics Platform does not include all the nodes that you might see in more complex applications. Those nodes are part of the Extensions packages and are usually installed separately. Unless at installation time the package containing all free extensions was selected, you will need to install the KNIME Extensions now. In KNIME Analytics Platform, go to the horizontal menu bar and select File -> Install KNIME Extensions, and then follow the instructions.
You will be presented with a list of extensions you can install. The most essential packages are KNIME & Extensions, KNIME Labs Extensions and KNIME Community Contributions –Other. The search box at the top of this window enables you to search for more specific extensions.
Prompts to download required extensions
After you have downloaded a workflow from either the KNIME Hub or the EXAMPLES server, you are ready to customize it to fit your data and your business case. Save the workflow to your LOCAL workspace in the KNIME Explorer, for example the sentiment analysis workflow in 08_Other_Analytics_Types/01_Text_Processing/03_SentimentClassification on the EXAMPLES server.
This workflow requires the Text Processing extension, which is not part of the core installation. So now you need to install at least the KNIME Labs Extensions/KNIME TextProcessing extension. Note that when you open a workflow, KNIME Analytics Platform will alert you about any missing extension and ask if you want to install it on the spot.

Fig. 9. Window to select extension packages to install in the core KNIME Analytics Platform.
6. Customize a Workflow in the LOCAL Workspace
Now you have your workflow open in the workflow editor, for example a copy of the workflow in 08_Other_Analytics_Types/01_Text_Processing/03_SentimentClassification or on the KNIME Hub (Fig. 8). Let’s customize it!
Change the file path in the configuration window of the File Reader node to point to your own data and adjust other parameters – such as headers, comment lines, presence of short lines, locale, etc … – if needed.
The gray nodes after the File Reader node are metanodes. A metanode is a container of other nodes that can be created to hide the complexity of the analysis. The metanodes named Document Creation and Preprocessing contain all the required text cleaning procedures. Double-click them to see their content. If your data need more or less cleaning, just remove or add the corresponding Text Processing nodes.
To create a new node, drag & drop or double-click the node in the Node Repository view. To connect the newly created node to existing nodes, click the output port of the preceding node and release the mouse at the input port of the following node.
After the File Reader node you can change the decision tree model with another machine learning method of your choice. You can look for the relevant nodes either in the Node Repository view or on the KNIME Hub. You can import nodes from the KNIME Hub directly into your workflow by drag&drop.
An entity that is similar to a metanode is the component. The difference is that components have their own configuration dialog and a view, formed by the configuration and view items of special nodes, contained inside the component. To learn more about components, check the videos What is a Component? and Sharing and Linking Components.
7. Become part of the KNIME Community!
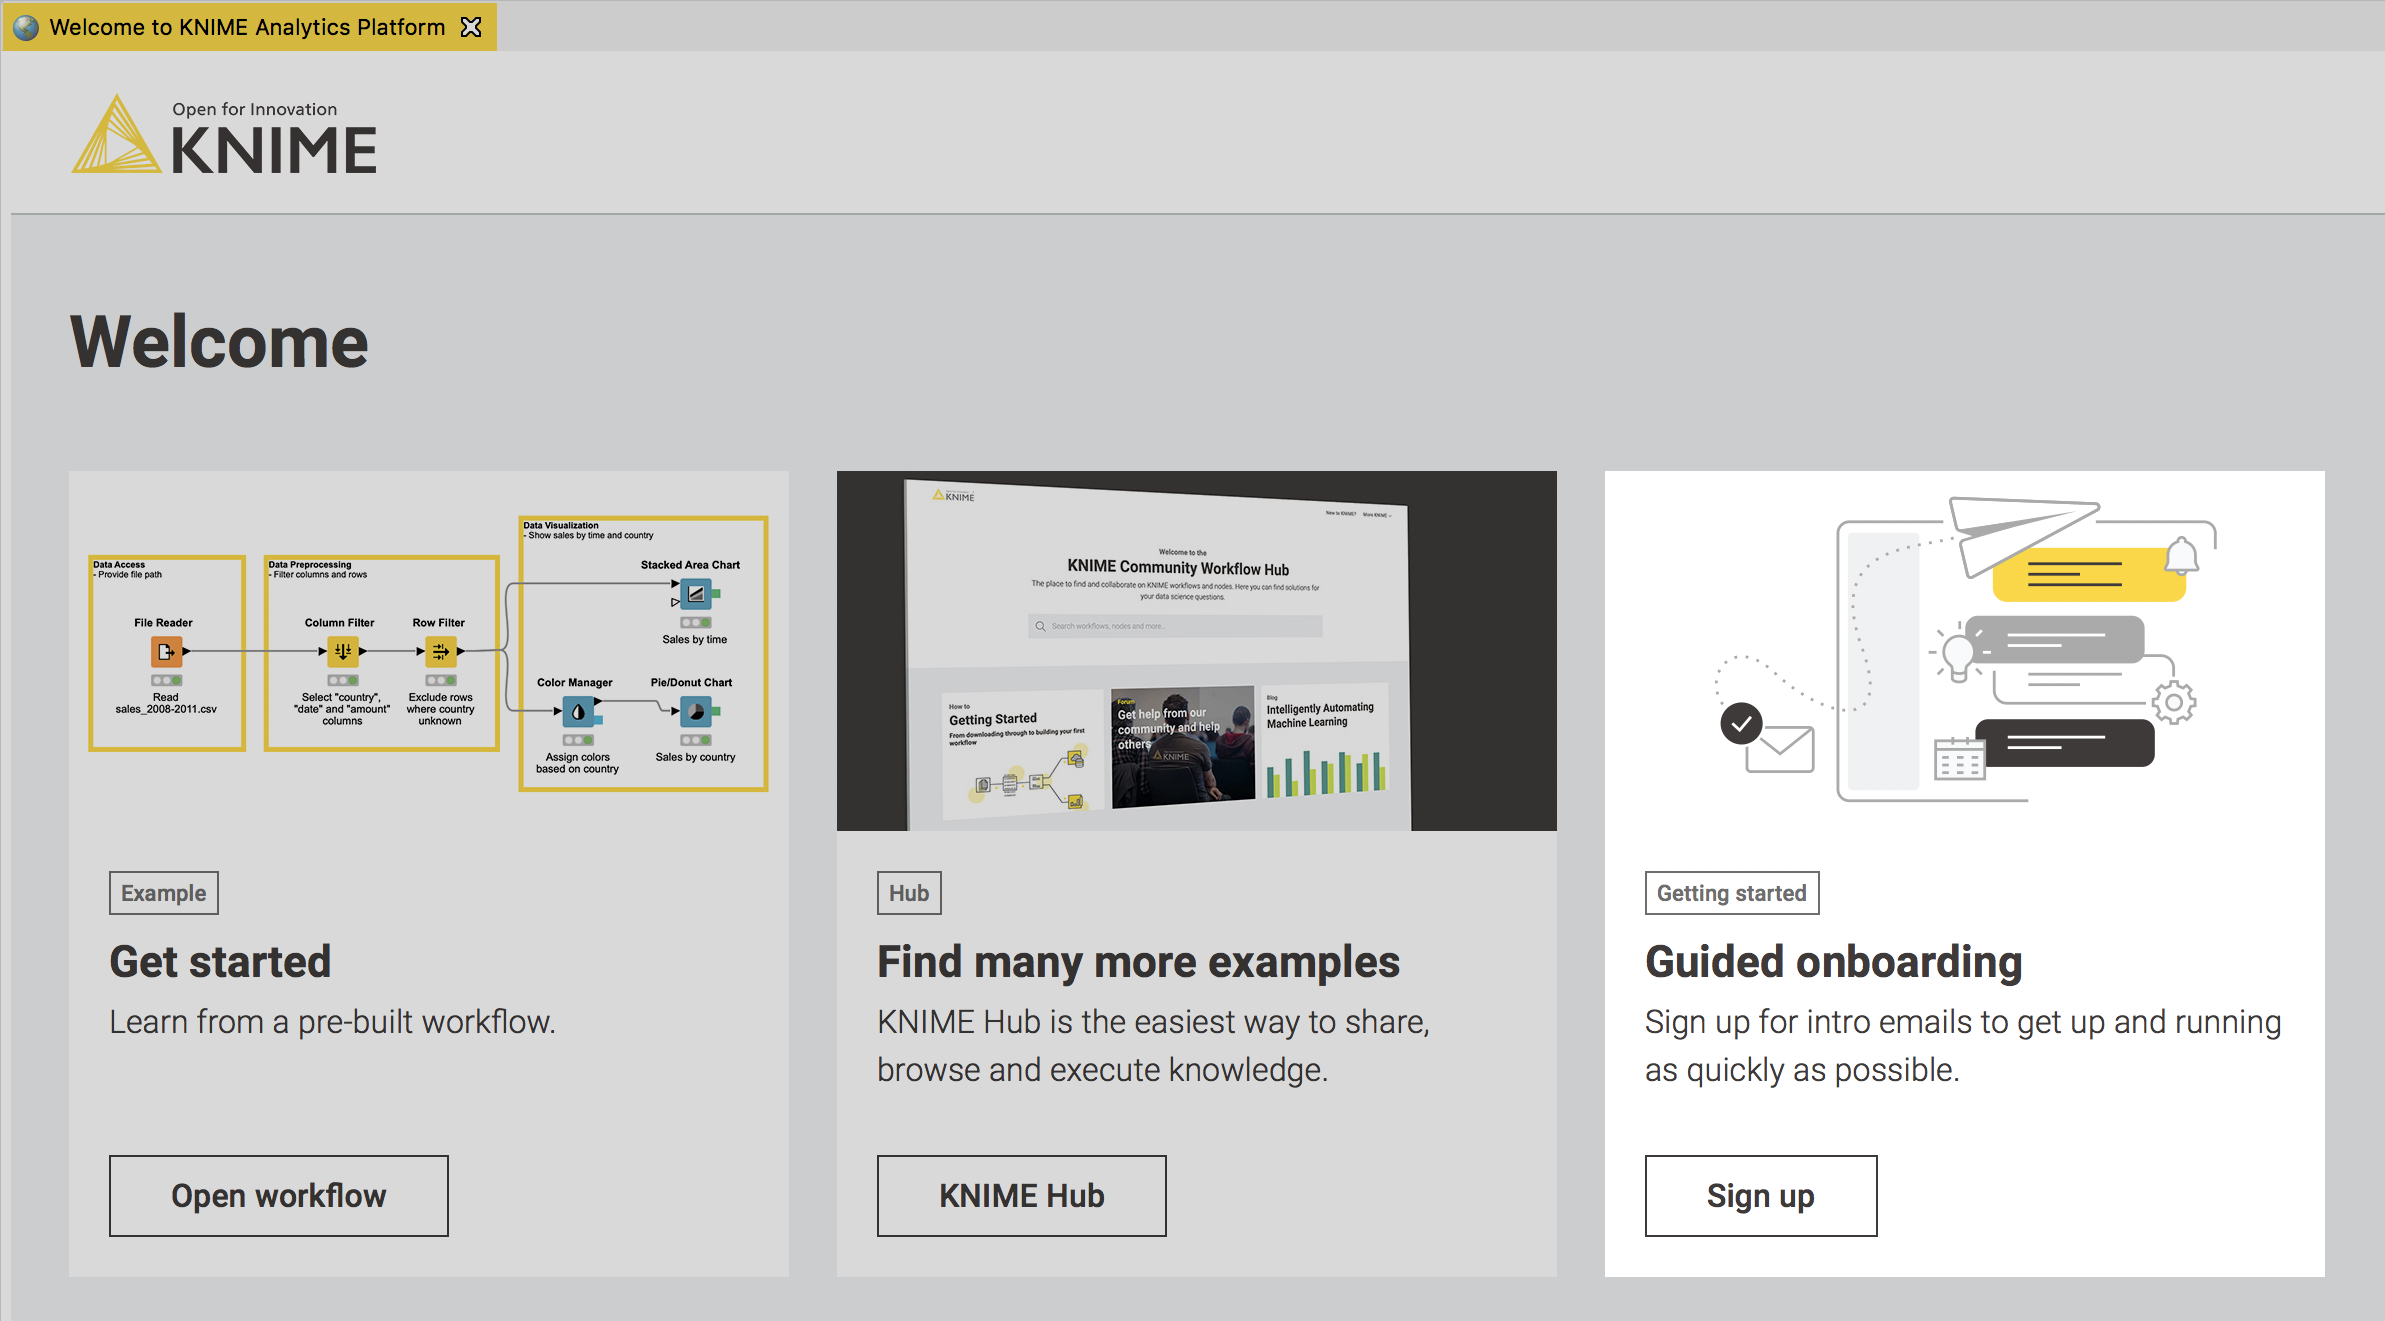
Fig. 10. First-time KNIMEr welcome page: Guided Onboarding.
During this blog post, we have played with the KNIME workbench, discovered where all examples are, downloaded and altered an existing workflow, and got to know what is where.
The seventh and last thing to do is to become part of the KNIME community! The KNIME community is very rich in information and very active in providing support. If you’d like to become part of the community and benefit from all the really useful resources it provides, we recommend the following:
- Sign up for Emil’s Guided Onboarding emails. As suggested in the Guided Onboarding tile on the first-time KNIMEr welcome page, register to receive a few introductory emails about how KNIME works (Fig. 10). The emails we send are kept short and sweet: just a few useful emails to get started.
- Become a KNIME Forum member. The KNIME Forum is the place to go to ask questions and look for answers provided by the community. Set up your own forum account, with a username and password.
- Do a self-paced course. Learn about data science and KNIME Analytics Platform at your own pace and to your own schedule by taking one of our self-paced courses on our learning platform: Track your progress, quiz yourself at the end of each lesson, earn points and badges and ask your questions. Find out more on our KNIME Self-Paced Courses webpage.
- Register for an in-person KNIME course. KNIME also offers online and onsite courses with teachers. You can explore the full list of courses and attend the one that fits your needs.
Notes on our course levels
Notice that all KNIME courses are organized by level of complexity.
- L1 (level 1) courses cover basic concepts of KNIME Analytics Platform;
- L2 (level 2) courses cover more advanced functionalities of KNIME Analytics Platform;
- L3 (level 3) courses cover deployment options;
- L4 (level 4) courses dig deeper into more specialized fields
More course information:
- All of our online courses are listed on our Events page. You can filter the search by clicking Online courses.
- See also our webpage about the KNIME Certification exams
Wrapping up
We have reached the end of the seven things we recommend doing after installing KNIME Analytics Platform. If you have followed all of them, you now have the basic skills to move around KNIME Analytics Platform and build your first workflows. We hope to meet you soon in the KNIME community with your questions and answers, initially learning from other KNIMErs and soon offering your own advice and tips & tricks.