
As AI-driven systems grow in complexity, a single agent equipped with multiple tools quickly becomes hard to maintain, extend, or reason about. Real-world applications often require multiple specialized components that evolve independently, apply different logic, and operate under clear boundaries.
This is where the Agent-to-Agent (A2A) protocol becomes useful. It standardizes how autonomous agents communicate, delegate tasks, and exchange results without requiring access to each other’s internal state, tools, or memory.
In this article, we explain what the A2A protocol is, how it compares to the Model Context Protocol (MCP), and show how to design a multi-agent architecture with KNIME. We’ll also share our learnings from implementing A2A with KNIME.
Table of contents
- What is the A2A protocol and why does it matter?
- A2A vs. MCP: What’s the difference?
- What’s an example of MCP and A2A being used together?
- Can I use KNIME for A2A and MCP?
- When should you use multiple agents rather than multiple tools?
- Key learnings using A2A protocol in KNIME
- Use case: Workflow Validation on KNIME Business Hub
- How to build an A2A-based architecture with KNIME
- Key reminders when designing A2A systems
What is the A2A protocol, and why does it matter?
The Agent-to-Agent (A2A) protocol, introduced by Google, standardizes how autonomous agents communicate, collaborate, and delegate tasks. Its primary goal is to enable agents to work together toward a shared objective securely and predictably, without exposing their internal implementation details.

With the A2A protocol, agents can:
- Discover each other’s capabilities via agent cards
- Negotiate interaction modalities (text, files, structured data).
- Coordinate long-running or multi-step tasks
- Securely exchange information to achieve user goals
Why the A2A protocol matters
The A2A protocol matters because it enables AI agents to work together like a coordinated team rather than isolated problem solvers. Crucially, this collaboration happens between peers, not through tightly coupled tool calls or shared memory. Each agent retains its own autonomy and specialized capabilities while cooperating through a shared protocol that makes interactions explicit, structured, and scalable.
From a systems perspective, A2A turns agent collaboration into a distributed systems problem, not a prompt engineering problem.
A2A vs. MCP: What’s the difference?
There are several protocols you can use to standardize how agents, models, and tools interact. Rather than compete, these protocols complement each other, as each one has a different purpose.
MCP is an emerging standard for connecting Large Language Models (LLMs) with data sources and external tools. Its focus is to reduce the complexity of connecting agents to tools and data. In contrast, the A2A protocol focuses on multi-agent teamwork. Rather than focusing on how a single agent accesses tools or data, A2A standardizes how agents communicate with each other, particularly when these agents are deployed as external services.
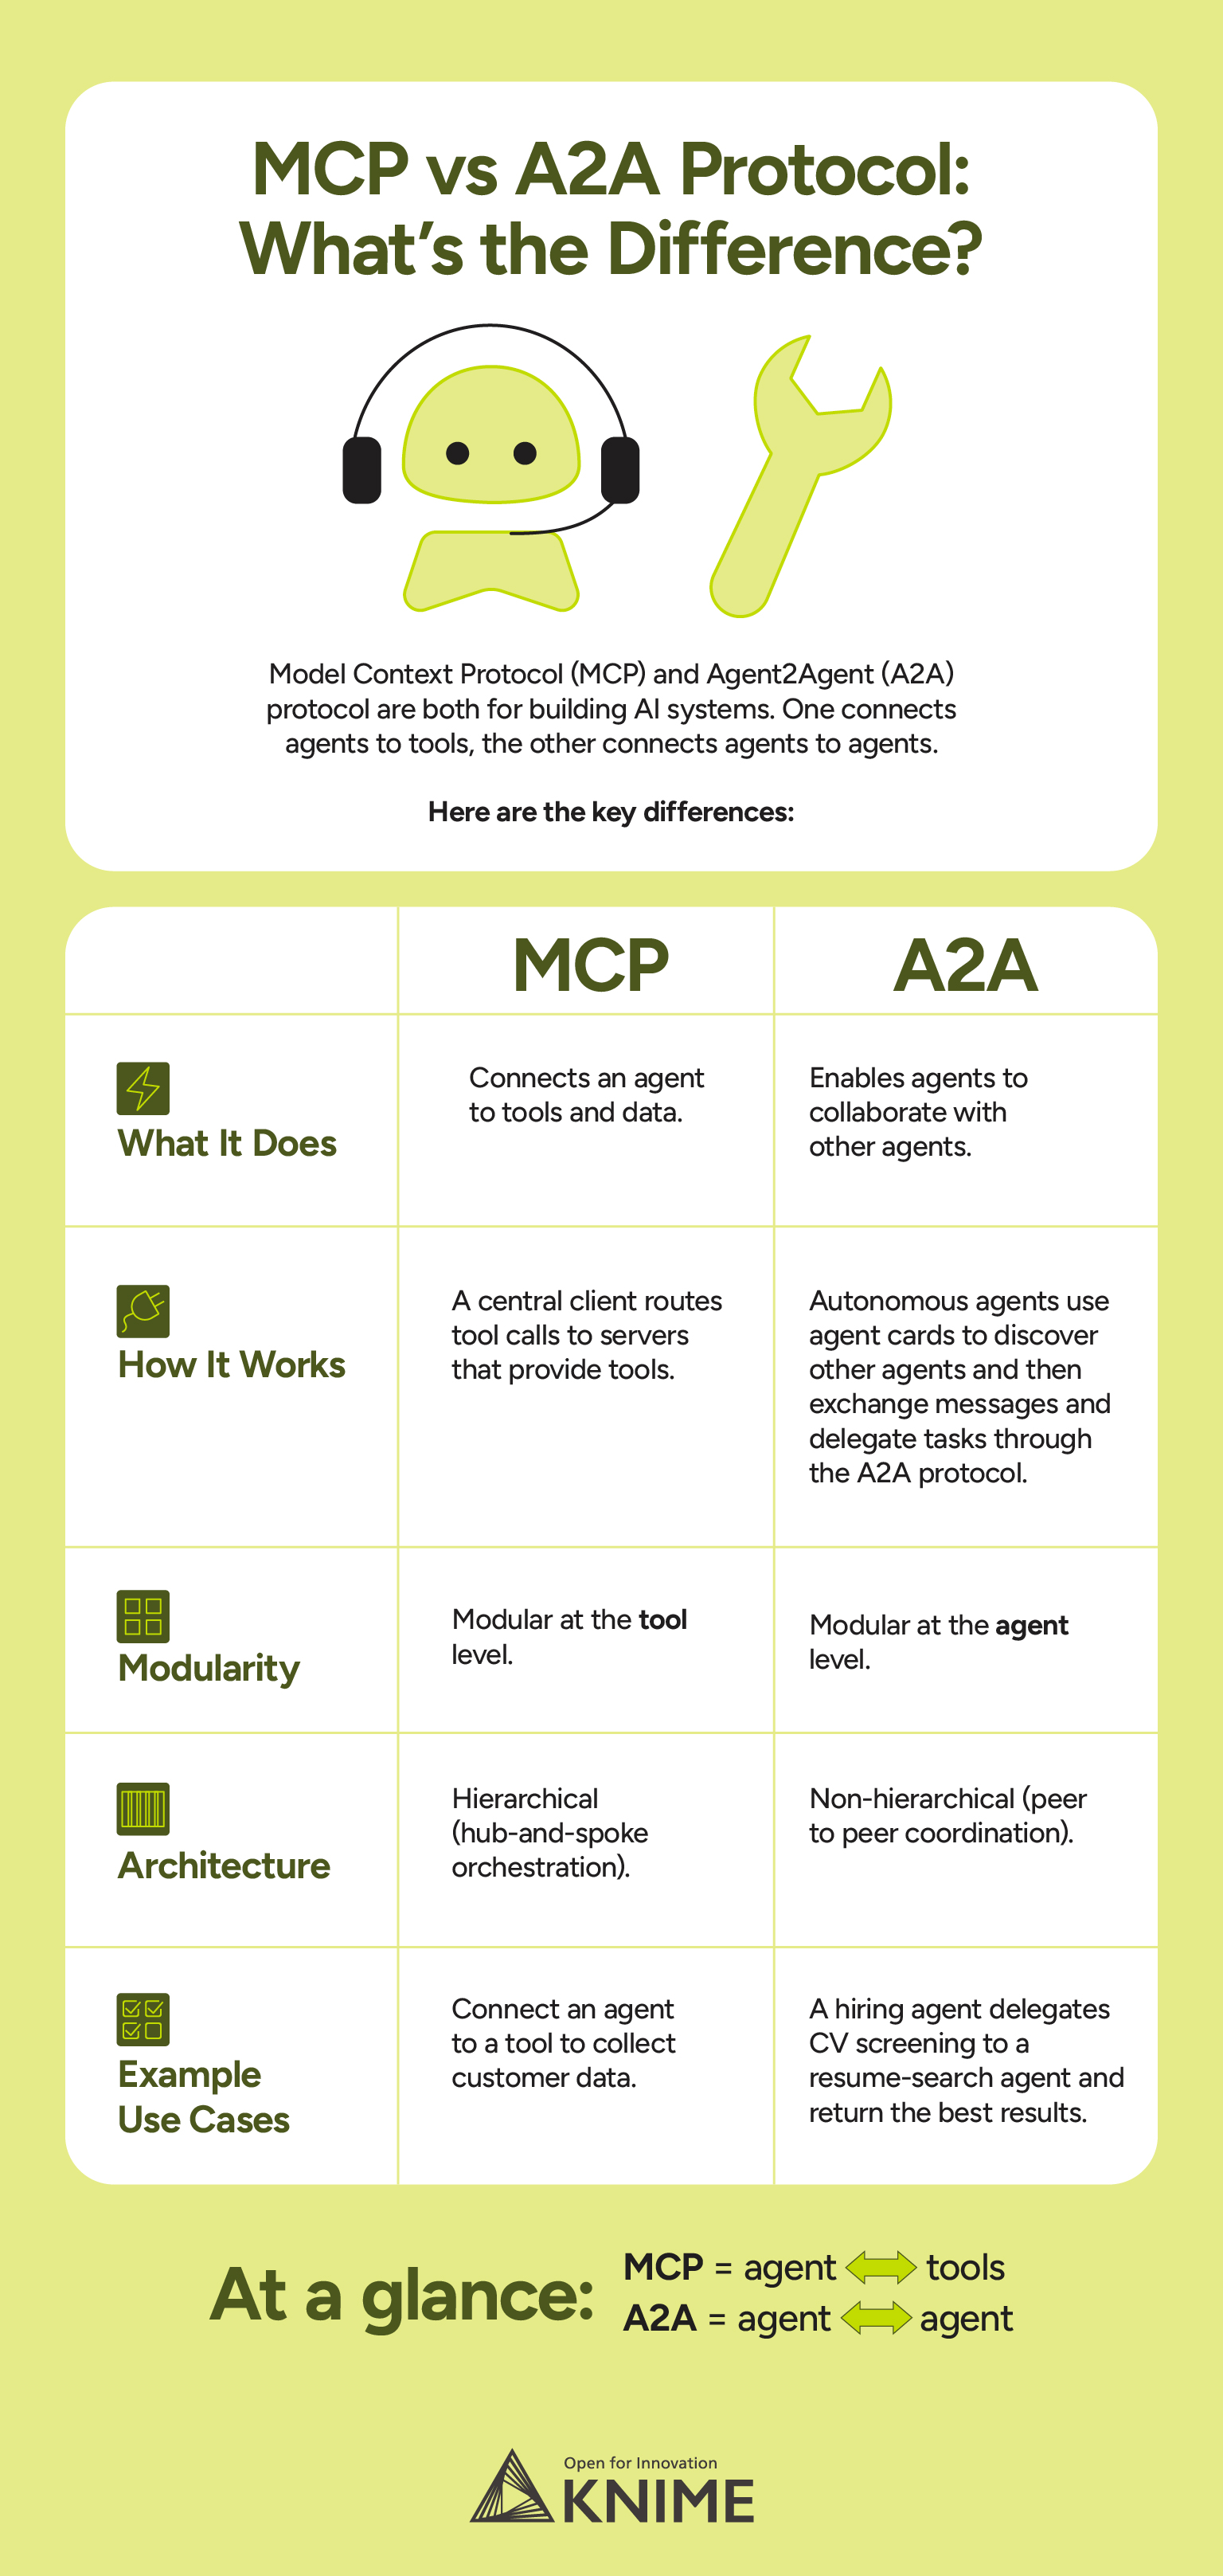
What’s an example of MCP and A2A being used together?
A typical agentic application uses A2A to coordinate between agents, while each agent internally relies on MCP to interact with its own tools.
Can I use KNIME for A2A and MCP?
Yes! KNIME fits well into this picture.
KNIME and MCP: As described in the KNIME as Model Context Protocol Server blog post, KNIME workflows can be exposed as MCP servers, allowing agents or LLM-based systems to invoke analytical logic, data access, and processing capabilities through a standardized tool interface.
KNIME and A2A: KNIME workflows can be deployed as A2A agents as REST services on KNIME Business Hub, with agent cards enabling capability discovery and collaboration through structured messages and task requests exchanged over the Agent-to-Agent protocol.
When should you use multiple agents rather than multiple tools?
One of the main challenges we encountered was deciding when a capability should be its own agent rather than just a tool. Early on, we found ourselves asking whether a capability truly deserved its own agent or whether it should simply be another tool attached to a single, larger agent.
This question is important, because introducing multiple agents without a clear motivation can add unnecessary complexity. At the same time, forcing everything into one agent with an ever-growing toolset quickly leads to tight coupling and unclear responsibilities.
Through building and iterating on our KNIME-based setup, we found that multiple agents become valuable when:
- Responsibilities can be clearly separated, such as e.g. booking a flight vs. planning an itinerary
- Different capabilities benefit from specialization, for example when an agent is particularly well-suited to a specific task or domain
- Large amounts of data should remain local, so that data and logic stay within the same agent instead of being passed back and forth
- Better fault isolation is required, so that failures in itinerary planning do not cascade into flight booking task
- Security and isolation matter, and certain operations must be separated based on permissions or trust boundaries
Fewer responsibilities per agent lead to clearer systems overall.
The goal of introducing multiple agents is not to add complexity, but to reduce it by making interactions explicit and responsibilities easier to reason about and maintain.
Key learnings using A2A protocol in KNIME
Stateless services require explicit memory handling
To address this, we introduced an explicit, lightweight memory mechanism in the form of a local CSV-based store per agent. This store records past interactions and metadata, allowing each agent to reconstruct relevant context when processing new messages or tasks.
Importantly, this memory is:
- Local to the agent, not shared across the system
- Explicitly queried, rather than implicitly available
- Scoped by context ID and user ID, ensuring relevance and isolation
Use case: Workflow Validation on KNIME Business Hub
The multi-agent setup described here is inspired by the workflow validation project documented in the KNIME Business Hub Workflow Validation Guide. In that guide, validation checks are applied systematically to ensure that workflows meet quality and governance standards before being shared or deployed.
We adopt the same underlying goals, but intentionally keep the validation framework minimal, as the primary focus is the implementation of A2A itself rather than comprehensive workflow governance. Within this scope, the Checker Agent performs validation-only checks, such as identifying deprecated nodes or missing workflow descriptions, while the Action Agent is responsible for assigning labels to workflow versions.
By separating validation from action and coordinating both through A2A, the system preserves the intent of the original validation guide while making the process more modular, extensible, and suitable for distributed, agent-based architectures.
How to build an A2A-based architecture with KNIME
Step 1: Define clear agent roles
All agents expose a shared set of A2A tools, including Process User Message, Create Task, Choose Agent, and Agent Call.
Each agent can independently process incoming messages, determine or reuse a context ID, and decide whether to act locally or delegate work. Agents differ not in their A2A capabilities, but in their domain responsibilities.
Step 2: Deploy KNIME workflows as Remote Agents
Remote Agents are implemented as KNIME workflows and deployed as KNIME service deployments. Each deployment exposes an HTTP endpoint that implements the A2A protocol and is invoked by other agents through the Agent Call A2A tool.
Each Remote Agent can:
- Accept A2A messages or tasks via HTTP POST
- Solve the task using KNIME workflows as internal tools
- Return structured results as artifacts
- Communicate exclusively using JSON-RPC 2.0
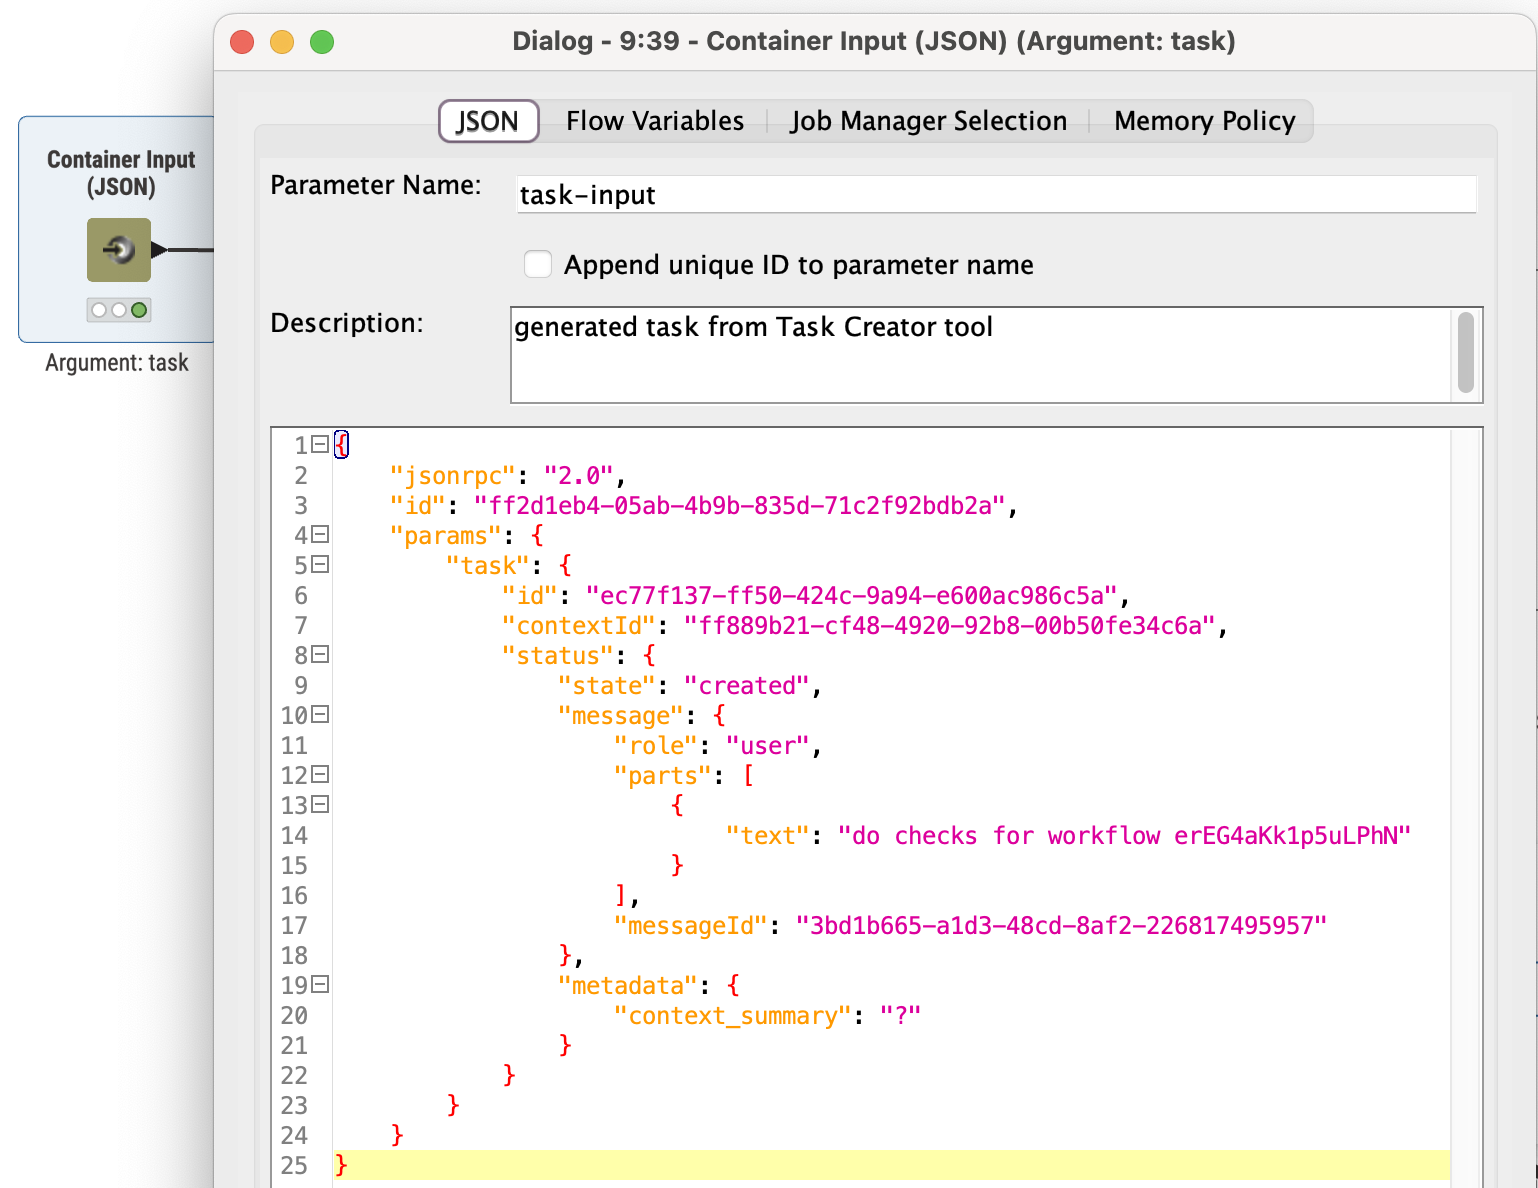
The screenshot above shows an example of an A2A task as it is received by a Remote Agent via the Container Input (JSON) node. The task is sent by another agent using the Agent Call tool and arrives at the service endpoint as a JSON-RPC 2.0 request. It contains task identifier, context ID, user message, and optional metadata such as a context summary, allowing the Remote Agent to process the request.
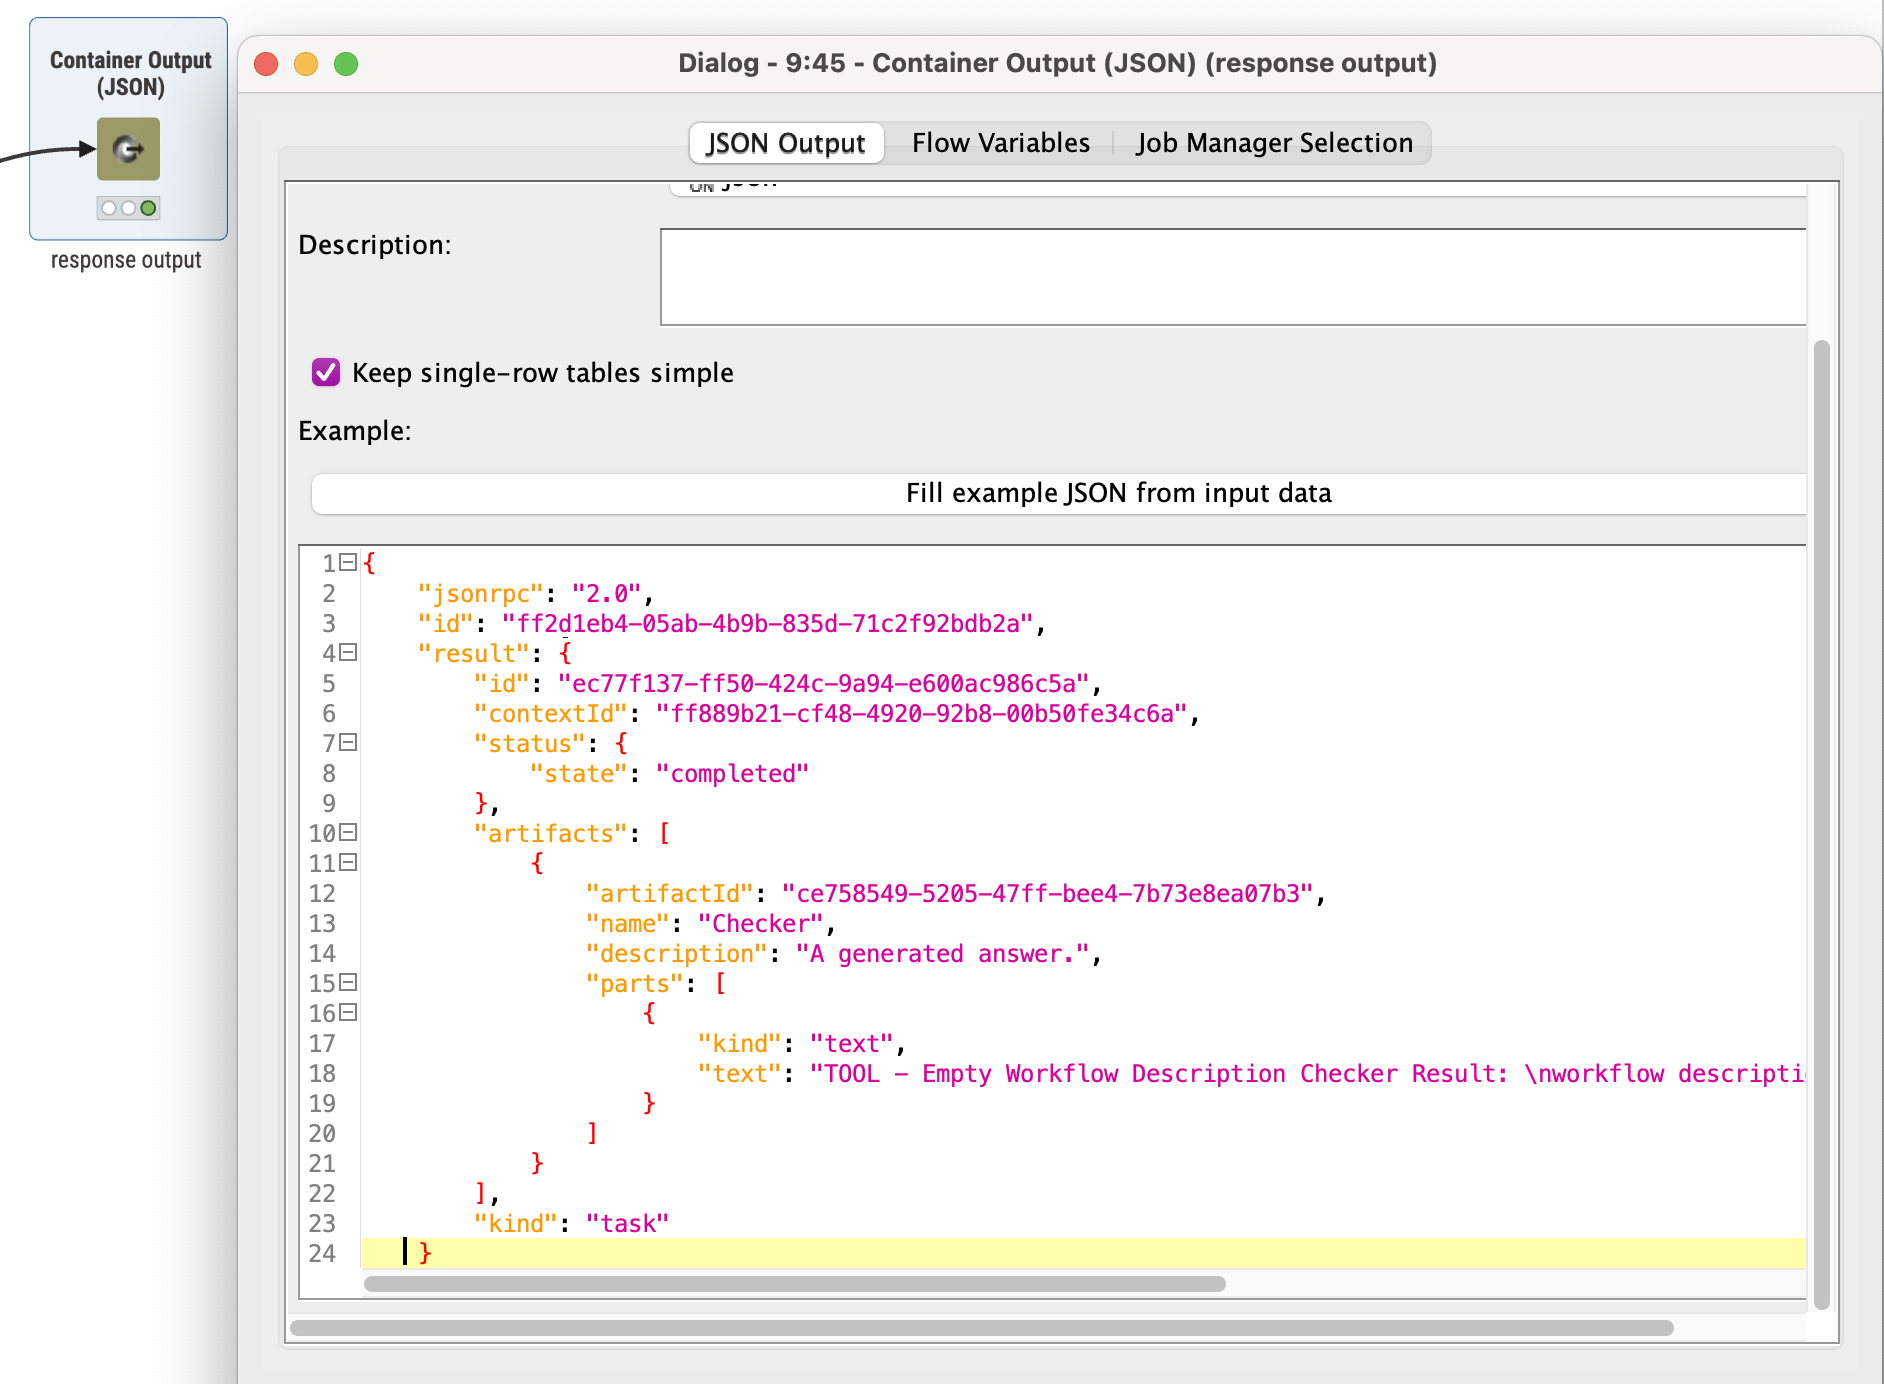
After processing an incoming A2A task, the Remote Agent constructs and returns its result as a JSON-RPC 2.0 response. The response includes task status and artifacts and is sent back to the calling agent via the Container Output (JSON) node, following the A2A specification.
Step 3: Use agent cards for discovery and security
Every agent exposes an agent card. In our implementation, the agent card is a JSON metadata document stored alongside the agent’s KNIME workflow. It acts as a self-describing manifest that declares:
- Agent identity
- Supported capabilities
- The specific skills the agent offers
- Endpoints
- Authentication requirements
To improve security and isolation, we distinguish between public and private agent cards. Public cards describe capabilities and are discoverable by other agents. Private cards contain sensitive configuration and must be protected behind authentication.
Although this separation is not implemented in the example presented here, a practical approach in KNIME-based deployments is to store public and private agent cards in separate KNIME Spaces. This allows capabilities to remain discoverable without exposing sensitive configuration, and aligns well with common security and access-control requirements.
Step 4: Handle context locally, but consistently
Context handling in our system is explicit and decentralized. Each agent follows the same rules for managing context, without relying on shared state or centralized storage.
Each agent can:
- Process incoming messages using Process User Message A2A tool, where a new or existing context ID is determined
- Store its own interaction history in a local CSV-based memory file
- Generate a context summary in the Create Task A2A tool, based on prior interactions filtered by context ID and user ID
There is no shared database between agents. When an agent creates a task for another agent, it includes the context ID and when appropriate a short context summary derived from its own local history.
This approach preserves agent autonomy while still enabling coherent, multi-step interactions across stateless service boundaries.
Step 5: Enable peer-to-peer delegation
In our setup, each agent exposes the same core A2A tools, Choose Agent and Agent Call, allowing any agent to delegate work to another agent when needed.
This enables peer-to-peer collaboration:
- An agent selects another agent based on declared capabilities in agent cards
- It invokes the Remote Agent via JSON-RPC 2.0 over HTTP
While the Client agent commonly initiates tasks, Remote Agents are equally capable of calling other agents directly, without routing all interactions through a single coordinator.
Key reminders when designing A2A systems
- Use A2A for agent collaboration, not simple tool calls.
- Keep agents distinct in scope and independently deployable.
- Enable agents to collaborate without requiring access to each other’s internal state, tools, or memory.
- Enable peer-to-peer delegation rather than centralized orchestration.
The Agent-to-Agent protocol provides a strong foundation for building modular, secure, and scalable multi-agent systems. By giving each agent its own independent memory and relying solely on A2A for collaboration, you preserve agent autonomy while keeping interactions explicit and traceable. Paired with MCP for tool integration, A2A helps create agentic systems that are easier to maintain today - and ready to evolve tomorrow.
Have you implemented your own A2A agent? Try connecting it with ours and see how peer-to-peer agent collaboration works in practice.Download the example workflows used in this article here.