
While surfing on the internet a few months ago, we came across this study1, promising to train a neural network to alter any image according to your preferred painter’s style. These kinds of studies unleash your imagination (or at least ours).
What about transforming my current portrait picture to give it a Medusa touch from the famous Caravaggio painting? Wouldn’t that colleague’s portrait look better in a more Picasso-like fashion? Or maybe the Van Gogh starry night as a background for that other dreamy colleague? A touch of Icarus blue for the most adventurous people among us? If you have just a bit of knowledge about art, the nuances that you could give to your own portrait are endless.
The good news is that the study came with a Python script that can be downloaded and reused2.
The bad news is that most of us do not have enough knowledge of Python to deploy the solution or adapt it to our image set. Actually, most of us do not even have enough knowledge about the algorithm itself. But it turns out that we don’t need to. We don’t need to know Python, and we don’t need to know the algorithm details to generate neuro-styled images according to a selected painting. All we actually need to do is:
- Upload the portrait image and select the preferred style (night stars by Van Gogh, Icarus blue, Caravaggio’s Medusa, etc.).
- Wait a bit for the magic to happen.
- Finally, download the neuro-styled portrait image.
This really is all the end users need to do. Details about the algorithm are unnecessary as is the full knowledge of the underlying Python script. The end user also should not need to install any additional software and should be able to interact with the application simply, through any web browser.
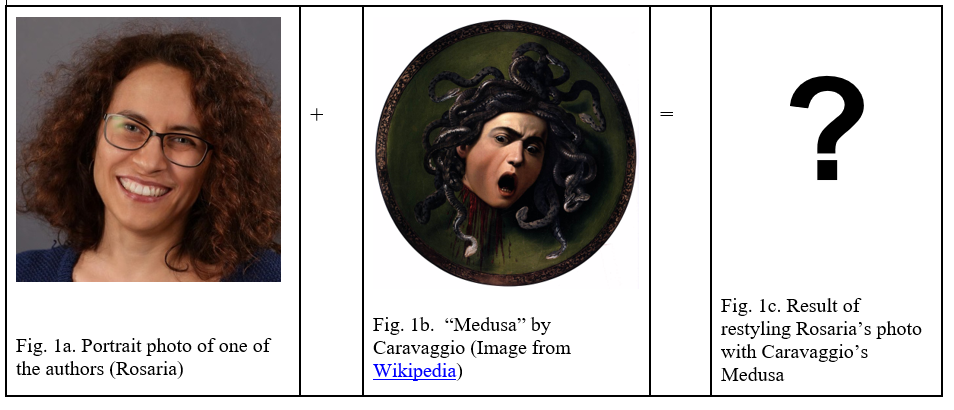
Do you know the Medusa painting by Caravaggio? It’s his famous self-portrait. Notice the snakes on Medusa’s head (Fig. 1b). Fig. 1a shows a portrait of Rosaria, one of the authors of this article. What would happen if we restyled Rosaria’s portrait according to Caravaggio’s Medusa (Fig. 1c)?
To see the result of the neuro-styling, we integrated the Python script — which neuro-styles the images — into an application that is web accessible, algorithm agnostic, script unaware, and with a UI fully tailored to the end user’s requests.
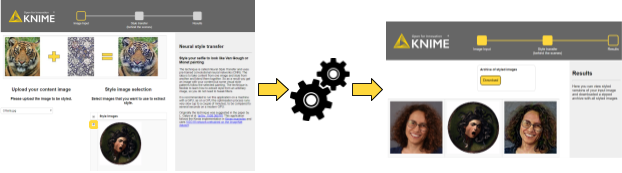
From a web browser on your computer, tablet or smartphone, the application starts in the most classical way by uploading the image file. Let’s upload the portrait images of both authors, Misha and Rosaria.
After that, we are asked to select the painting style. Rosaria is a big fan of Caravaggio’s paintings, so she selected “Medusa.” Misha prefers Picasso’s cubism and picked his “Portrait of Dora Maar.”
At this point, the network starts crunching the numbers: 35 minutes on my own laptop3 using just my CPU; 35 seconds on a more powerful machine4 with GPU acceleration.
Now, we land on the application’s final web page. Let’s see the restyling that the network has come up with (Figs. 3-4).
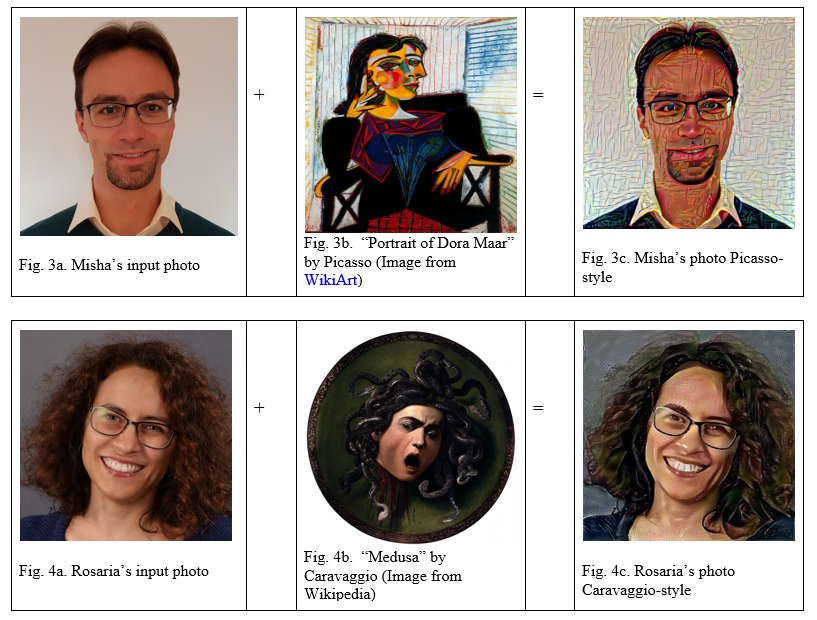
The neuro-styled images are shown below in Figures 3 and 4. Notice that the input images are not deeply altered. They just acquire some of the colors and patterns from the art masterpieces, like Rosaria’s Medusa-style hair or the background wall in Misha’s photo. Just a disclaimer: As interesting as these pictures are, they might not be usable for your passport yet!
Three easy steps to get from the original image to the same image, styled by a master! No scripting and no tweaking of the underlying algorithm required. All you need to know is where the image file is located and the art style to apply. If you change your mind, you can always go back and change the painting style or the input image.
Implementing the image neuro-styling app
To put this application together, we needed just a few features from our tool.
- An integration with Python
- Image processing functionalities
- A web deployment option
Python integration
The task here is to integrate the VGG19 neural network developed by the Visual Geometry Group at the University of Oxford and available in a Python script downloadable from the Keras Documentation pageii to style arbitrary portrait pictures. So, we need a Python integration.
The integration with Python is available in the core installation5 of the open source Analytics Platform. You just need to install the Analytics Platform with its core extensions and Python with its Keras package. After both have been installed, you need to point the Analytics Platform to the Python installation via File -> Preferences -> Python page. If you are in doubt about what to do next, follow the instructions in the Python Integration Installation Guide and in the Deep Learning Integration Installation Guide.
After installation, you should see a Python category in the Node Repository panel, covering free scripting, model training, model predictor, plots, and more Python functions (Fig. 5). All Python nodes include a syntax highlighted script editor, two buttons for script testing and debugging, a workspace monitor, and a console to display possible errors.
Notice that a similar integration is available for R, Java and JavaScript. This whole integration landscape enables you to collaborate and share colleagues’ code and scripts, too.
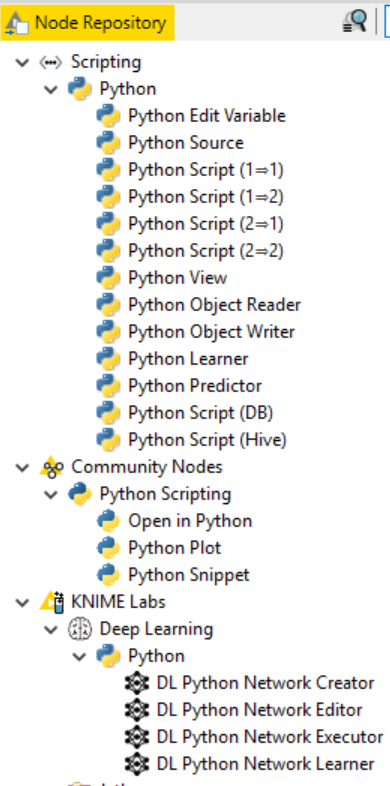
Image Processing Extension
The image processing functionalities are available in the Image Processing community extension. After installation, you’ll see the image processing functionalities in the Node Repository, in the category Community Nodes/Image Processing. You can use them to manipulate images, extract features, label, filter noise, manipulate dimensions, and transform the image itself.
Web deployment option
The web component is provided by the WebPortal. All the widget nodes, when encapsulated into components, display their graphical view as an element of a web page. The two web pages shown in Fig. 2 have been built by combining a number of widget nodes into a single component.
The final workflow
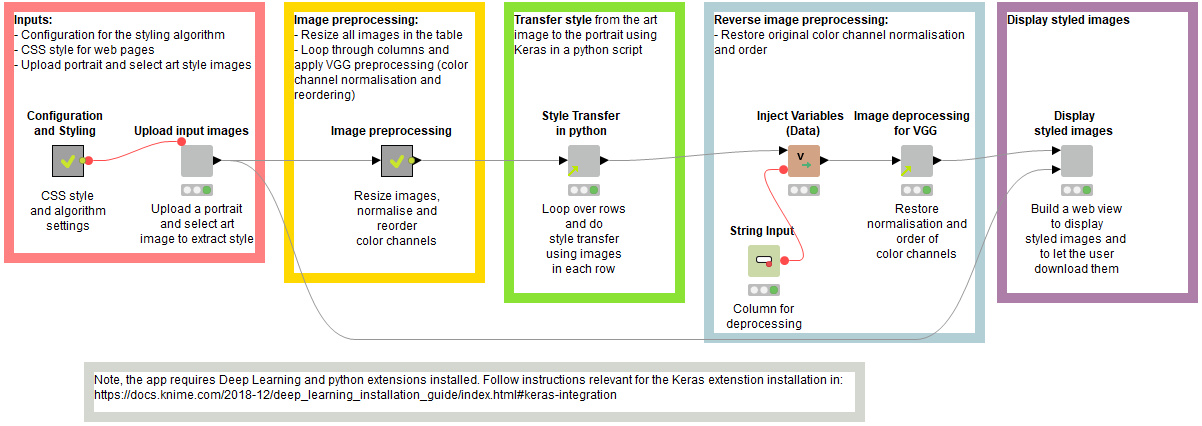
The final workflow implementing the web application described above is shown in Fig. 6 and is available for download from the Hub.
The workflow in Fig. 6 starts by reading the input portrait image and the art-style images (component named “Upload input images”). The input image is then resized, normalized and its color channels are reordered. At this point, the Python script — performing the neuro-styling as described in the Appendix and encapsulated in the component called “Style transfer in Python” — takes over and retrains the neural network with the new input image and the selected art-style. The produced image is then denormalized, and the color channels are brought back to the original order. The last node, called “Display styled images,” displays the resulting image on the final web page.
Notice that it was not necessary to alter the Python code. A copy and paste of the original code into the Python node editor with just a few adjustments — for example, to parameterize the training settings — was sufficient.
On an even higher level, the end users, when running the application from their web browser, will not see anything of the underlying Python script, neural network architecture, or even the training parameters. It is the perfect disguise to hide the obscure script and the algorithm’s complexity from the end user.
Python code as reusable component
Now, the Python script seems to work reasonably well, and most of us who do not know Python might like to use it, too. The Python code in the “Style Transfer in Python” component worked well for us, but it is hard to recycle for others.
To improve the reusability of the Python script by other users, we transformed this component into a template and stored it in a central location. Now, new users can just drag and drop the template to generate a linked component inside their workflow.
Similar templates have been created for the image processing components. You can recognize the linked instances of such templates by the green arrow in the lower left corner of the gray node.
Deploying the image neuro-styling app in one click
The last step is deployment. In other words, how to turn our freshly developed workflow into a productive application accessible from a web browser and work on the current data.
All we need to do is drag and drop the neuro-styling workflow from the LOCAL workspace in the Analytics Platform to a workspace. The workflow can then be called from any web browser via the WebPortal of the Server. In addition, if any widget nodes have been used, the workflow execution on the WebPortal will result in a sequence of interactive web pages and dashboards.
Notice that this one-click deployment procedure applies to the deployment of any Python script, making it much easier to use in a productive environment.
Summary
With the excuse of playing around with neuro-styled portraits of Rosaria and Misha and their colleagues, we have shown how easy it is to import, integrate and deploy an obscure Python script — without needing to know Python.
We have also shown how to configure the application to let it run from any web browser, where we ask the end user for just the minimum required information and hide all other unnecessary details.
In order to make the Python script and other parts of the application reusable by others, we have packaged some pieces as templates and inserted them as linked components in many other different applications.
Appendix: neuro-style transfer
Neural style transfer is a technique that uses neural networks to extract a painting style from one image and apply it to another. It was first suggested in “A Neural Algorithm of Artistic Style i.”
The main idea is to make use of the fact that convolutional neural networks (CNNs)6 capture different levels of complexity in different layers. First convolutional layers can work as low-level edge detectors, while last convolutional layers can capture objects. As we are interested only in a general object detector, we do not need to train a dedicated network for the purpose of style transfer. Instead, we can use any existing pre-trained multilayer CNN. In this article, we have used the VGG19 neural network developed by the Visual Geometry Group at the University of Oxford and available in a Python script that is downloadable from the Keras Documentation pageii.
The styling procedure is defined as an optimization of a custom function. The function has several parts:
- One term ensures that the resulting image resembles the high-level objects in the original image. This is achieved by the difference between the input and output images, where the output image is the network response in one of the last convolutional layers.
- The second term aims at capturing the style from the art painting. First of all, the style is represented as a correlation across channels within a layer. Next, the difference in style representation is calculated across the CNN layers, from first to last layer.
- The last term enforces smoothness of the resulting styled image and was advocated in “Understanding Deep Image Representations by Inverting Themv.”
Finally, the optimization of this custom function is performed iteratively using automated differentiation functionalities provided by Keras. The custom function needs to be optimized for every new input image. That means that for every new portrait, we need to run the optimization procedure on the pre-trained CNN again.
As first published in Dataversity.
References
1. L. Gatys et al., A Neural Algorithm of Artistic Style, [arXiv:1508.06576]
2. Keras Neural Transfer Style Example, Keras Documentation Page
3. Laptop specs: CPU Intel i7-8550U, 4 cores, with multi-threading; 16 GB RAM
4. GPU machine specs: CPU Intel i7-6700, 4 cores, with multi-threading; 32 GB RAM; NVIDIA GeForce GTX 1080 with 8GB VRAM
5. Aravindh Mahendran, Andrea Vedaldi, Understanding Deep Image Representations by Inverting Them, [arXiv:1412.0035]
6. Convolutional Neural Networks video series on YouTube, Deeplearning.ao, 2017