
How hard must it have been to perform even the simplest daily task centuries ago, when we had no technology to make our lives easier? Like for example creating a KNIME workflow in the Stone Age when all you had was rocks and determination, and what about during the Italian Renaissance, or in Ancient Egypt?
We asked the open-source KNIME Analytics Platform to show us. In this article, we want to explain how you can generate images like these yourself, from text, with KNIME’s Image Generator.

What is the OpenAI Image Generator in KNIME?
KNIME’s OpenAI Image Generator node enables you to connect directly to OpenAI’s GPT Image 1 or DALL·E 3 models. While both are capable of generating high-quality images from prompts, GPT Image 1 goes one step further by supporting image editing, offering more flexibility and customization.
How is the Image Generator node used?
The Image Generator node receives two inputs:
- a prompt
- a PNG image to edit.
This node works in two modes; you can use it to generate and edit images.
- Image generation. To generate an image, you provide a prompt and select the AI model you want to use.
- Image editing. To edit an image, provide an input table that contains image-type columns with the images to edit. You can include multiple image-type columns in the input table and use one column for the image to edit and one column for the background.
FYI: The node currently supports only PNG images for both input and output.
We experimented using a screenshot of a classic KNIME workflow and asked the model to incorporate it into a stylized historical scene. The results were surprisingly detailed and imaginative. A vivid, AI-generated scene where your workflow is reimagined in a completely different historical era — whether it’s being chiseled into stone in the Stone Age, painted in a Renaissance studio, or inscribed on a temple wall in Ancient Egypt.
Please note that this application uses the OpenAI API to generate images. To use it, you must configure your own OpenAI API Key. High-quality image generation is significantly more expensive than text generation.
- Use the low quality configuration setting, while exploring or testing
- Switch to the high quality configuration setting, only for the final image
- See the OpenAI documentation for details on cost calculation.
Now see how we built an image generator data app with KNIME.
An image generator: The “Time Travel Workflow Illustrator” data app
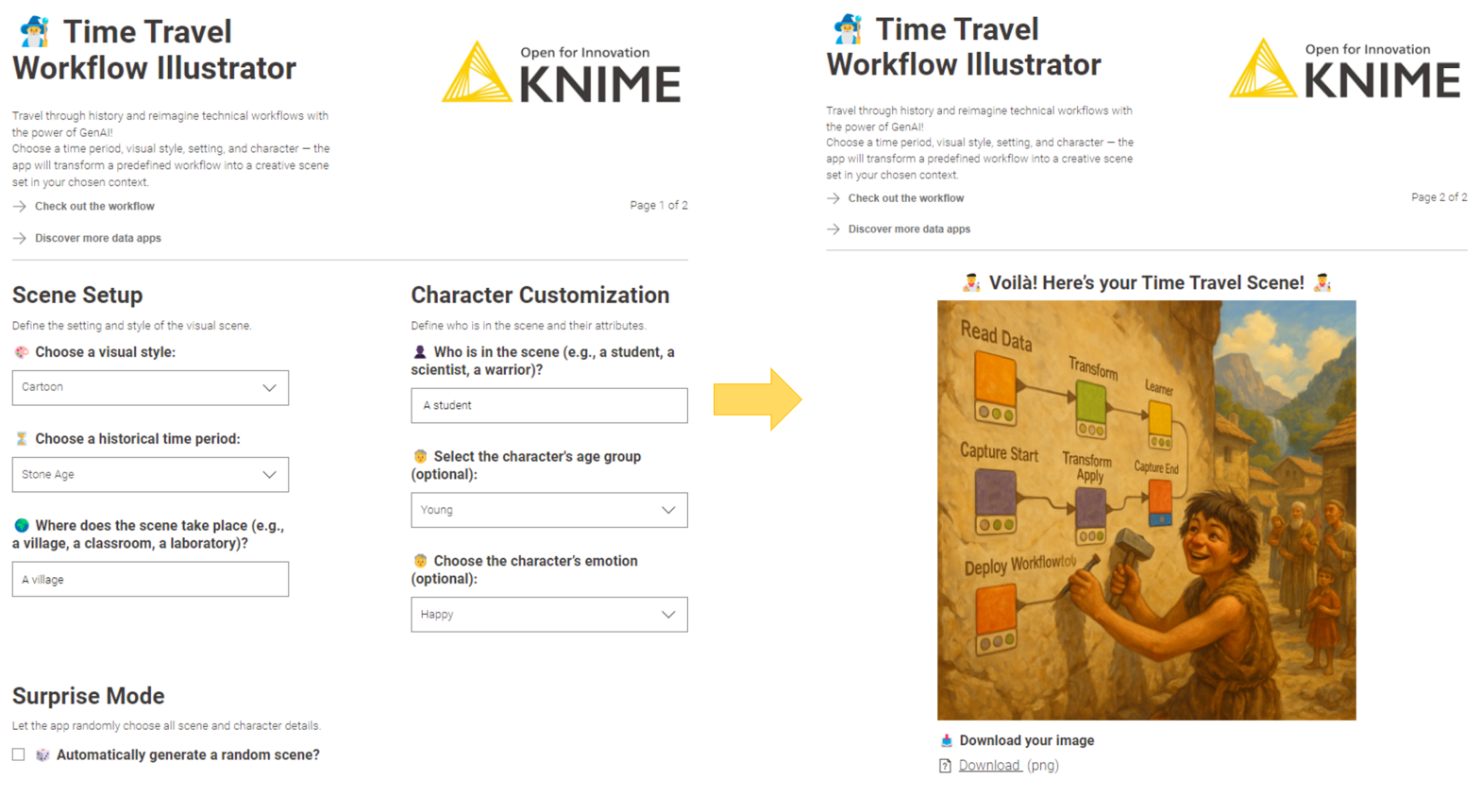
This “Time Travel Workflow Illustrator” designed to reimagine a workflow in a completely different era. With the data app, the end user can:
- Define the scene settings via an input form
- Get a preview of the AI-generated image
The input form collects the following information to generate a custom visual scene:
Section | Description |
| Character | Describe the main character in the scene (e.g., a student, a scientist, a warrior) |
| Age | Baby, Young, Adult, or Elderly |
| Emotion | Happy, Sad, Angry, Scared, Surprised, Calm, Excited, or Confused |
| Location | Describe the setting of the scene (e.g., a village, a classroom, a laboratory) |
| Surprise Mode | Optional — randomizes all the above to generate unexpected combinations |
| Time Period | Ancient Egypt, Classical Greece, Declaration of American Independence, Future, Industrial Revolution, Middle Ages, Modern Day, Renaissance, or Stone Age |
| Visual Style | Cartoon, Comic, Oil Painting, Pixel Art, Sketch, Watercolor Painting, or 3D Render |
After configuring the scene, the user clicks “Next” in the low right corner to generate the illustration. The final screen shows the AI-generated image based on the workflow screenshot and the input settings – along with a button to download it as a .png file.
How to build the Time Travel Workflow Illustrator
Behind the scenes, the app is powered by a KNIME workflow that orchestrates everything – from user input to image generation. The workflow is structured into clean, visual blocks, making it easy to customize it.

Build a repeatable workflow using components
To provide a more structured and repeatable experience, we embedded the OpenAI Image Generator node within a KNIME workflow using three distinct components: two for UI and one for AI.
Each component handles a key stage of the process:
Component #1. Scene Setup Form
This component presents a simple web-based input form where users define the time period, visual style, character, age group, emotion, and location of the scene. Alternatively, activating “Surprise Mode” randomizes all parameters for a fun twist.
The web page is generated by the composite view of the component “Input” and the fields of the form are generated via Widget nodes inside the component.
Component #2. Prompt Generation
The component “Prompt to AI” receives the user settings and the workflow screenshot (a PNG file), encapsulates them in a text prompt, and sends both the prompt and the screenshot to the OpenAI Image Generator node to produce the final visuals.
There are essentially two ways to create the prompt from the user settings:
- Add those settings to defined fields into a fixed default prompt text
- Prompt an LLM to generate the most appropriate prompt based on those settings.
We went for this second option. Within the “Prompt to AI” component, the text prompt for the OpenAI Image Generator node is produced by an LLM Prompter node.
Note. To connect to the OpenAI API, we used the Credential Configuration node. This works locally, but the API key resets each time the workflow reopens, unless “Store password in configuration (weakly encrypted)” is enabled.
For team environments, you can store keys more securely in the Secret Store of the KNIME Hub. This stores the credentials in a central place, without the need of modifying the workflow when the API key changes (see blog post, Build an AI Party Card Generator, for more details).
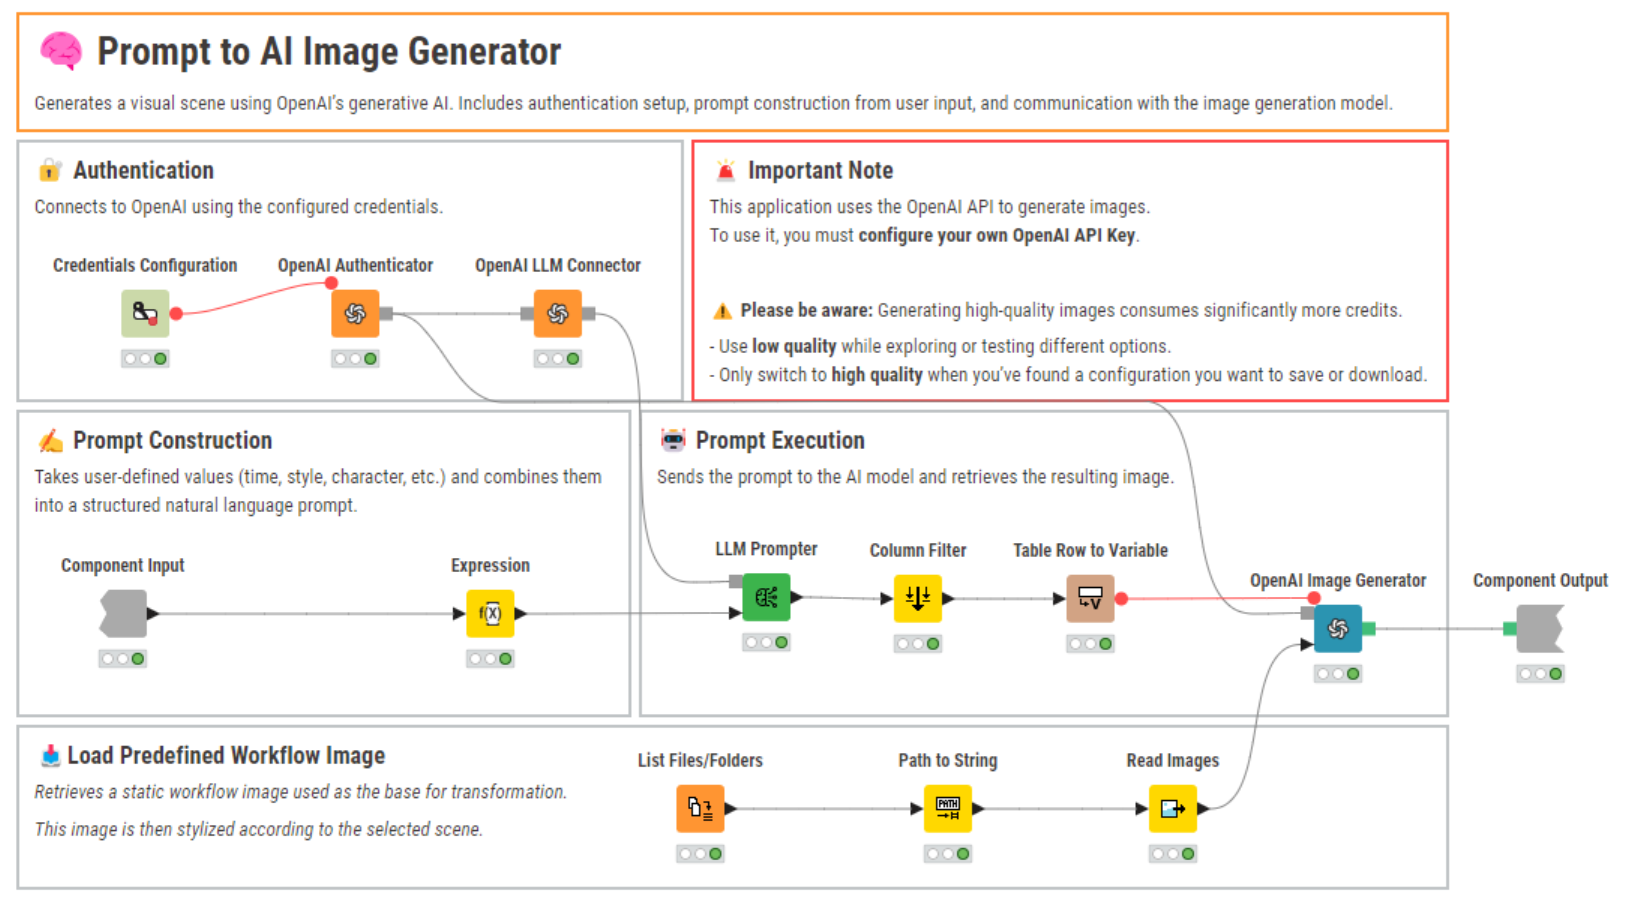
Component #3. AI-Generated Scene
The last component named “Output” displays the AI-generated image based on the prompt and workflow screenshot. It includes a download button for exporting the result as a .png file. The image was displayed using a Table View node and the Download button was created using a “File Download Widget” node.
The full workflow Time Travel Workflow Illustrator is available for download and customization on the KNIME Community Hub.
See KNIME workflows through the ages with the Image Generator node
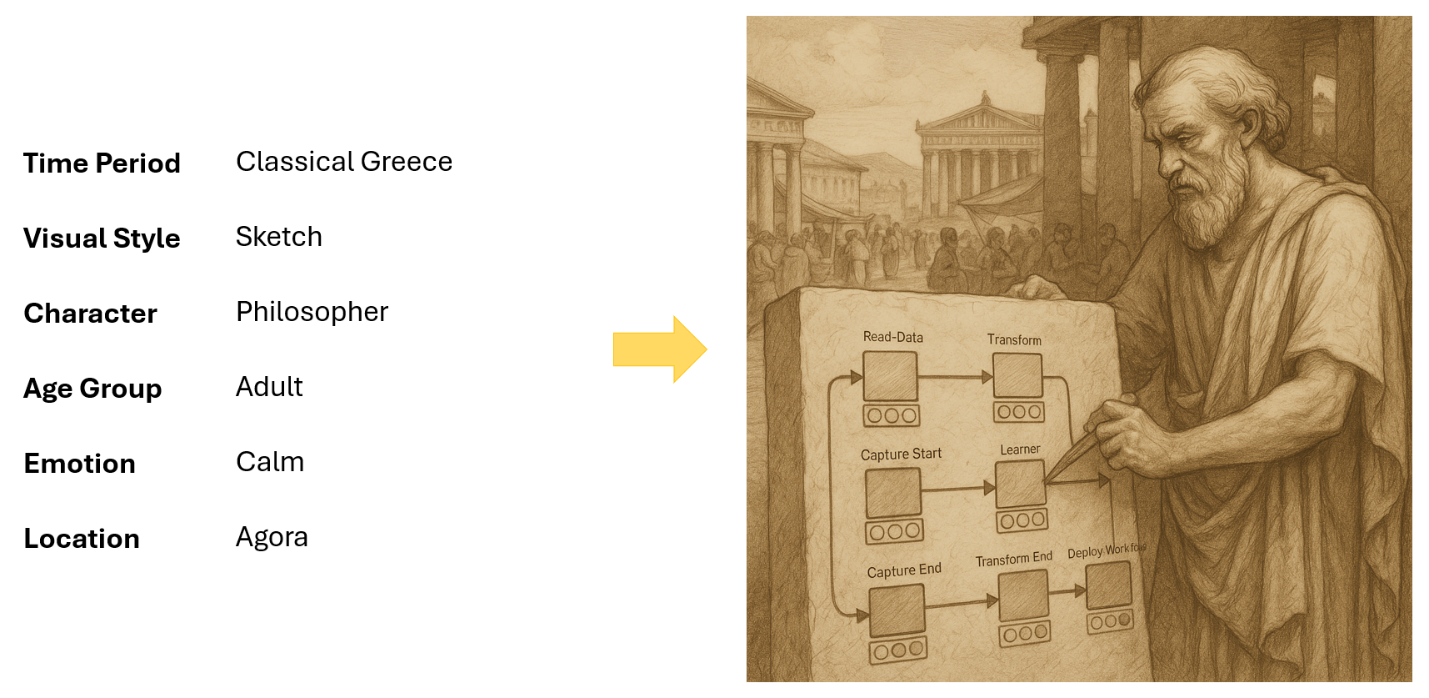
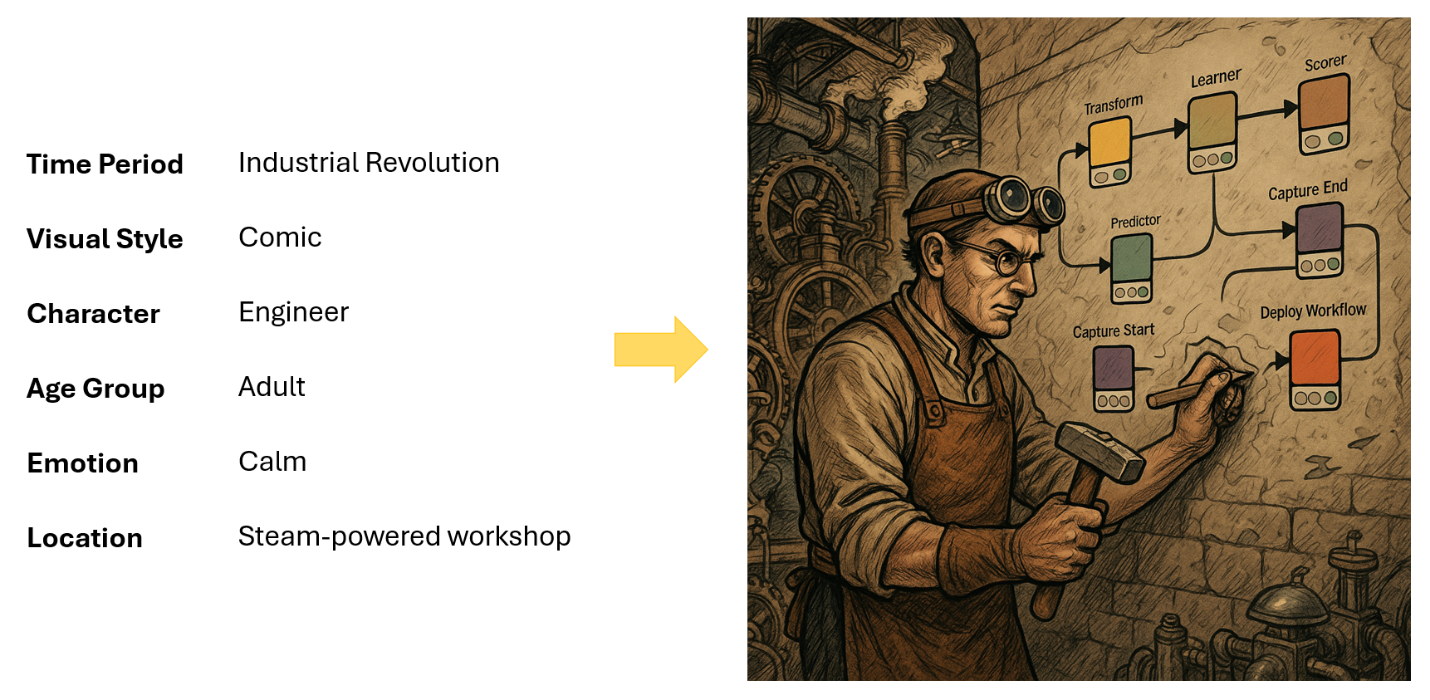
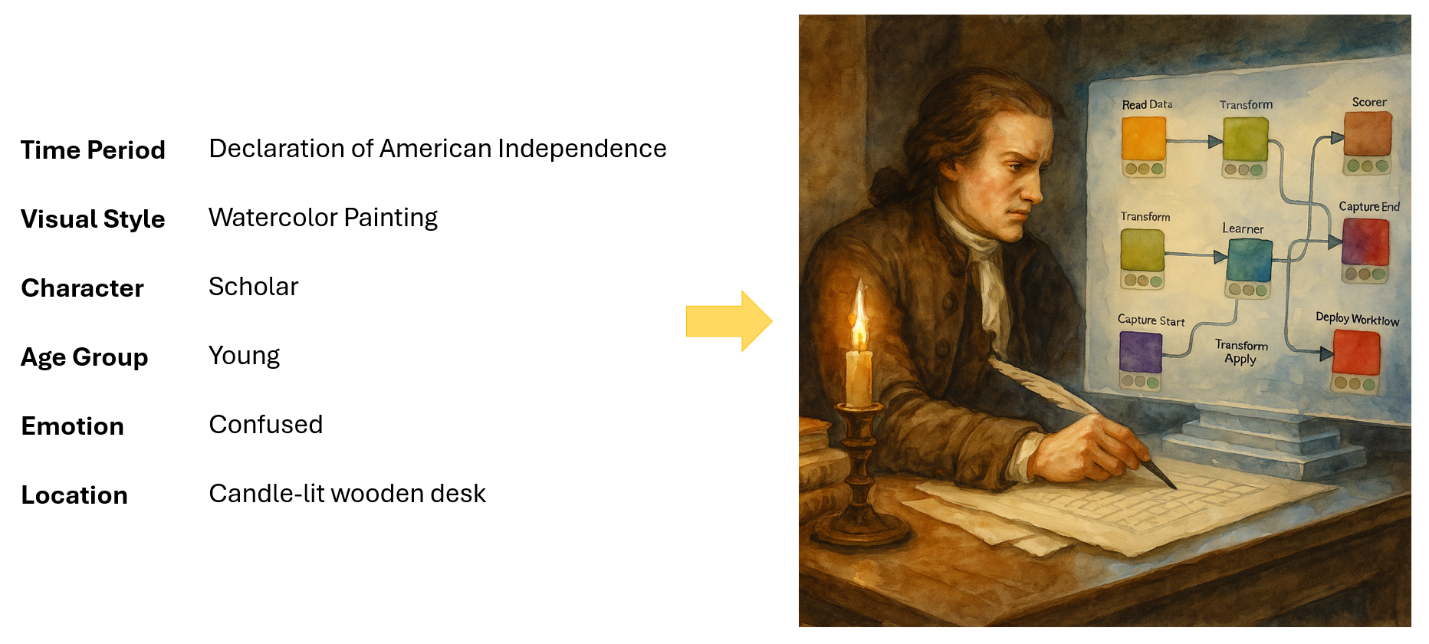
All the images presented in this article were generated using the same KNIME workflow screenshot and a consistent structure for the first prompt. The only variation is the parameters selected by the user – such as time period, visual style, emotion, and character – and entered through the input form.
This setup shows how the OpenAI Image Generator node can produce richly diverse illustrations with just a few changes in user-defined inputs.
This is the fixed prompt built using the Expression node and sent to the LLM Prompter node to generate another prompt for image generation.
The prompt used to set the scene:
You are an imaginative scene descriptor. Prepare a description of a scene for an image generator.
The scene revolves around the image of a KNIME workflow, a technical structure with visible node labels. Keep its layout recognizable while transforming the scene.
Based on the fields below, generate a vivid scene that reimagines this workflow as if it belongs to a different time period and artistic style.
Some fields may be empty — be creative when that happens.
Here are additional instructions:
- Visual style: [style]
- Historical time period: [time_period]
- Character: [character]
- Age group: [age]
- Emotion: [emotion]
- Location: [location]
The character should interact with the workflow in a way that fits the time period — for example, chiseling it into stone, painting it on parchment, or assembling it with gears. Be creative and choose an action that feels natural in the scene.
Don't include dialogue, text, or panels — just describe the scene vividly and creatively.
The result of the LLM Prompter is a more articulated prompt, with many more details about the scene to recreate in the image.
Using the same workflow screenshot and adapting the prompt to the different user-based parameters, we obtained very different images. Some we showed in figure 1 and some more are shown below.
Generating scenes like this is really that easy with the OpenAI Image Generator node in KNIME. And no, KNIME isn’t that old. But judging by these results, building workflows in the Stone Age or during the Renaissance might have required some extra skills – like stone carving or tapestry embroidery.
Who said workflows can’t time travel?
From cave walls to futuristic labs, the Time Travel Workflow Illustrator shows that even a technical process like building a KNIME workflow can become a creative visual story. With just a simple prompt, a workflow screenshot, and a few user-defined parameters, the OpenAI Image Generator brings workflows to life in ways we didn’t think possible – and definitely never imagined embroidered onto a Renaissance tapestry or carved into stone.
Want to know how your own workflow would look in Ancient Egypt? Or on a scroll in Classical Greece? Give it a try – time travel is just a few clicks away.