In this article, Steven Enoch, Reader in Computational Toxicology at Liverpool John Moores University, and Alice Krebs, who is a data scientist on the Life Sciences team at KNIME, and has a PhD in Toxicology, explain how they came to collaborate to revise some SMARTS patterns and develop a KNIME component for skin sensitization.
Steve Enoch is a Reader in Computational Toxicology at Liverpool John Moores University, UK, with 20 years of experience in the development of computational tools for the non-animal safety assessment of cosmetics, pesticides and pharmaceuticals. His expertise lies in the development of profiling schemes for grouping and read-across, and the development of mechanism-based quantitative structure-activity models, especially for toxicological endpoints in which covalent reaction chemistry plays a key role. Steve has published over 60 peer-reviewed journal articles and been part of a number of key EU projects including the development of the OECD QSAR Toolbox and the COSMOS project.
What is Skin Sensitization and How Can it be Assessed?
Most of us have encountered an allergic reaction to certain cosmetics, detergents, or jewelry throughout their lives. The symptoms of this contact dermatitis can include rash, swelling, redness, blisters, dryness and itch. While it’s not life threatening, it’s still uncomfortable and can impair life quality significantly when experienced for a longer time.
Allergic contact dermatitis is the most common manifestation of immunotoxicity in humans, and many hundreds of chemicals have been implicated as so called skin sensitizers. Therefore it’s important to identify and characterize chemicals that have the potential to cause skin sensitization. Assessment of such compounds is a regulatory endpoint and has traditionally relied on animal testing, such as the local lymph node assay in mice. In the murine local lymph node assay (LLNA), the test substance is applied to the ears of mice. The animals are later euthanized, and their lymph nodes are removed and analyzed. If the substance was a skin sensitizer, the lymphocytes in the lymph nodes draining the site of application will have proliferated. The ratio of lymphocyte proliferation between treated and untreated control animals defines the sensitizing potential of the chemical.
Besides animal testing being expensive and time consuming, there is also increasing public pressure to reduce and ultimately replace animal testing due to ethical reasons. Computational methods like (quantitative) structure–activity relationships ((Q)SAR) and read-across methods are increasingly used to predict adverse effects and toxicity. The majority of skin sensitizing chemicals elicit their effect via covalent bond formation with skin proteins. These nucleophilic–electrophilic reactions are well understood, and can be predicted in silico. Several widely used tools in toxicology apply these approaches. ToxTree, [1] is one such example. The ToxTree approach references a paper from 2008 by Enoch et al [2] that identified a series of SMARTS patterns, capable of defining the reactivity of chemicals. This enabled them to make skin sensitizer predictions. While some functionalities of tools like ToxTree are not straightforward to implement in KNIME, structural alerts based on SMARTS are.
Let’s now look at how we came to collaborate and develop a KNIME component based on updated SMARTS, which users can now use to flag their input molecules for potential skin sensitization capabilities.
What did Enoch et al do in the Original Paper?
The SMARTS patterns defined by Enoch et al. could be used to screen SMILES strings and classify them into the five different mechanisms of action involved in skin sensitization.
To define them, they used a primary training data set of 208 chemicals that had been tested in the local lymph node assay (LLNA) and, based on these results, were classified as non, weak, moderate and strong skin sensitizer. Additionally, the chemicals also had one or several potential reaction mechanisms assigned to them manually by experts [3]. The initial set of SMARTS they came up with correctly identified the mechanisms of action of 203 of the 208 chemicals from the training set.
To validate these results, they evaluated the SMARTS on a validation data set of 44 chemicals. Like the training data set, these chemicals had been tested in the LLNA assay and had potential mechanisms of actions assigned to them [4]. The mechanisms assigned by the SMARTS rules were in agreement with the manual classification for 40 out of the 44 chemicals. Four chemicals however were not recognized. A closer look revealed that they exhibited reaction mechanisms that were not previously identified from the training data set. However, all four of these chemicals are (strong) skin sensitisers, and it’s important that they are identified by the defined SMARTS. Therefore they added three additional SMARTS patterns to the ones defined based on the training set, so that these previously mis-classified chemicals in the validation set would be captured as well. After all, the paper resulted in 67 individual SMARTS strings to flag potential skin sensitizing chemicals.
What Work Has Been Done in our Collaboration?
We have implemented flagging based on SMARTS in earlier components, so it was easy to build another component based on this principle. The supplementary material of the Enoch et al paper [2] provided all the data sets and SMARTS as csv format, so this seemed straightforward to implement.
However, we did face some challenges. First of all the test and validation data molecules were only provided with CAS numbers and names as identifiers, but we would need them in SMILES to run a substructure search on them. In a first step, we tried to retrieve the corresponding SMILES using the RDKit from IUPAC node and the given names. The molecules that couldn’t be converted based on their name we then tried to convert based on their CAS number via a GET request to Cactus. After these two steps, we managed to convert only 193 of the 208 molecules from the test data set, but all 44 from the validation data set.
Getting the SMARTS into a ready-to-use format wasn’t too straightforward either. It took quite some manual grooming to have them in a format compatible with the RDKit toolkit, but nevertheless there were two SMARTS patterns indicated in the paper that we couldn’t parse (“OxophilicSN2'' and “SulphurSN2”). Simply excluding them led to unacceptably bad results, and we were far from reproducing the results that were published in the paper. This is why we decided to reach out to the authors and ask them about the two SMARTS patterns we couldn’t parse, as well as the SMILES of the training and validation sets. Lucky for us they know KNIME and had worked with us before. Furthermore, they were just thinking about getting some of their work and functionality into KNIME too, so we decided to team up for this component (and more components predicting toxicological alerts are in the pipeline, stay tuned!).
Revising the SMARTS to Define Unique Areas of Chemical Space
When KNIME contacted us at Liverpool John Moores University asking about the 2008 paper we saw it as an opportunity to update a very old set of rules (from our point of view!) with much of the learning we have gathered in the intervening years of structural alert development. The key aspect to our approach for the development of structural alerts for toxicological endpoints in which covalent bond formation is the Molecular Initiating Event (MIE) is now to ensure that each alert defines a unique area of chemical space based on a common reaction site (for a given mechanism). In practice, this means that chemicals can be grouped into categories based on the presence of a common structural alert enabling structure-activity models to be created.
We have shown that such ‘mechanism-based’ models are capable of predicting glutathione reactivity, aquatic toxicity, and skin sensitization potency [5-8]. As an example of how the common reactive site approach can alter how the SMARTS patterns are encoded, consider the Michael addition domain. In the original 2008 publication, the Michael acceptor domain was encoded as a single category; closer inspection of the alerts that defined the category showed that polarized alkenes and polarized alkynes were grouped together. From a reactive site point of view, these two types of Michael acceptor should be separated into distinct categories as the chemical reaction leading to protein binding occurs at an sp2 carbon for the polarized alkenes and an sp carbon in the polarized alkynes (Figure 1).

As mentioned, we have shown that such differences are important when developing mechanism-based models capable of computationally predicting rates of protein-binding and skin sensitization potency in the LLNA. In our updated work the Michael addition domain is split into two categories.
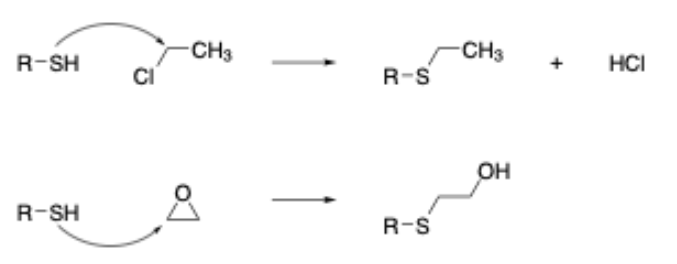
In addition to this, our research has also shown that chemical reactions in which ring strain release plays a significant role in the overall reactivity also need to be modeled separately when building mechanism-based models (this is due to the entropic factor associated with the opening of strained ring systems that is difficult to model computationally). As an example, this leads to the separation of epoxides (and aziridines) from other chemicals acting via an SN2 mechanism (Figure 2). Given the importance of developing such models, we felt that all of the skin sensitization alerts should be redefined on these principles - the key thing being to ensure that the classification statistics remained in-line with the original publication.
Newly Developed Component Outputs the Highlighted Potential Reactive Sites
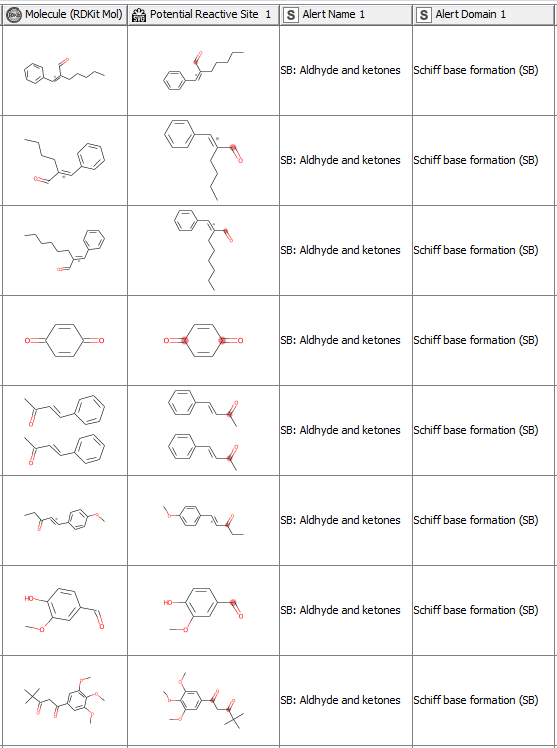
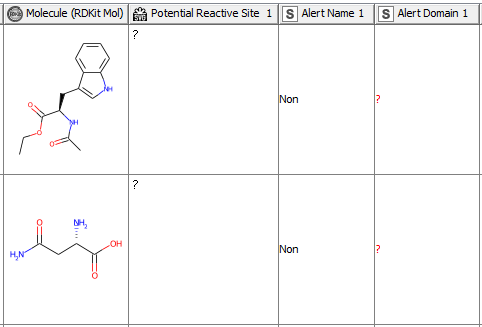
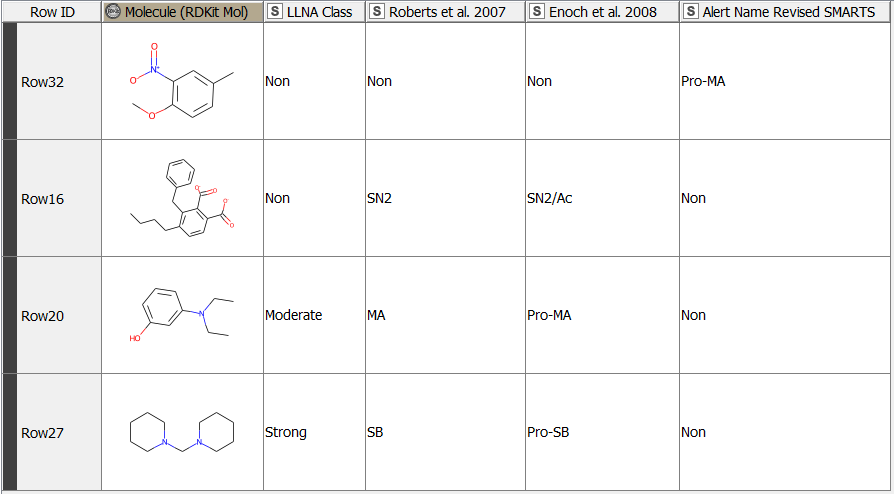
After having revised the SMARTS from 2008 so that every alert defines a unique area of chemical space based on a common reaction site, we wanted to make this functionality available for the community. We developed a component that accepts molecules in SMILES, Mol, SDF or RDKit molecule format as an input. Substructure filtering and highlighting of reaction sites is done using RDKit nodes. Molecules that can’t be converted to a RDKit molecule are returned at the component’s second output port. The component’s upper output port returns the input table appended with at least four additional columns. First, the molecule as a RDKit molecule column, followed by an SVG column showing the highlighted potential reactive site, the alert name column and the alert domain column. In case the input molecule contains more than one potential reactive site, the latter three columns are appended for each of them (Figure 3). Molecules not matching any of the SMARTS patterns are returned in the lower part of the table with Alert Name 1 “Non” (Figure 4). The new SMARTS are stored and can be found within the component.
Comparison to the Previously Published Data: How Do the Redefined SMARTS Patterns Now Perform?
After redefining the SMARTS patterns, it is of course of interest how they perform in comparison to the SMARTS defined in the paper from 2008, which are also implemented in widely used tools. We’ll have a look at that in the following section.
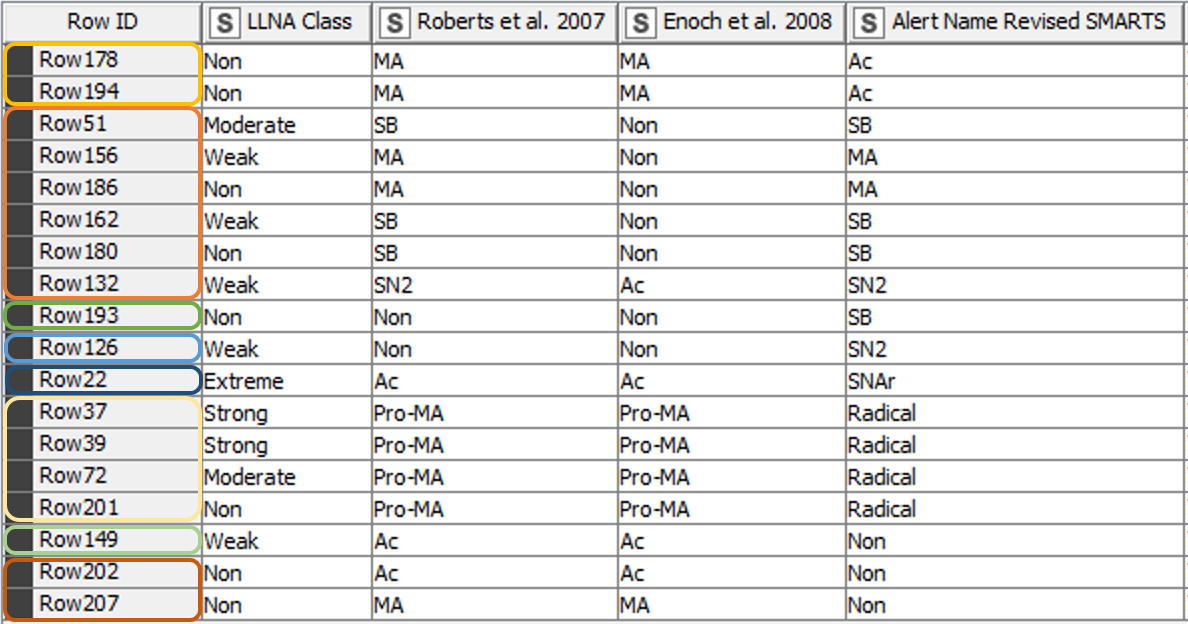
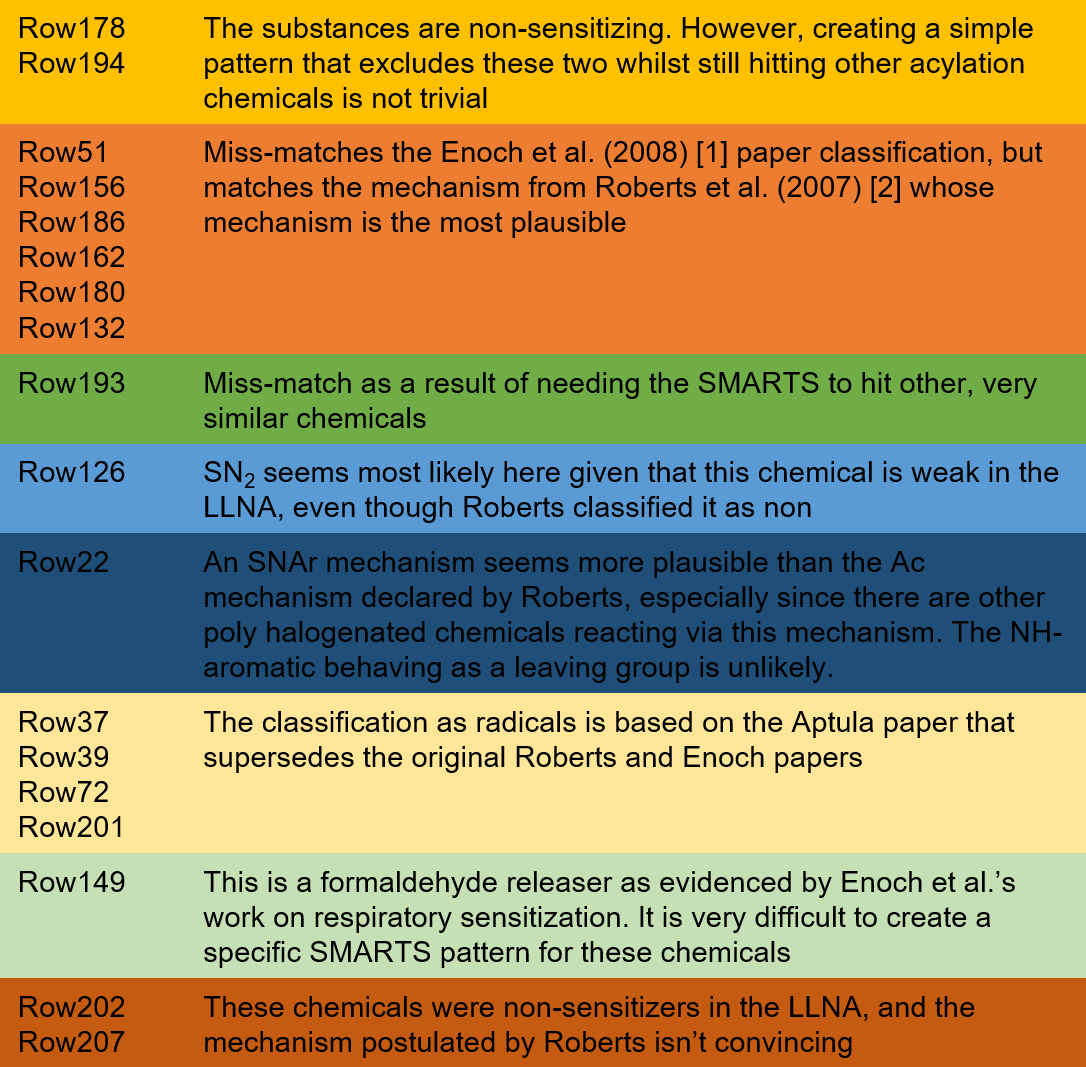
From the 208 chemicals included in the training data set [3], 190 chemicals matched the classification of the paper from 2008 [2] using the revised SMARTS. The classification of 18 chemicals however differed from the previous results (Figure 5). Table 1 gives further details and explanations.
Explore Tox Alert Skin Sensitization Component
We have created a KNIME-verified component that flags input molecules upon their potential skin sensitization capability. It is based on 51 revised SMARTS that are documented within the component and accessible to the community. While flagging compounds with toxicological alerts based on their structure is a valuable part of QSAR and also contributing to AOPs, their outcome should be taken reasonably. If a chemical fails to trigger any of the electrophilic rules coded in the SMARTS patterns, it does not necessarily mean that it will be a non-sensitiser. The resulting classification should not be used in isolation and is ideally combined with other weighted evidence and information.