
You’ve probably heard the acronym “BYOB” right? Well instead of bringing your own bottle, we want to BYOC or Build Your Own Component in KNIME with Python.
In large organizations, data teams use various sets of tools or coding platforms to perform their tasks. The productivity of the data team is higher if everyone can collaborate and work while still using their preferred tool. Imagine a team where some data scientists perform their tasks with KNIME Analytics Platform while others are using Python.
Python users tend to code data science solutions by applying existing libraries or creating their own. When a data science project grows in complexity it is often necessary to create custom libraries to transform and analyze data in a way that can also be exported in reusable Python objects. It would be useful if these Python scripts, tailored to the needs of the organization, could also be shared easily with the KNIME users on the team.
Share Python Scripts with your Team
Wouldn’t it be great if the Python user scripts could be made available to all the KNIME users in the organization in a reliable and user-friendly way?
This is where the KNIME Python Integration and KNIME components come into play. There is no need for KNIME users to try and recreate the Python script, node by node. Instead, Python users can simply wrap the Python scripts and the required dependencies into reusable and reliable components. These components can be shared across the organization via KNIME Hub or KNIME Server. KNIME users can simply drag and drop these components into their workflows to perform their tasks just like all standard nodes.
Isn't this encapsulation of Python script in components cool? A KNIME user can exploit the benefits of any Python library without even writing a single line of code.
How To Build a Python-based Component for Data Transformation
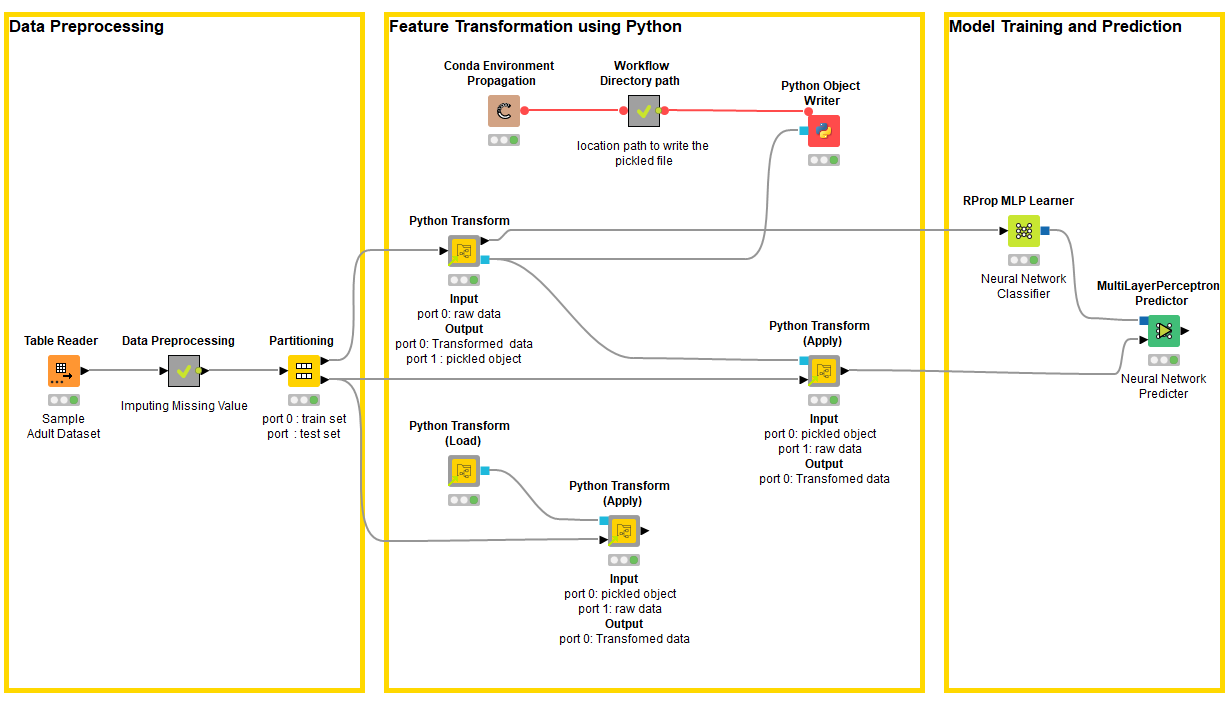
In this article, I am going to provide you a step-by-step guide on how to build a KNIME component for data transformation. The component uses Python libraries that are both well established (e.g. numpy) and also custom-tailored by me (basically a Python file to be imported). The Component is called Python Transform and can be used in the example workflow shown in Figure 1. The workflow is available on KNIME Hub and trains a neural network model that requires the data to be normalized. This normalization is carried out by the Python Transform components which use Python libraries.
Please note, that you can perform data normalization with the KNIME Normalizer node, but I intend to re-implement it via KNIME-Python Integration and create a component out of it for demonstration purposes: Use this component to learn how to embed your Python scripts in a component and make them available to a larger audience by sharing it to KNIME Hub.
Before we begin:
Components are KNIME workflows of many nodes which on the outside look and work just like a single node: bundle functionality, have their own configuration dialog and their own interactive views
The Conda Environment Propagation (CEP) node ensures that your code’s Python package dependencies are always available to support your KNIME workflows wherever they go. This is indeed the solution to the problem “It fails in your Python Environment but works in mine". Read more
Make sure you have installed Anaconda to your system, It is used to manage Python environments. Anaconda can be downloaded here (choose Anaconda with Python 3) and also the KNIME Python Integration
Step 1: Import Python Code into the Python Script node
- Drag the Python Script node to the Workflow Editor and open its configuration panel.
- Import all the packages required to transform the data.
Optional: Import the custom class, in case you are using it in your code (Place the class definition file in the workflow directory so that the Import is successful)

In my case, I have created a custom Python class “custom_class_data_processing” that performs the data normalization using the sklearn preprocessing Python library. Now I import the data transformation from this class as shown in Figure 2.
Pro tip: Most users prefer to create a separate Conda Environment for each of their task/project, this helps in managing the projects independently of each other. You can create a Conda Environment directly through KNIME and install the required python libraries. (Read more)
Step 2: Provide Selection Options for Using Component
You can add nodes to the component that enable the user to configure it how they need it.
-
Select and drag the configuration nodes that will allow the users to select appropriate options
-
Connect these configuration nodes to the Python script node
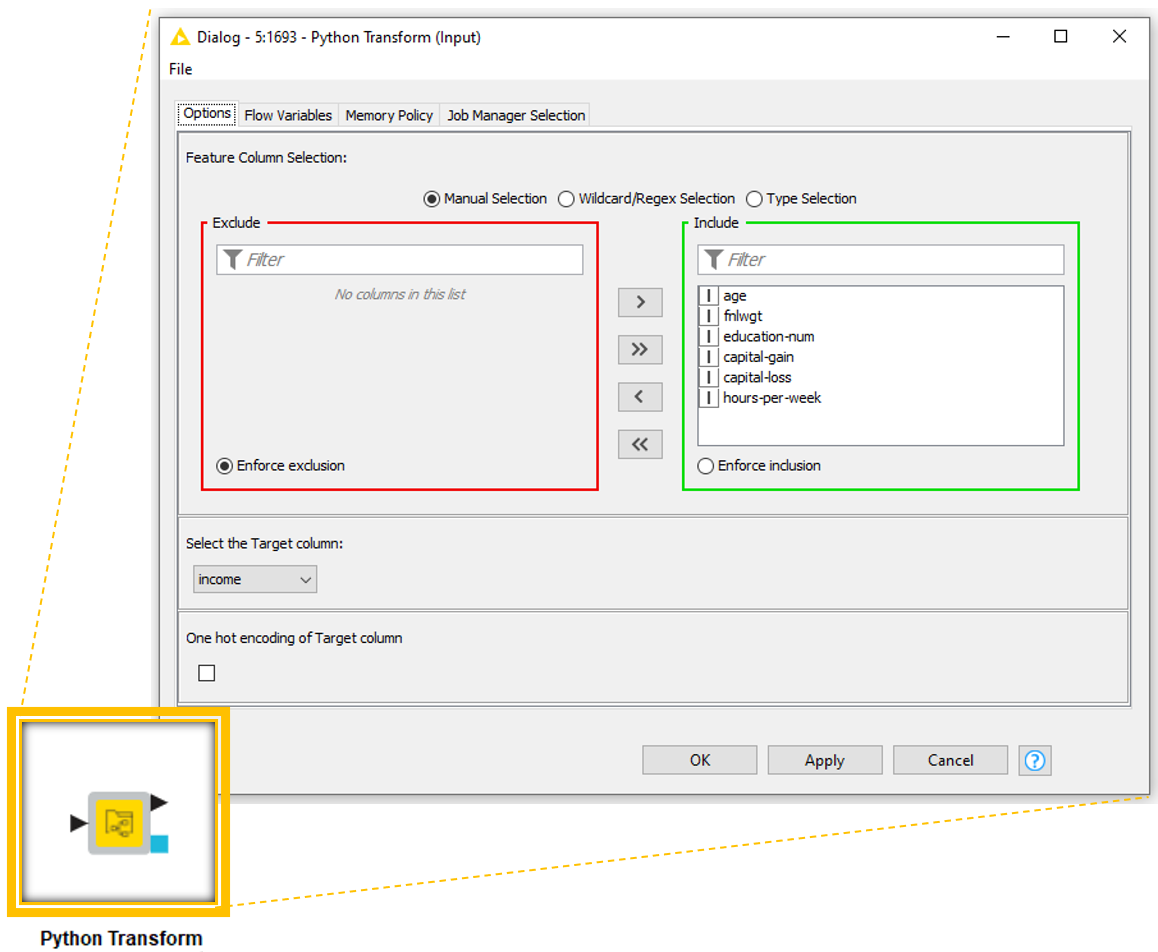
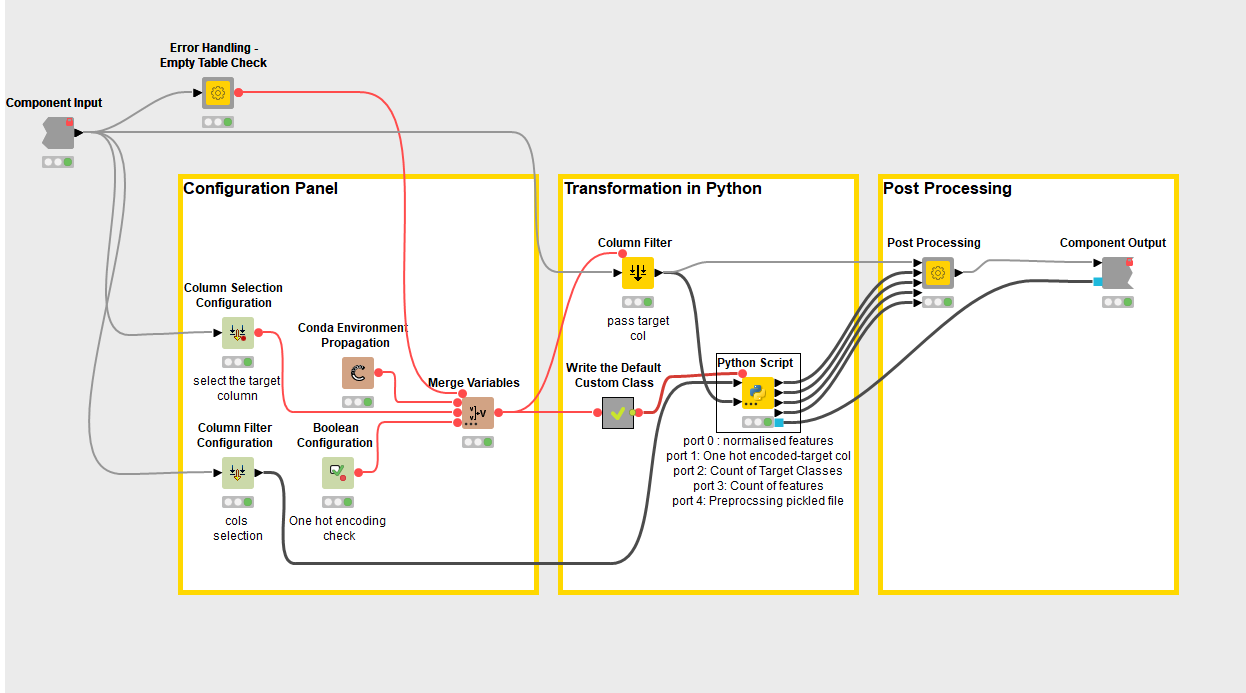
In this case, I decided to offer the user three selection options: features to transform, target column and whether the target column has to be one-hot encoded at the output as shown on Figure 3. To provide these options, I drag the Configuration nodes as shown in Figure 4 Configuration Panel.
Step 3: Embed Dependencies - Select Environment and Packages to be Available in Execution Locations
This step ensures your component will run on any of your team’s setup. By configuring the Conda Environment Propagation node we can snapshot the details of your Python environment and propagate that onto any new execution location.
-
Drag the Conda Environment Propagation Node to your Workflow Editor
-
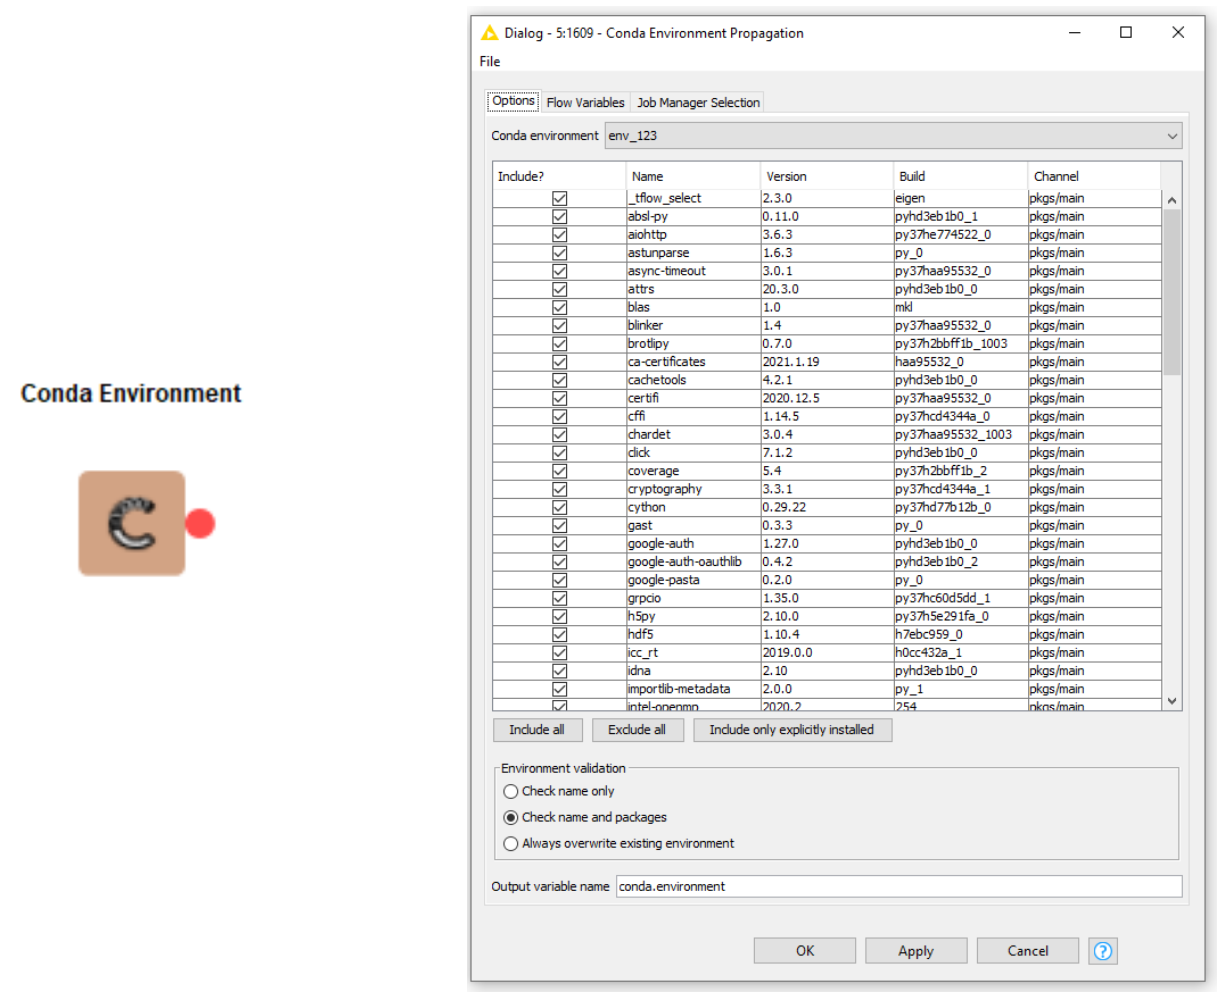
Select the Conda Environment that has all the required libraries installed in it for the Python Script node as shown in Figure 5.
-
Connect the Conda Environment Propagation node to the Python Script node and make sure the flow variables for Conda Environment in the Python Script node are set by this connection
Step 4: Determine Post-Processing Steps to Provide Standard Output
In this step, we determine the post-processing steps needed to provide the user with standard output from the component. For the Python Transform Component, I decided to have two outputs
Port 0: Table with normalized features along with target column
Port 1: Pickled Object
In the case of machine learning tasks, the data is often normalized and the normalization parameters are learned on the training set and used to normalize the test set. The motivation is therefore to provide the user with pickled objects as output so that these parameters can be sent out of the component and used while normalizing the test data.
The Advantages of Using Python-based Components
The biggest benefit is that a data team of visual programmers and scripters can collaborate at speed: Python users can create numerous custom libraries (or standard libraries) and instantly make them available for KNIME users.
Once these components have been created they are reusable (think of them as “reusable code) and can always be executed - irrespective of the Python environment on the user’s system.
And ultimate, you can easily control who has access. Share them publicly or within the organization via the KNIME Hub (Read more)