In this challenge, we help the accountants of a superstore company, and automatically generate invoices based on orders information. Each invoice contains the order id, order date, customer name, ordered products and their costs, and possibly other information.
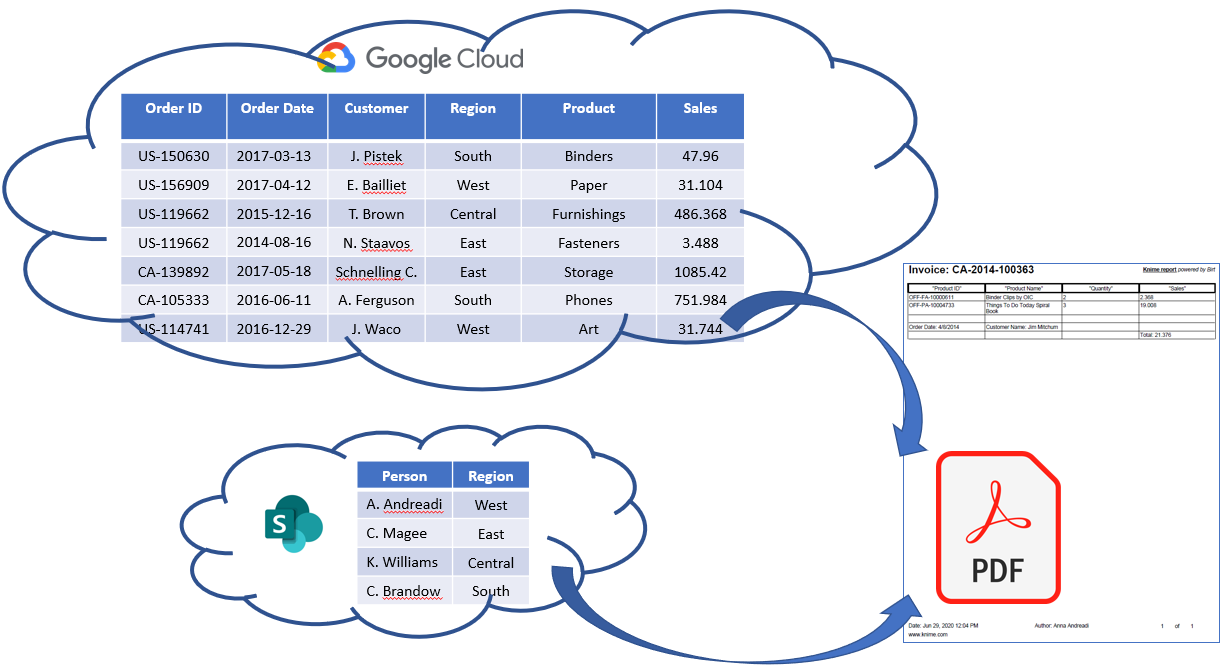
The company stores the huge amounts of orders data on Google Cloud Storage. We need to access, filter, and put the data into a shape that fits an invoice report. After that, we export the report as a pdf file.
However, an official document from person to person is always nicer, isn’t it? Therefore, we want to use the company internal data about the customer contact partners and their regions of responsibility, blend this information with the region where the order was submitted, and add the person’s name in the footer of the pdf. The company stores internal data on collaboration space of the company, Microsoft SharePoint.
Topic: Generate invoice reports as pdfs
Challenge: Blend data from Google Cloud Storage and Microsoft SharePoint to access all required information for an invoice report. Export the invoice report as a pdf file.
Access mode: CSV files
Integrated Tools: Microsoft SharePoint, Google Cloud Storage
The Experiment - Sharepoint - Google Cloud
The superstore company sells furniture, technology, and office supplies in North America for both corporates and consumers. For each order we have the information regarding the order id, order date, customer name and location, sales amount and profit. In addition, we have company internal data containing the names of the responsible persons for the West/East/Central/South regions. The original Sample-Superstore.xls file is provided by Tableau.
This article is part of a collection of articles published by KNIME Press all about tool blending. Download your own copy of the ebook Will They Blend? The Blog Post Collection - Third Edition
This article is part of a collection of articles published by KNIME Press all about tool blending. Download your own copy of the ebook Will They Blend? The Blog Post Collection - Third Edition
Step-by-step guide to accessing Google Cloud Storage
1. We start by accessing the order data available on Google Cloud Storage, which is one of the services in Google Cloud Platform. We access the data with the Google Cloud Storage Connector and Google Authentication (API Key) nodes.
2. In the configuration dialog of the Google Authentication (API Key) node, we provide the service account email and P12 key file. We can get these by following the steps described in detail in the Tutorial: Importing Bike Data from Google BigQuery blog post: signing in with a Google account, creating a project, creating a service account, and downloading the API key in P12 format.
Hint. Make sure you assign the Storage Admin role to the service account you use to access Google Cloud Storage from KNIME Analytics Platform.
3. Further down in the configuration dialog of the Google Authentication (API Key)node, in the scopes field, we select the Google services, such as Cloud Storage, Drive, and Sheets, which are granted for this connection. We select Google Cloud Storage (Read) in the dropdown menu, and click the Add button. When we do this, we see this line in the scopes field:
4. Next, we access the order data with the Google Cloud Storage Connector In the configuration dialog, we provide the project id, and select a working directory where the subsequent Reader nodes in the workflow start the browsing for files. The project id is shown in the top left corner of the Google Cloud Platform dashboard. Our data reside in the “Superstore” bucket in the “Orders” folder, so we write “/Superstore/Orders” in the working directory field and click OK.
5. Now, we’re ready to read the data into KNIME! We simply use the CSV Readernode, and connect the Google Cloud Storage Connector node to its optional File System Connection input port. In the configuration dialog of the CSV Reader node, we click the Browse button, and select the Sample-Superstore.csv file.
Step-by-step guide to accessing data on SharePoint Online
1. In this second step, we access the company internal data on Microsoft SharePoint, the collaboration space of the company. We can access SharePoint Online, one of the Microsoft 365 cloud services, with the Microsoft Authenticationand SharePoint Online Connector
2. In the configuration dialog of the Microsoft Authentication node, we have two options for authentication: interactive authentication or username and password. We select “Interactive authentication” in the dropdown menu, and click Login. A dialog opens asking for the Microsoft account credentials and security consent before proceeding. Agreeing creates the connection, confirmed by a green “logged in” message next to the Login button in the configuration dialog. Alternatively, we could select Username/password authentication in the dropdown menu, and write the Microsoft account credentials in the fields that activate.
3. Further below in the configuration dialog we can define the reach of the authentication. The “memory” setting resets the connection when the workflow closes. The “file” setting enables using the same connection in multiple workflows. The “node” setting enables closing and opening the workflow without recreating the connection.
4. Finally, we define the access rights for the connection. For this experiment, the SharePoint files (Read) access is enough.
5. Next, we access the data in the collaboration space with the SharePoint Online Connector In its configuration dialog, we can directly access the “root site”, the uppermost folder level in the company’s SharePoint site, or the Web URL, such as superstore.sharepoint.com, or if the admin consent was given in the authentication step, we can also select a group site directly.
6. We can select a working directory by clicking the Browse button next to the Working directory field, and the subsequent Reader nodes will browse for folders and files starting from this folder level.
7. Finally, we use the CSV Reader node to read the Superstore-People.csv file containing the names of the responsible persons for different regions.
Blending, wrangling, and exporting data into a pdf file
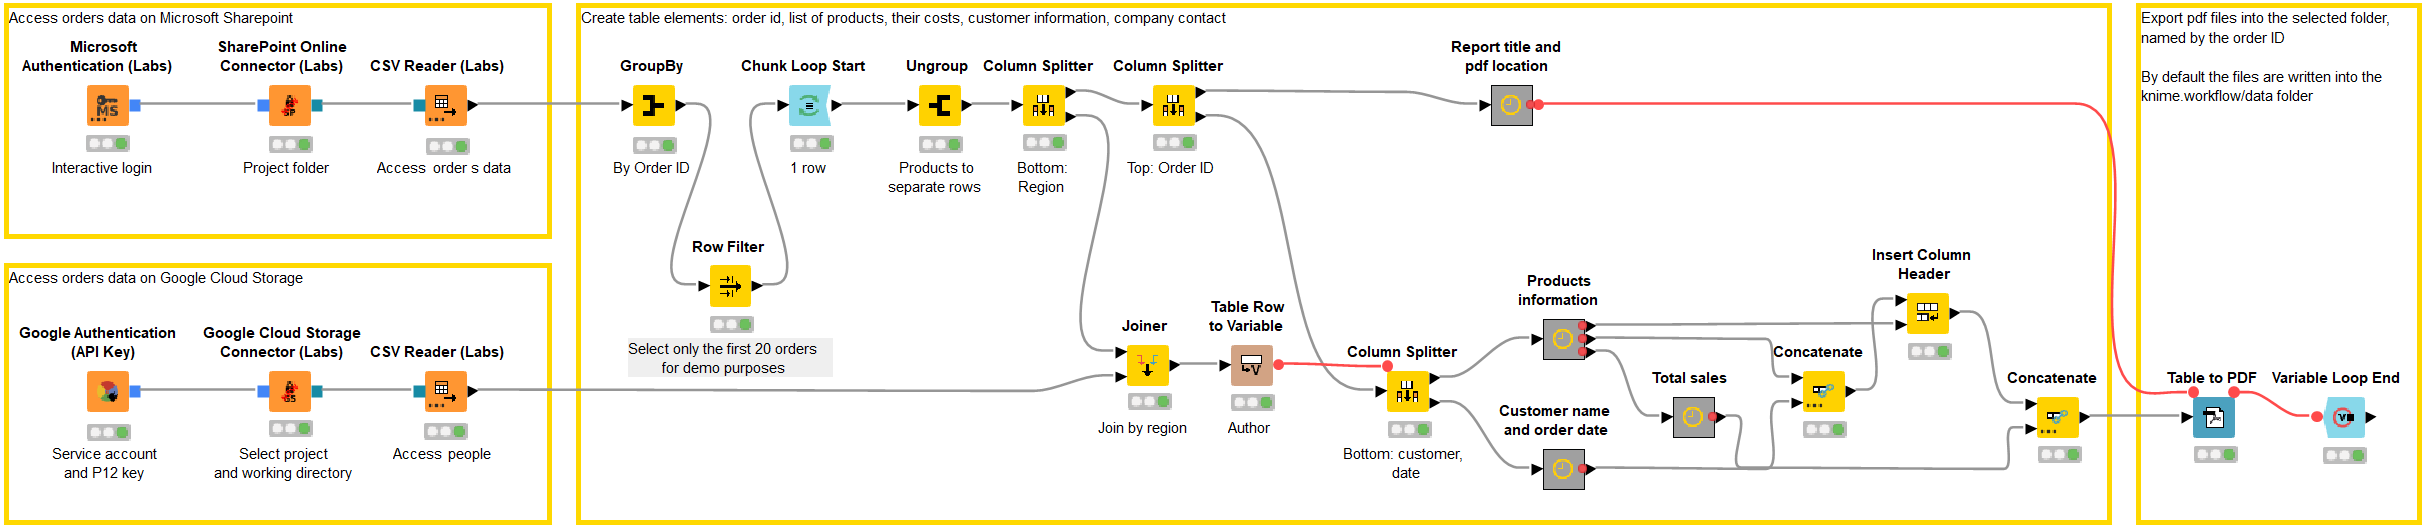
The data blending and preprocessing steps are shown in the Microsoft Sharepoint meets Google Cloud Storage workflow in Figure 2. The workflow can be downloaded from the KNIME Hub. After accessing the data, we start a chunk loop to handle only one order at a time. Next, we reshape the data for each order so that
- Each ordered product appears in a separate row
- The customer name, order date, and total value appears at the bottom of the table
- The order ID appears in the invoice report title
- The employee name appears in the footer
Therefore, we join the information about the employee name to the order data based on the region where the order was submitted. We concatenate the rows for the products, customer name, and the total value, because this information is shown in the invoice table. We combine the string “Invoice:” with the order id to customize the title of the invoice report. Finally, we provide the invoice table as the data input, and the employee name and report title as flow variables for the Table to PDF node.
Download the Microsoft SharePoint meets Google Cloud Storage workflow from the KNIME Hub.
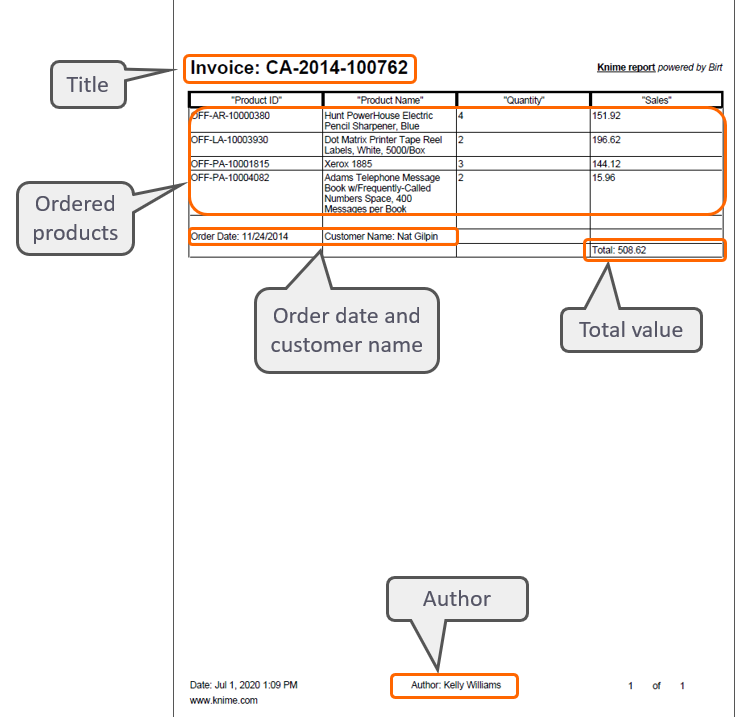
The Table to PDF node generates a pdf (Figure 3), where the input table appears as an image, with a custom title and author. The pdfs are exported into the location specified in the configuration dialog - whatever kind of storage the accountants are using!
Results
Yes, they blend! We generated invoice reports with data from two different sources, Google Cloud Storage and Microsoft SharePoint. We defined the layout of the invoice report with the preprocessing nodes in KNIME, and let the workflow subsequently generate all invoice reports by one click, each one named according to the order id. A lot of manual work was saved. So the next time if you receive your invoice report in record time, you might know the reason!