
Want a workflow that uses available in-DB capabilities and moves to a production Spark setup? At the same time it should use special Google services before comparing a KNIME Random Forest to an H2O Random Forest and then automatically choose the correct model to create data that are automatically added to your favorite CRM - so that the new score is placed back into the CRM? No problem in KNIME.
Or you want to use AWS and Azure ML services together along with KNIME nodes to provide a focused Guided Analytics application to end users? Again, a straightforward build of nodes in a workflow can, after execution, be one click deployed to KNIME Server and made instantly available via the KNIME WebPortal. Similarly, only minimal effort is needed to create a RESTful Web service out of that same workflow on the KNIME Server, which enables you to make your new achievements callable from existing applications.
However, if you have options, how do you make a decision if performance and scalability are key? There is now a KNIME white paper providing background around choice and tuning options, as well as an approach and sample workflows for determining the “right” combination for your specific requirements.
Choice and Tuning Options
The white paper first reviews the four major areas that can be managed to obtain optimal workflow performance and provide scalability options in KNIME:
- KNIME setup and workflow options
- Hardware and resource options
- KNIME extensions
- Additional capabilities provided by KNIME Server such as distributed executors
A Six Step Approach to Performance and Scalability
Thanks to the huge choice offered in KNIME Analytics Platform, there is no single “best” recommended approach for scaling a workflow. Instead, the recommendation is to build different scenarios with KNIME and execute and compare them so as to choose the best for your given situation.
In the white paper, a six phase approach is detailed for evaluating and identifying an optimal workflow configuration for your requirements. The six steps are:
- Create your workflows using native KNIME nodes.
- Identify relevant capabilities
- Define possible scenarios
- Deal with environment contexts
- Set environment and run
- Measure and compare
Nodes and Example Workflows
Within KNIME, there is a robust series of benchmark nodes provided to capture the performance statistics of every aspect of a workflow. The concept is straightforward and shown in Figure 2. You begin your workflow with a Benchmark Start (memory monitoring) node. You end it with a Benchmark End (memory monitoring) node. When executed, the nodes capture such statistics as run time and memory usage. The nodes can be configured so that they go down to the individual node level, even within a metanode or component. In this way you can collect all relevant performance statistics.
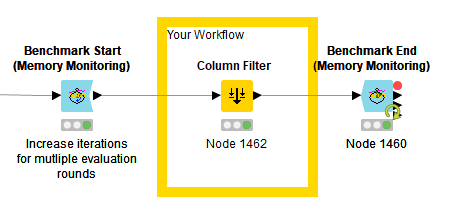
The nodes are KNIME community nodes provided by KNIME trusted partner Vernalis Research Ltd. It's worth investigating the configuration options of the nodes.
- Find KNIME Community nodes by Vernalis Research Ltd on the KNIME Hub.
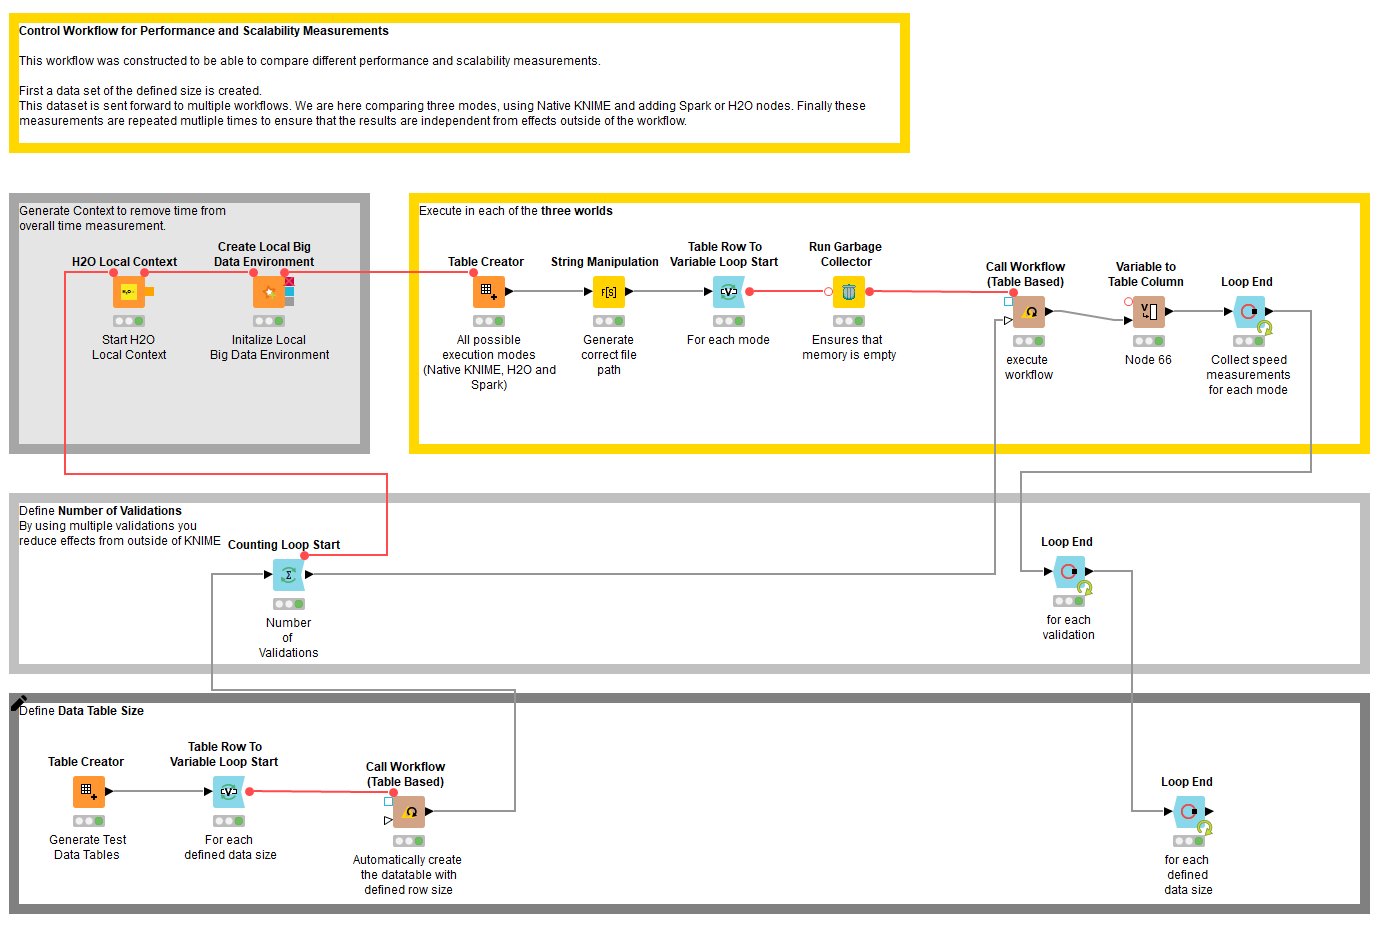
A series of example workflows is available to show you how to use the nodes:
Conclusion
With this six step process for testing performance and scalability of scenarios in KNIME, you have an extremely powerful way to make your choices and come up with the best way to achieve a performant and scalable workflow for your data science problem.
- Check out all the details of the white paper: Tuning Performance and Scalability of KNIME Workflows by Iris Adä and Phil Winters
- Or jump straight to the examples on the KNIME Hub