
Ever sat next to a friend or colleague at the computer and were awed when you suddenly realised the way they do certain tasks is much better? We recently asked KNIME users to share their tips and tricks on using KNIME. In this series of posts we’ll be showing you how the experts use KNIME in the hopes that by sharing ideas you’ll discover some handy techniques.
So where do bunny ears come into this?
How to Enable Flow Variable Ports on a Node
Flow variables are used in KNIME Analytics Platform to parameterize workflows when node settings need to be determined dynamically. They are carried along branches in a workflow via data connections (the black edges between nodes) and also via explicit variable connections (the red edges between nodes).
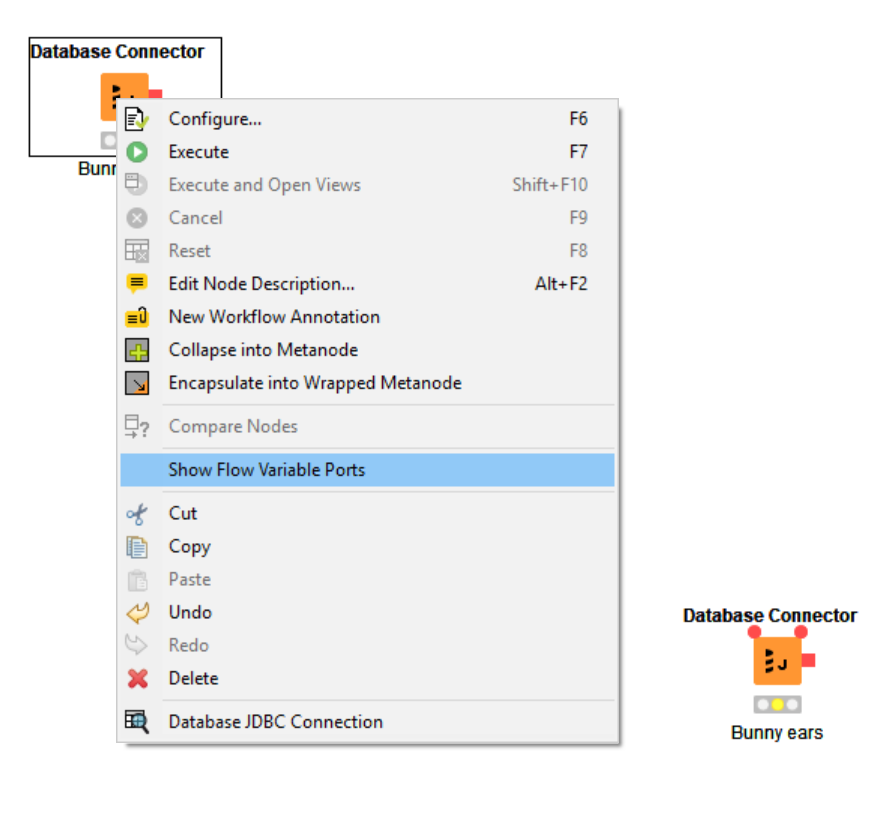
The “bunny ears” are the flow variable ports on a node (Fig. 1). They are hidden by default so you usually cannot see them.
To enable flow variable ports in any node, you can:
- Right click the node and select “Show Flow Variable Ports” in the Context menu.
Or
- Start a data connection at a flow variable port (red circle) and drop it at the top left corner of a node
Ta-dah! Bunny ears.
Find out more about flow variables in Chapter 7.1 Workflow Parameterization: Flow Variables of the KNIME e-learning course.
Figure 1. To show the flow variable ports of any node, use the option “Show Flow Variable Ports” in the context menu or start the connection at a flow variable port (red circle) and drop it at the top of the receiving node. This will make the flow variable ports appear.
Make Your Workflow Portable. Use the KNIME Protocol.
Rosaria recommends using the knime:// protocol as much as possible to read and write data. This way, when you move your workflow and your data to the production server - or anywhere else - the workflow will still run successfully in the new location.
The reason for this is that the knime:// protocol allows you to explore relative paths; relative to the mount point of a KNIME Server, to the local workspace, and to the local workflow. For example, knime://knime.workflow/../data refers to a folder named “data” located one level up from the folder in which the workflow is stored.
In Reader and Writer nodes, you can specify either the file’s absolute path (with file://) or its relative path (with knime://).
To know more about the knime:// protocol, you can check the lesson unit on absolute and relative path in section 2.1 of the e-learning course “Introductory Course to Data Science”.
Keeping Your Data with Your Workflow
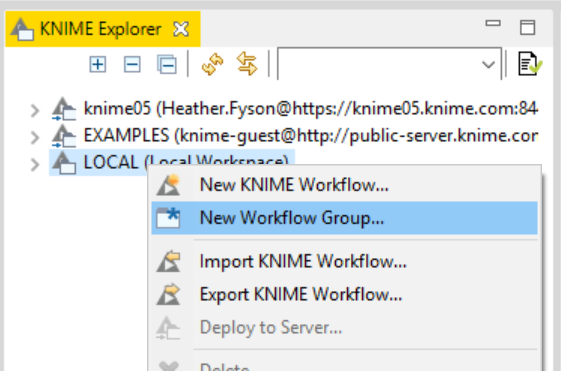
It’s a good idea to organize your workflows in Workflow Groups (folders) in your workspace. If you want to create a workflow group, right-click inside your local workspace in the KNIME Explorer view and select New Workflow Group. A folder is subsequently created in the workspace directory for each workflow group. Once you have your files and workflows organized into groups, you can export the entire group to a KNIME Workflow Archive in .knar format to share with others.
Figure 2. Creating a New Workflow Group. Right-click the workflow in KNIME Explorer and select “New Workflow Group”
You might have already known how to organize your workflows, but did you know that KNIME workflows can contain data files within themselves? Scott has a tip about keeping your data with your workflow. If you access the KNIME workflow from your operating system, you can manually create a “data” folder to store your data there directly.
Figure 3. Accessing a folder named “data” inside the the workflow folder via the knime:// protocol. When exporting the workflow, the folder “data” and its content will be exported as well.
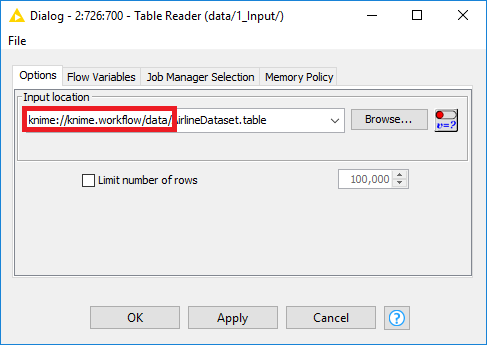
Building on the tip from Rosaria above, this then allows you to reference data within nodes using knime://knime.workflow/data. In this way, your data will remain with your workflow whenever you archive it, export it, or upload it to a KNIME Server.
How to Monitor the State of a Node
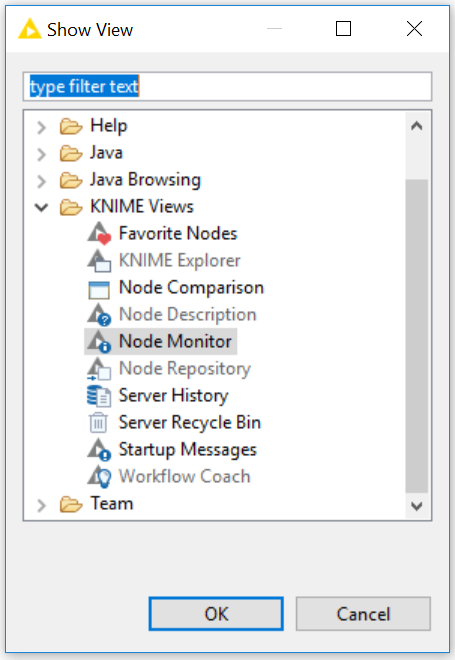
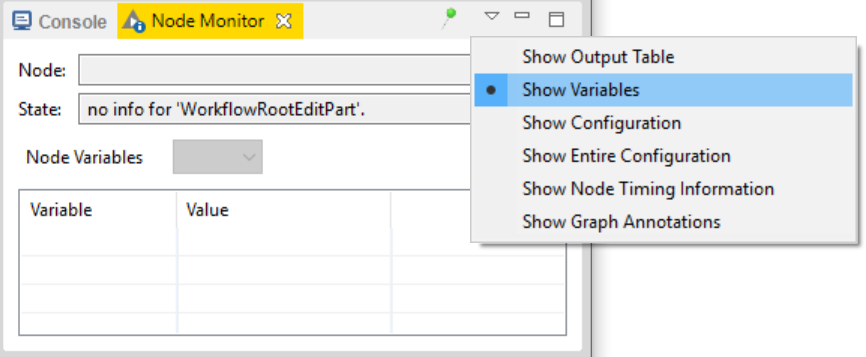
Another tip from Scott is to check out the KNIME Node Monitor view.
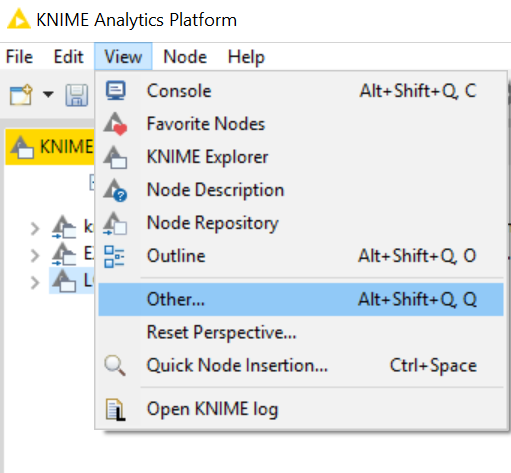
You’ll find it at View → Other… → KNIME Views → Node Monitor. It gives you information about the selected item’s state as well as other useful parameters. From the Node Monitor view, then, you can open the dropdown menu shown in the image on the right in Fig. 4 and have the Node Monitor show you different contents.
The Node Monitor can show you quite a lot of information about your node. For example:
- You can use it to preview the output of a node without having to right-click on the node directly
- You can have the Monitor show workflow variable values - particularly useful for showing the progress of looping nodes in real time
- You can keep an eye on how many times a node has executed, and how long it took to finish
Check out the Node Monitor and see what else you can find!
Figure 4. From left to right: Selecting the Node Monitor panel from the View menu and exploring the Node Monitor’s dropdown menu contents.
Using Metanodes for a Tidy Workflow
KNIME Analytics Platform relies on visual programming, thus making our work easier. However, the complexity of data analytics remains and can sometimes lead to quite complex workflows.
Danyal points out that wrapping huge, messy workflows inside a metanode is an excellent way to improve readability and understanding. Metanodes are nodes that contain other nodes. In your top-level workflow they look like a single gray node, but contain many nodes and even metanodes.
To create metanodes is very easy. Just select the nodes that you would like to group inside a metanode. Right-click and select “Collapse into Wrapped Metanode”. Et voilà, your nodes have disappeared from your workflow and are hidden inside the newly created wrapped metanode.
Figure 5. Selecting the nodes to collapse into a wrapped metanode, called “Prepare Data”.
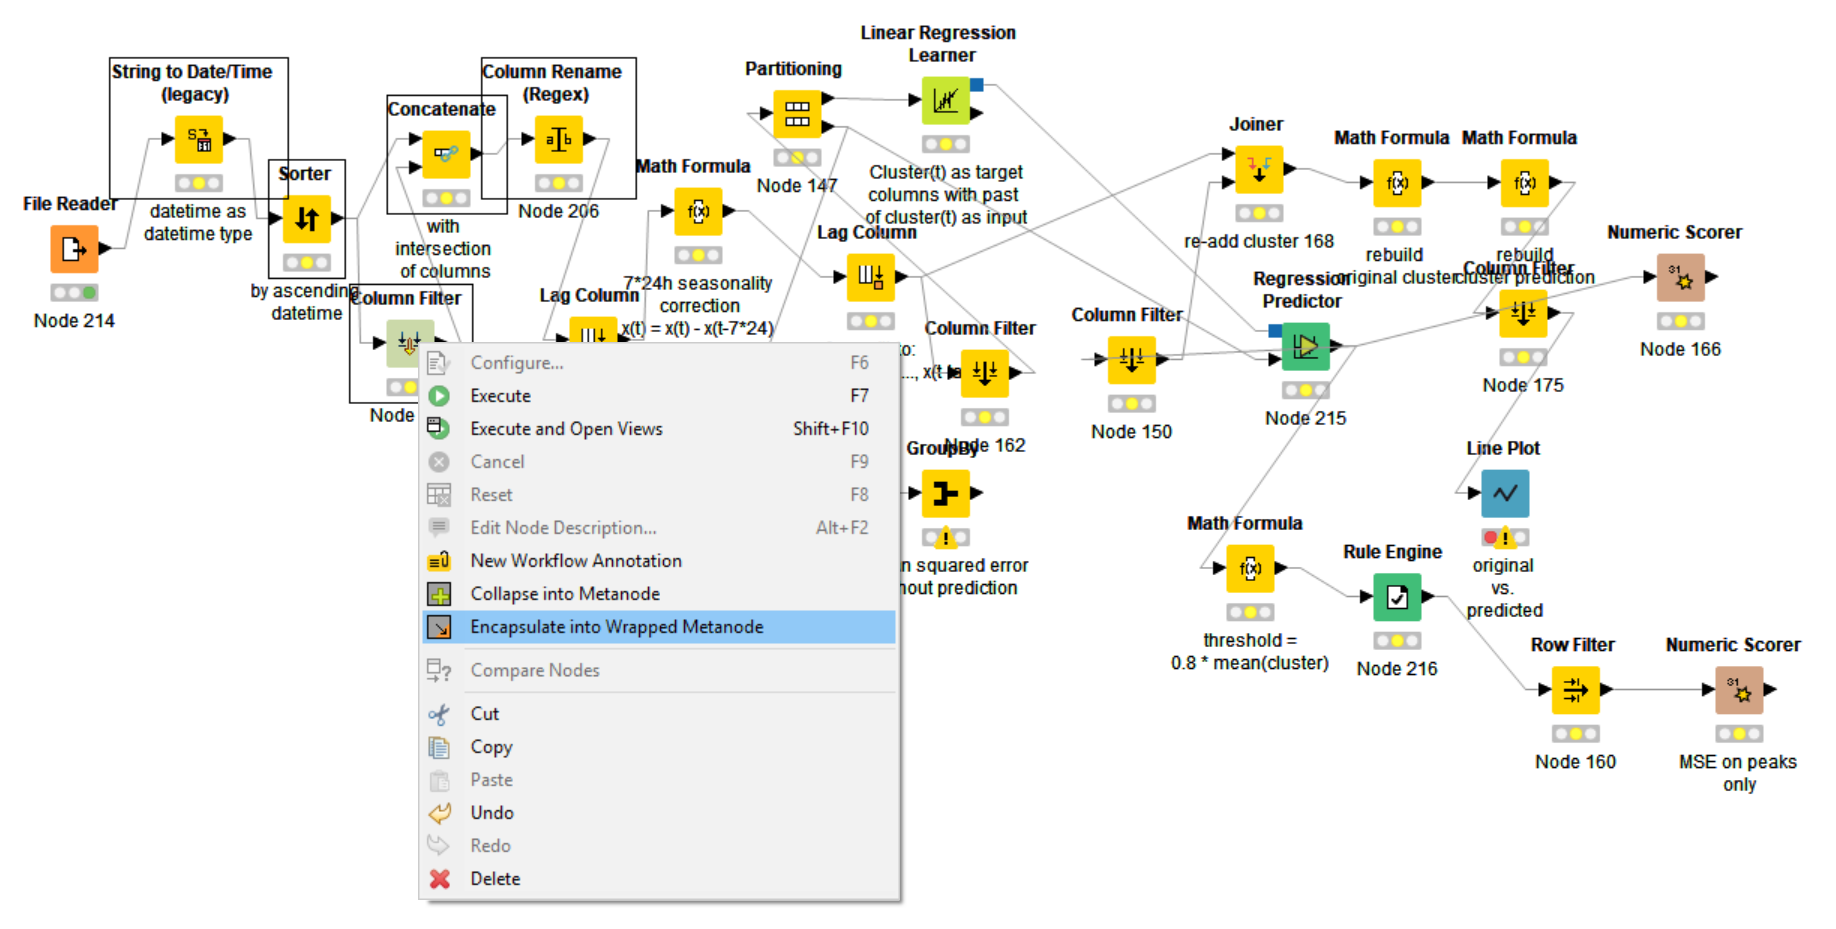
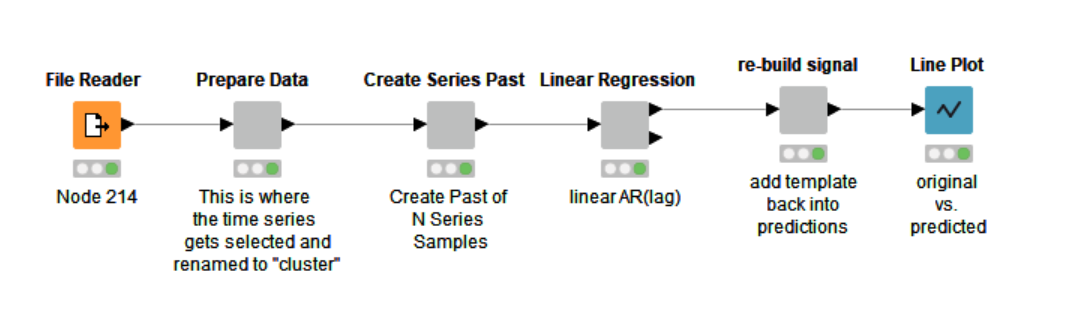
Figure 6. Complex workflow now with improved readability having “tidied” nodes into the wrapped metanodes: “Prepare Data”, “Create Series Past”, “Linear Regression”, and “Re-build Signal”.
Wrapped metanodes have evolved from the simple metanodes. They can acquire a configuration window (via Quickform nodes), their inports and outports can be renamed, and they can filter flow variables from the inside to the outside and vice versa. In addition, wrapped metanodes allow for streaming functionality, which can improve I/O and run time.
Keyboard Shortcut to Open Wrapped Metanodes
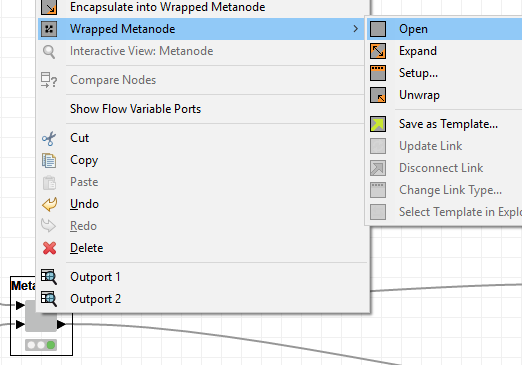
Once you have created your wrapped metanode, you might want to inspect its content. The standard mouse-click method involves right-clicking the wrapped metanode and then selecting “Wrapped Metanode” → “Open”. This opens the content of the wrapped metanode in the workflow editor.
Alternatively, Ctrl+Double-click on the wrapped metanode also opens the wrapped metanode.
Figure 7. Right-click a wrapped metanode, then select “Wrapped Metanode” → “Open” to open the metanode’s content in the workflow editor. Ctrl+Double Click does the same.
These are just some tips and tricks that KNIME experts have shared with us this week. Do not worry! We will publish more in the next posts. In the meantime, if you want to know more about KNIME Software, you might want to attend the webinar on July 16.
Webinar: Overview of KNIME Software on July 16 at 6:00 PM CEST
We’re running a webinar to answer questions about KNIME Software. So if you’re feeling curious about, what kind of data sources KNIME can connect to, what integrations are available, how KNIME can help with ETL and more…. Sign up for the webinar on our website.
Thank you...
...to the KNIME experts who have provided us with their tips and tricks.
We would love to post more useful tips and tricks to use in KNIME Analytics Platform. Send your ideas to blog@knime.com. Selected tips and tricks will be published in this blog, together with their author!