
In my job as a senior analyst, I leverage technology to provide insights around talent acquisition data - all of the data points from application to hire. Recently, I worked on a project that relied on capturing up-to-date roster data from across a number of departments. In this article I’d like to show how I did this using Microsoft Graph API & KNIME Analytics Platform.
My solution had to solve these issues:
- Populate a roster on a monthly basis but also track personnel movement in the departments that were a part of my work
- Pull in the department leadership hierarchy and additional data such data as job titles, email addresses, and contractor information
- Incorporate flexibility to add departments as needed and pull updates whenever my project called for it
I ultimately addressed these challenges by accessing the Microsoft Graph API via GET Requests through KNIME Analytics Platform. This allowed me to pull the data I needed to build my personnel roster, which I am now able to use with various talent acquisition projects such as recruitment tool usage analysis.
The Microsoft Graph API gives me the ability to query various cloud resources which include the user information I need for populating personnel rosters. Through the RESTful nodes in KNIME, I pull my data in, blend and process the returns from multiple Graph API requests.
Capture roster data and provide hierarchy information with components
I’d now like to walk you through what I did to capture the roster data and add the hierarchy information to the names I collected.
The workflow I created accesses Microsoft Graph, fetches the user data I need, and builds the roster. I decided to encapsulate the major steps of the process in components. The advantage here is that I can share these components with my team or reuse them myself in other workflows.
Let’s have a closer look at my components and what they do.
How to use the KNIME Azure Authenticator
I registered a KNIME app (not to be confused with the KNIME software available in the Azure marketplace) in Microsoft Azure with the necessary permissions and built a component in KNIME to handle the authentication. You need to acquire an access token from the Graph API to make successful GET requests.
Note: Your organization will likely have a process you need to follow to get your Azure app setup.
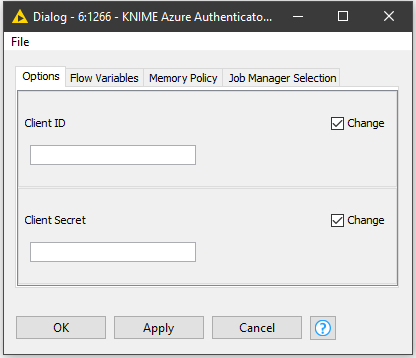
1. To use the KNIME Azure Authenticator, just double click it and add the client_id, and client_secret in from your Azure app. The workflow builds out the rest of the POST body with the scope and grant_type. The column POST_Body is then chosen in the POST Request node’s Request Body configuration.
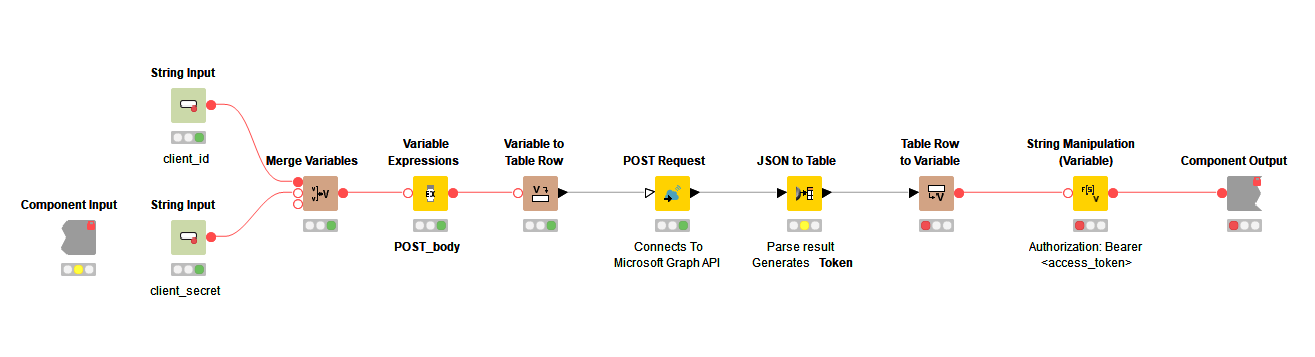
2. Opening the KNIME Azure Authenticator component, the workflow inside follows the POST process documented here. Using a JSON to Table node the POST return is converted to a one row, six column table. From here,the table is converted into a single row using a Table Row To Variable node. Using a String Manipulation (Variable) node the word ‘Bearer ’ (space included) is joined to the front of the access_token variable.
- When you use/build components you need to let variables in/out - to flow through the workflow.
- Your token will eventually expire and you will need to refresh it. To avoid re-processing my workflow I just connect another Azure Component to the part of the workflow I am on and re-execute it. The variables are overwritten, and it authenticates again.
How to use the GET and Process component
This component contains the bulk of the overall workflow. It’s modular, allowing me to add as many Department Listing components as I need to collect roster data. It also contains the Roster Builder components and Hierarchy Builder (Up and Down) components to complete the full roster.
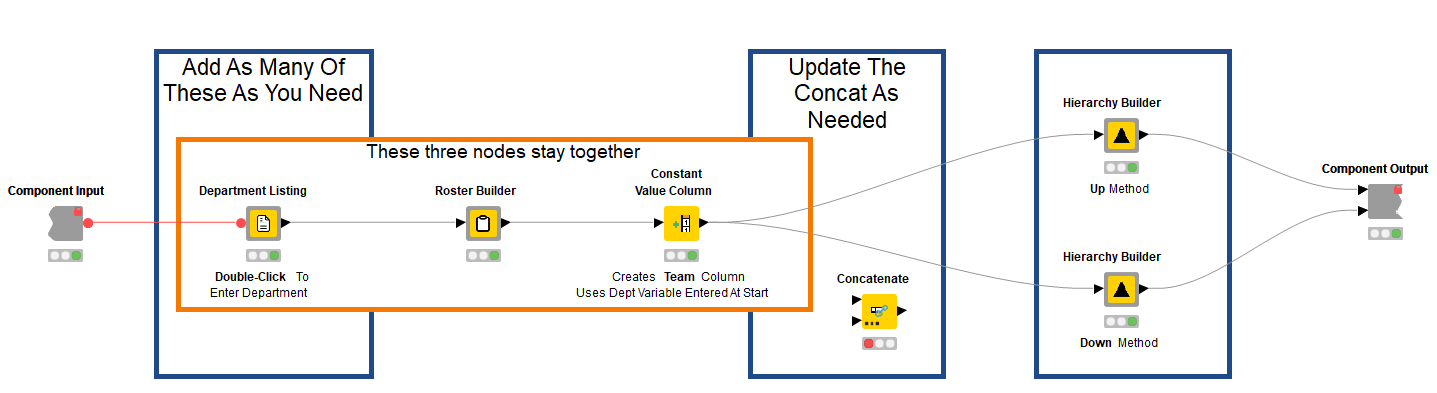
Once the access_token variable is properly formatted with its “Bearer ” prefix I connect the variable outport of my KNIME Azure Authenticator component to the variable inport of my GET and Process component. I then connect the variable to the variable in-port of my Department Listing component. If you have more than one Department Listing component connect the variable to all of them.
I chose a modular approach here so I could easily add and remove departments and so the GET requests run simultaneously. To add a department, just double-click on the Department Listing node and type in the name of the department as it appears in Azure for your organization.
Configure the GET Request node
Using the Microsoft documentation here and Microsoft Graph Explorer to test different requests I configured my GET Request nodes inside the Department Listing component to filter by department and select only the data fields that I needed for my roster. If you want to learn more about how to use query parameters check out this page in the Microsoft documentation.
Note: the URL field in the GET Request node does not accept nor automatically handle spaces in a URL (whereas they are not an issue in Graph Explorer). When you enter or feed in a URL as a variable, do not forget to add ‘%20’ in place of the spaces. You can learn more about this here and here.* I included a Variable Expressions node that adds the spaces for you after you have provided the name of the department.
Here you can see an example of my URL flowing into the URL column of the GET Request node:
https://graph.microsoft.com/v1.0/users?$filter=Department%20eq%20'HR%20Talent%20Acquisition%20Mgmt'&$select=givenName,surname,displayName,jobTitle,userPrincipalName
1. The first part https://graph.microsoft.com/v1.0/users is straightforward. It simply accesses Users via v1.0 of Microsoft Graph API.
2. The second part: ?$filter=Department%20eq%20'HR%20Talent%20Acquisition%20Mgmt' is where I specify what department I want to filter down to. In this case the department is HR Talent Acquisition Mgmt.
3. To configure the third part, I experimented with Microsoft Graph Explorer to see what information was returned for Users in a department. I decided that I just needed a few pieces of information.
The third part: &$select=givenName,surname,displayName,jobTitle,userPrincipalName simply returns the fields I select via the &$select query parameter. To view the Users that directly report to another User - in order to get the hierarchy - a separate GET with userPrincipalName is required, so that’s why I included it here.
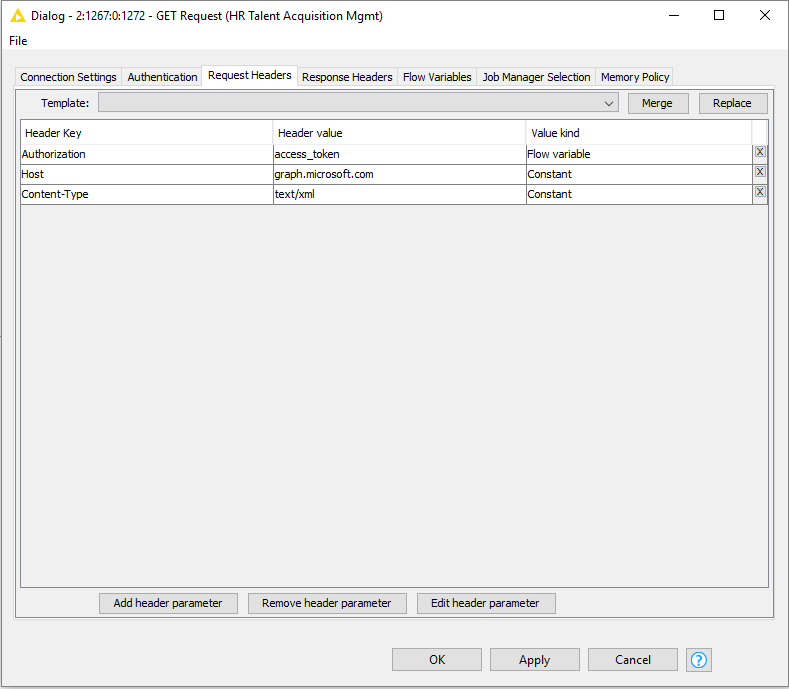
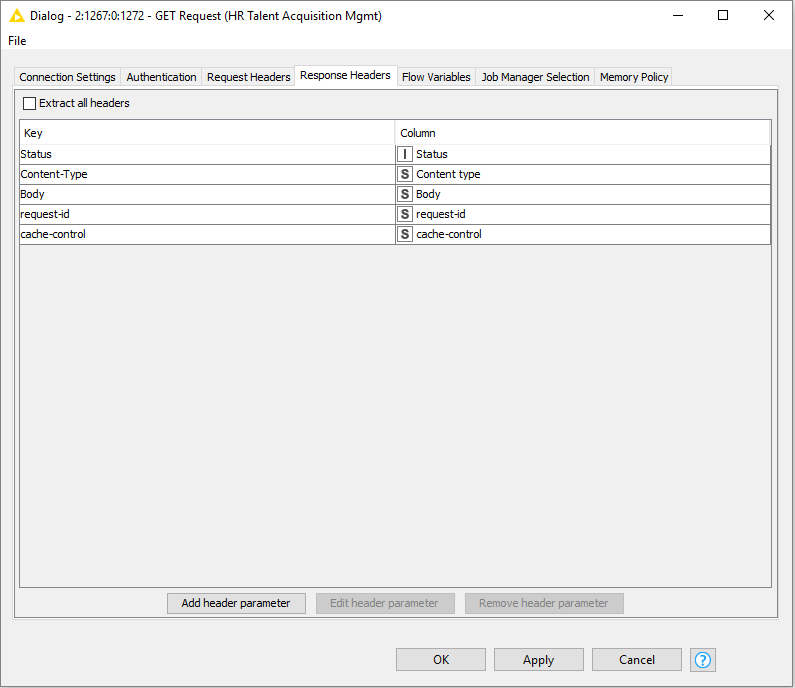
4. Now that the URL is entered, I need to configure the Request Headers and Response Headers of the GET Request node.
Under the Request Headers configuration of the GET Request node, I added a Header Key called Authorization, set its value to access_token and the value kind is a Flow Variable which corresponds to the variable of the same name. You will recall this variable is flowing from the KNIME Azure Authenticator. For reference, the images show how I configured the node and Request and Response headers.
The results of this GET request may return paginated which adds a bit of complexity since the Graph API only returns 100 results at a time.
Handling Pagination
1. Once the GET Request node has executed, view the ‘GET results’. In the JSON Body column you should see JSON formatted data returned from your request if it was successful. If you see a result other than 200 in the status column, reference this page in the doc for troubleshooting help.
2. If the results are paginated, at the top of the JSON results you will see two @odata entries. One of them will have the word nextLink after it. nextLink has a specific URL that follows it and is used to pull the next page of results that follow from the original request.
3. The Graph API returns 100 results at a time. If my User count in a department is 181, a new GET request from the nextLink URL will return the remaining 81 Users.
So long as that link continues to appear, there are more pages available to request.
How to use the Roster Builder component
User data has been returned as a result of our GET request. Next, the data moves into a Roster Builder component. Again, different ways exist to handle this; this is simply the approach that made sense to me.
1. Inside the Roster Builder, the workflow uses an IF Switch node to allow the data from the GET Request node to flow along two different paths.
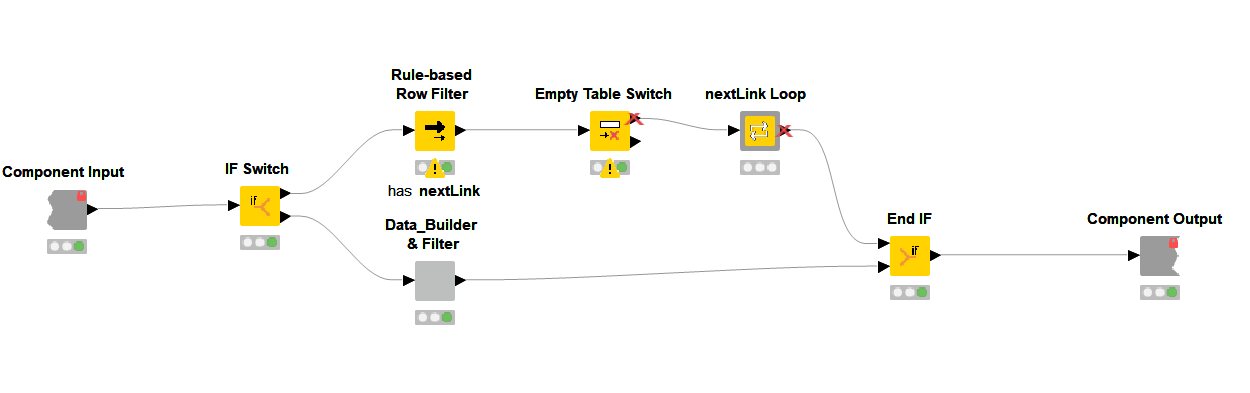
2. The bottom path always collects the first page of Graph API results from my initial GET Request node and simply feeds into the component Data_Builder & Filter, which extracts the fields I want from the initial JSON Body return of the GET request, ungroups them into rows, and finally filters out unneeded columns.
3. The top outport of the IF Switch node is where things get specific for how I handle pagination of the GET results. Our first stop is a Rule-Based Row Filter node, which looks for the presence of the nextLink @odata entry in the JSON Body column covered earlier.
The Rule-Based Row Filter node is configured with the expression:
$body$ LIKE "*nextLink*" =>TRUE and Include True Matches is selected.
4. If the nextLink text is located, the condition is met, and the JSON Body column flows through the node. If nextLink is missing, then nothing matches and the node creates and sends an empty data table through the workflow.
5. The instance of an empty data table is handled via the Empty Table Switch node which will send non-empty input/tables to the top and empty input/tables to the bottom. As you can see, only the top outport is connected, because if nothing passes through (due a missing nextLink) the outport becomes inactivated, demarked by a red X. The nice thing here is that the entire flow that includes the nextLink Loop component becomes inactive, but still concatenates into the End IF node without issue.
Simply put, this means if our GET return is 10 or 200 Users, this structure works, and all of our data is collected in the End IF node without any problems. The workflow carries on!
6. When our table is active due to the presence of the nextLink, it passes data into the component nextLink Loop, which contains a recursive loop. At risk of oversimplification, the recursive loop structure allows you to send selected data back to the Recursive Loop Start node for each loop iteration.
How to use the nextLink Loop component
This component is a recursive loop that paginates through the GET results until all pages have been requested.
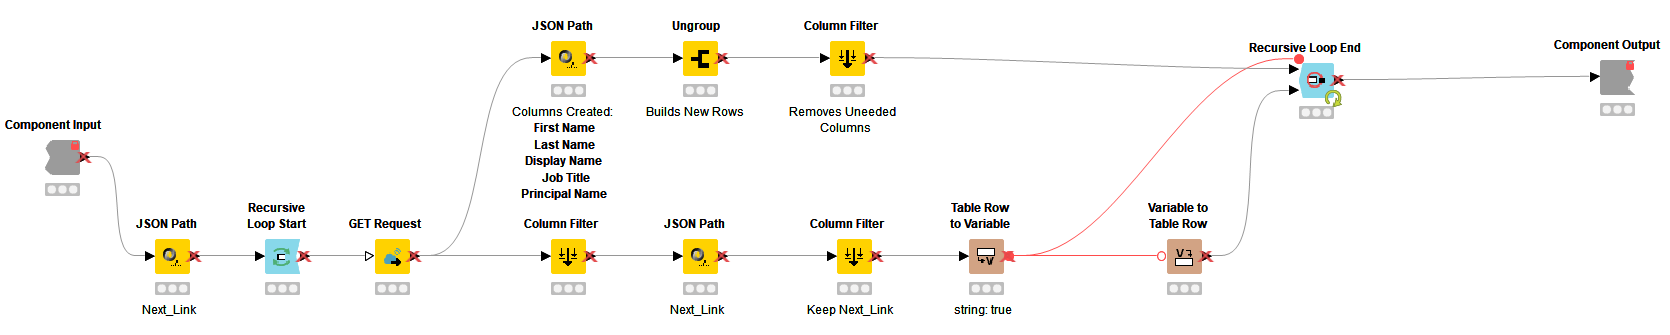
1. The nextLink Loop component workflow starts with the JSON Path node. Using this node, I isolate the @odata.nextLink data itself, creating a new output column called Next_Link. This column contains the URL information that followed @odata.nextLink in the JSON Body column.
2. This newly created Next_Link column now passes into the Recursive Loop Start node and into the GET Request node. The column is used to populate the URL column in the GET Request node. This Next_Link column represents the data that we will be sending back through the Recursive Loop Start for each iteration.
Note: As you can see, the URL fields of the GET Request node can be controlled through either hard-coding the URL or assigning it to an existing column of data. The Next_Link column is the column that will change and return through the loop so I'm using it here at the beginning of my loop.
3. The GET Request node is configured the same way as the first GET Request node except for the URL. The results of this node flow across two paths, one flows through the JSON Path, Ungroup and Column Filter nodes which are the same as the Data_Builder & Filter component but I am showing here for clarity. These nodes organize the GET results and put them into a table format before being collected at the top inport of the Recursive End Loop node.
4. The bottom path out of the GET Request node first filters everything but the JSON Body column. That column flows into a new JSON Path node that isolates out the new nextLink value that was just provided in the GET results. The second Column Filter keeps only the Next_Link column.
Note: If nextLink is missing from the GET results in the JSON Body column, the column Next_Link is still created in the JSON Path node but generates with a missing value (identified by a (?)). This should eventually happen and is expected when we reach the end of our requested data.
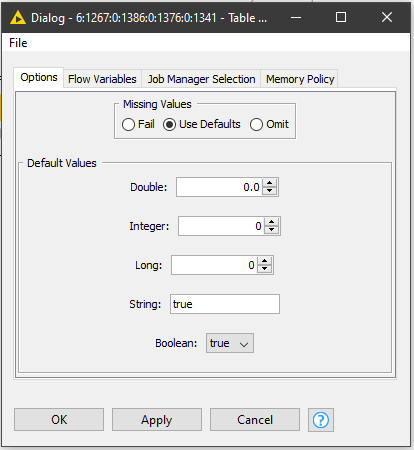
5. Next the data flows into the Table Row To Variable node. This node needs to be specifically configured to handle the missing value that eventually generates in the Next_Link column. Our recursive loop is going to be configured to stop on a ‘true’ variable output, and this is where we control for that.
6. The JSON Body column is a string column, so we enter ‘true’ in the String section of the node configuration. What happens is that rather than output a missing value, the node overwrites the output of ‘?’ with the word ‘true’ in the cell.
7. I connected the variable outport of the Table Row To Variable node to the top variable inport of the Recursive End Loop node. Using a Variable to Table Row node I converted the Next_Link variable back to a row so it will pass back into the URL column configuration in the GET Request node at the beginning of the loop. The Variable to Table Row node data outport connects to the bottom inport of the Recursive Loop End node.
8. As I briefly touched on already, the Recursive Loop End node is controllable in a few different ways. The way I chose to do it here is to “End Loop with Variable”. The node documentation says that:
“End loop with variable: the loop ends if the option is enabled and the value of the selected variable equals ‘true’.”
9. Since I configured the Table Row To Variable node to output a ‘true’ if the Next_Link column is missing its value (which means there are no more nextLinks to paginate through) that means that the variable feeds to the Recursive Loop End node with a ‘true’ value which then stops the loop (based on the configuration).
10. Once the Recursive Loop End node passes the ‘true’ and stops the loop, everything gets concatenated together and you can move forward in the workflow.
- The really nice thing here is that with the use of the IF Switch and Empty Table Switch nodes the data will flow through the workflow whether you have one or more pages of results.
- Additionally, you don't need to supervise the GET results to ensure that you're pulling back all of your results and since the loop continuing is based on the presence of a value in the Next_Link column and stops on a ‘true’ it scales nicely.
How to use the Hierarchy Builder component
There are two methods to grab hierarchy data out of Microsoft Graph. The Up method looks up to the individual’s manager, whereas the Down method looks down at direct reports of an individual.
The Hierarchy Builder Down Method component removes duplicate names and explores the job titles to identify those in leadership roles. This is where the userPrincipalName output is necessary.
In the workflow here, I am using the Down method because I am not concerned about hierarchy outside the departments I selected. An example of the Up method is below:

This is an example of the expression in the Variable Expressions for the Up method:
join("https://graph.microsoft.com/v1.0/users/",variable("Principal_Name"),"/manager","?&$select=displayName,jobTitle")
In my Hierarchy Builder a few things are happening:
1. I have two paths coming out of my Duplicate Row Filter node, the top path will flag and filter those Users in leadership roles and the bottom path moves the entire dataset past the loop and into a Joiner node on the other side.
2. Using a Column Expressions node, Users who are in leadership roles (based on my organization’s job title conventions) are flagged with a ‘1’ or ‘0’. The Rule-based Row Splitter node passes those Users identified as being in leadership roles. Here is what I flagged:
Note: I used a Rule-based Row Splitter node here, but a Rule-based Row Filter will work just fine.
3. Next I set a Table Row to Variable Loop Start node and based on the Graph API documentation I built a new URL column with the Variable Expressions node. This new URL returns a list of the user’s direct reports:
join("https://graph.microsoft.com/v1.0/users/",variable("Principal_Name"),"/directReports")
4. Additionally, inside the Variable Expressions node I converted Display Name, Job Title, and Team to Manager_Name, Manager_Job_Title and Manager_Teams for integration further down the workflow.
5. The variable outport of the Variable Expressions node is connected to the variable inport on top of the GET Request node. To make things easier I used a copy of my previous GET Request node and simply configured the Constant URI flow variable in the GET Request node’s configuration to use the GET_URL column I just created.
Much like before, when I pulled my roster data I filter the columns I want from the JSON data returned in the GET request, ungroup them to build new rows and then filter out all the extra columns I don’t need.
6. To finish this hierarchy loop, using three Constant Value Column nodes and the variables I created in the Variable Expressions node previously, I append the columns Manager, Manager Job Title and Manager Team to the data and set the corresponding variable in the node’s value settings.
7. Once the leadership names are looped through, I filtered out the missing last names with a Rule-Based Row Filter and used a Right Outer Join on First Name, Last Name, and Job Title to connect the Users to their direct leader. The Joiner node is also filtering out the columns I do not need in my final output, such as Iteration. It’s a great strategy to make your workflow more efficient and save a node!
8. A Column Resorter node helps organize the final output which leaves me with a total of 9 columns including first name, last name, display name, principal name, job title, team, manager, manager job title, manager team.
Further Steps for the Roster
From here you can just export these results or move them on in the process and combine them to a master roster that looks for changes.
I hope this helped! If you would like to see how I handled historical and current roster data to help with historical analysis let me know. Look up John Denham on the KNIME Hub or on LinkedIn.