Web scraping is an effective technique to automatically extract data from websites and save you time and resources that can be better spent on other (more interesting) tasks. It’s defined as “the activity of taking information from a website or computer screen and putting it into an ordered document on a computer." It’s when the data is parsed into a structured format, that it can be further processed and analyzed.
The value of web scraping
The benefits of web scraping are immense. We can access and retrieve valuable data from a wide range of online sources, providing insights and information that would otherwise be time-consuming or difficult to obtain. By leveraging specialized scraping tools or libraries, web scraping empowers us to navigate through web pages, locate specific elements, and extract relevant data such as text, images, links, or even structured data like tables. This opens up a world of possibilities for data-driven decision-making and automation.
It’s particularly useful when you need to extract data from websites that don't offer APIs or data feeds, for example in scenarios such as market research, competitor analysis, or gathering data from websites with frequently updated information. However, it is important to practice responsible web scraping by adhering to website terms of service and legal considerations.
Web scraping, while effective, can pose some challenges. For instance, extracting data from dynamic web pages that change in real time can be complex. Additionally, websites may implement blocking mechanisms to deter scraping, or the required data may be removed or updated, which could render previously scraped data out of date. The output from web scraping can also be messy, requiring additional effort to clean and standardize.
Legal considerations are another crucial aspect. One must respect copyright laws, privacy rules, and adhere to the website's terms of service to avoid potential legal issues.
Given these complications, if a website's API is available, it's often a preferable choice. APIs provide a more structured, reliable, and safer way to access data. By using APIs, you can bypass many issues associated with web scraping, making data extraction more efficient. Check out this article to discover more.
How to scrape text from a data science blog
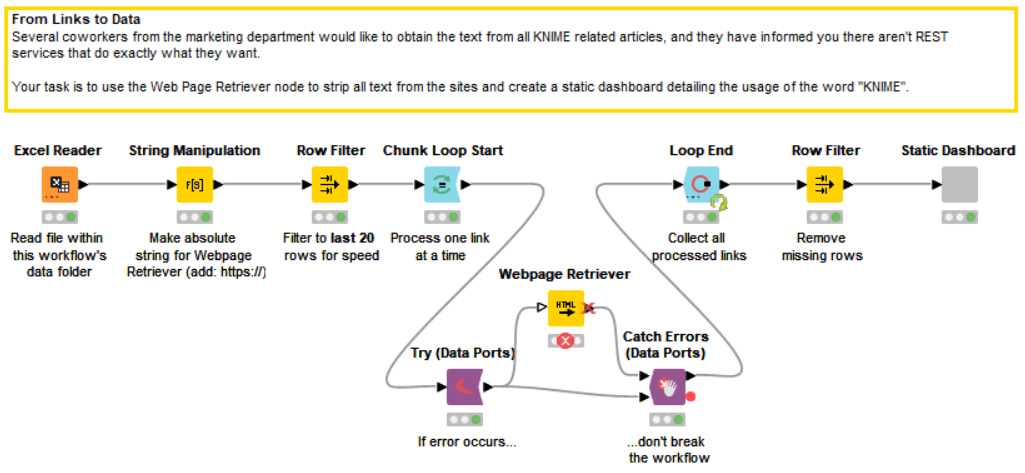
In this article, we want to walk you through our From Links to Data workflow, which automatically scrape textual data in articles about data science from the KNIME Blog. We’ll be using the Webpage Retriever node (part of the KNIME REST Client Extension).
We used KNIME Analytics Platform to build the web scraping workflow. KNIME is a free and open-source software that you can download to access, blend, analyze, and visualize your data, without any coding. Its low-code, no-code interface makes analytics accessible to anyone, offering an easy introduction for beginners, and an advanced data science set of tools for experienced users.
Explore the example workflow From Links to Data on KNIME Community Hub.
Step 1: Import the data
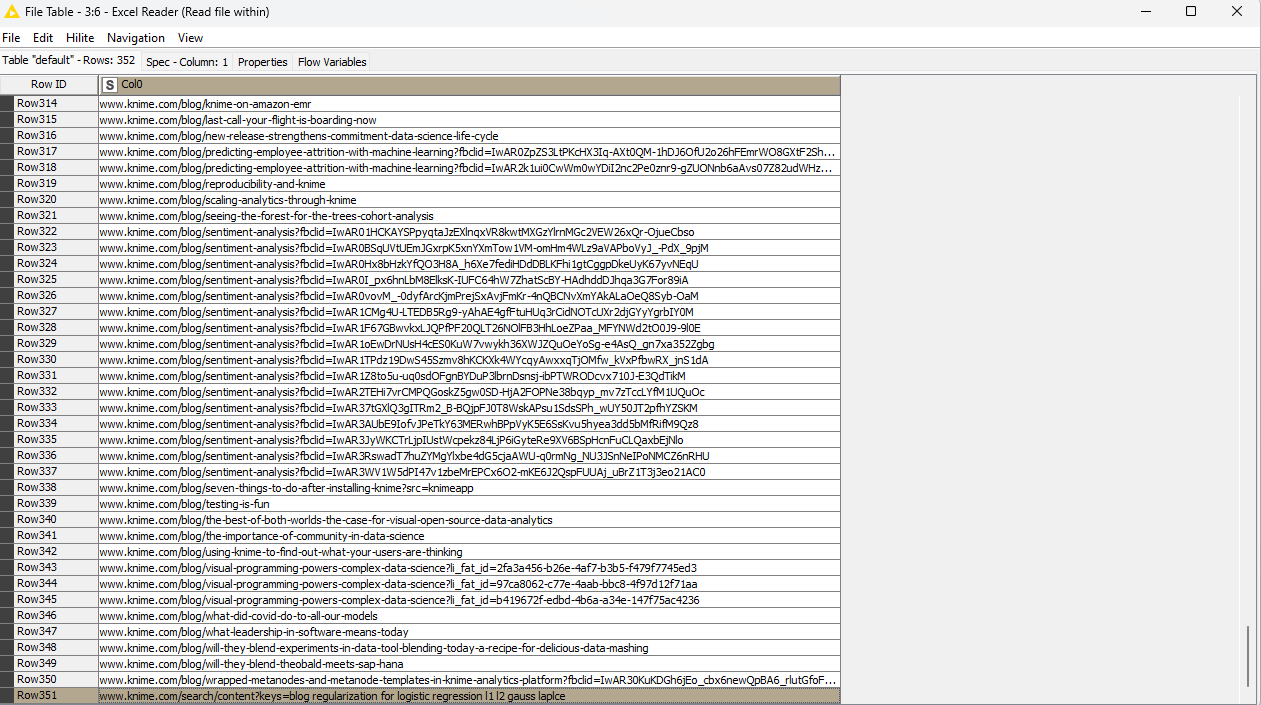
Our starting point of data in this workflow is an Excel sheet where we have the website links of numerous blog posts on the KNIME Blog.
KNIME offers a variety of nodes to read files. Since we have an .xlsx file, we use the Excel Reader node to get things started. The node output port returns the links of 351 blog posts.
Step 2: Preprocess the data
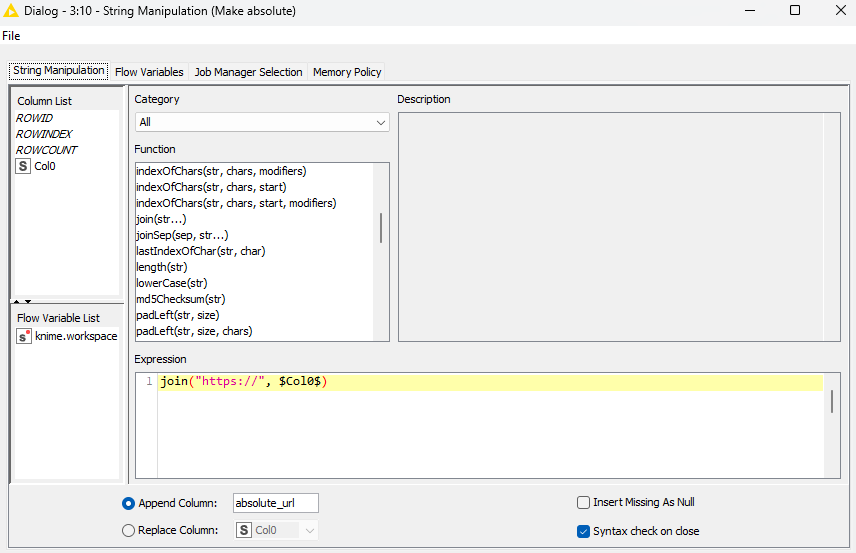
As we plan to get information from webpages later on, it will come handy to add the https:// protocol to our links to convert them into web pages that can be accessed and navigated. This can be easily achieved with the String Manipulation node. As we configure it, we simply use the join() expression to join the https:// string with each row in the table.
While possible, retrieving all 351 web pages may slow down our analysis. For demonstration purposes, here we filter our results to the last 20 rows with the Row Filter node to achieve more speed for our upcoming loop.
After filtering the rows, the data preprocessing is now complete and we are ready to scrape our web pages. We will process one link at a time by building a chunk loop.
Step 3: Use Chunk Loop to process links
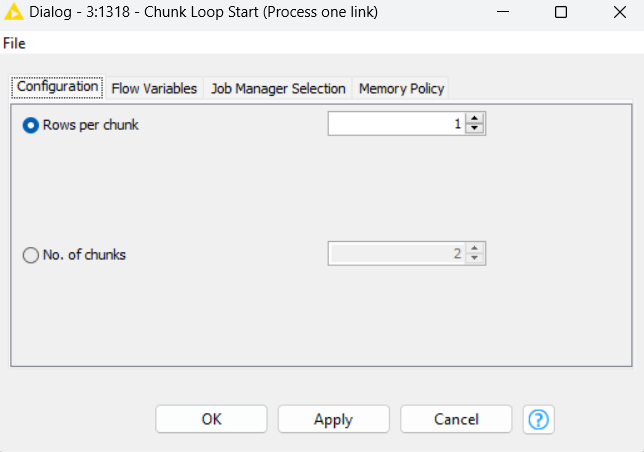
We create a loop with the Chunk Loop Start and Loop End nodes and put our Webpage Retriever node inside this loop. The idea with the Chunk Loop is that we divide the initial dataset into smaller chunks for further processing. Thus, each iteration processes another chunk of rows. You have the flexibility to configure the chunking either by defining a fixed number of rows per chunk or by specifying a fixed number of chunks. We opted for the first choice and settled on one row per chunk.
To signify the termination of this loop and collect the intermediate results, we employ the Loop End node which concatenates all the incoming tables row-wise.
Step 4: Scrape the web with the Webpage Retriever
The Webpage Retriever node obtains webpages by issuing HTTP GET requests and parses the requested HTML web pages using the jsoup Java library under the hood. The parsed HTML is cleaned by removing comments and, optionally, replacing relative URLs by absolute ones.
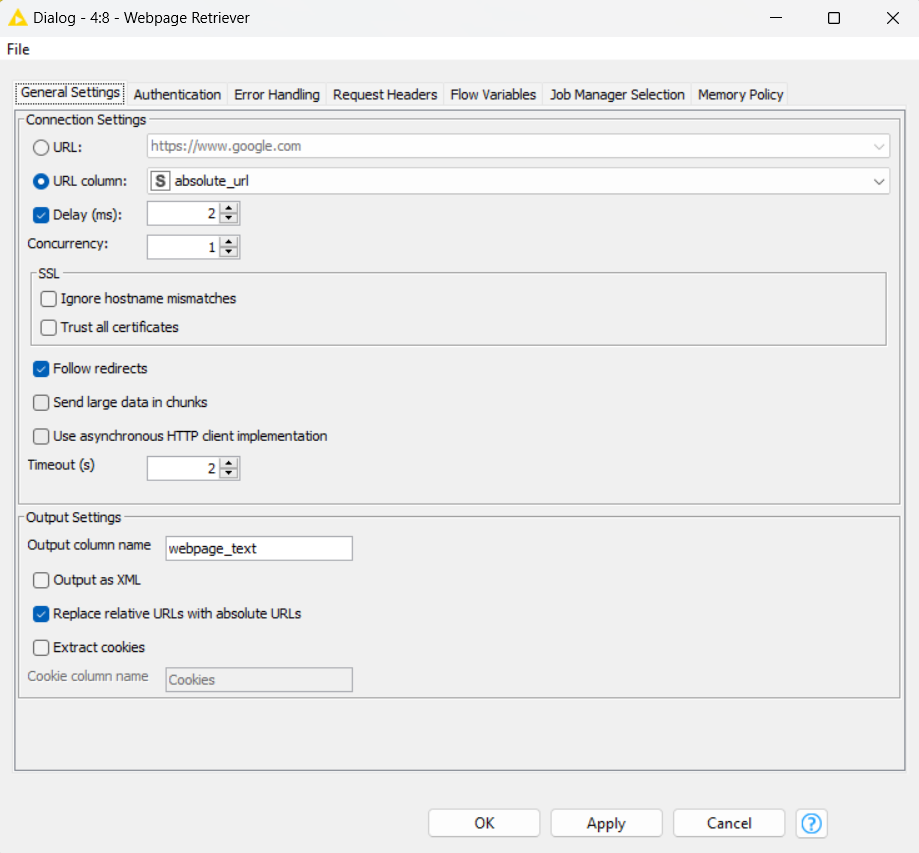
The “General Settings” tab of the Webpage Retriever node is the vital component of this web scraping workflow, providing you with robust control over the process.
You have the option to input a fixed URL (manually specified) or a set of URLs from an optional input table. In our example, we opted for the latter. In essence, each URL will generate a request and the result of each request is returned in the output table.
The Webpage Retriever node includes options to regulate the pace and timing of server requests using Delay, Concurrency, and Timeout parameters to ensure efficient data retrieval without overloading the server.
Delay allows you to set a specific interval between successive requests, measured in milliseconds. Delay is particularly useful when dealing with websites that have strict rate limiting measures in place. By introducing a delay between requests, you ensure that you're not overloading the server, reducing the chance of being blocked.
Concurrency controls the number of simultaneous requests that can be sent to the website. A higher concurrency value means more requests are made concurrently, speeding up the scraping process. However, keep in mind that a very high concurrency can potentially overwhelm the server or trigger anti-bot measures, so it's important to find a balance.
Timeout sets a limit on how long the retriever node will wait for a response from the server before giving up, this time in seconds. If you're dealing with slow servers or networks, increasing the timeout can prevent unnecessary failure of requests. However, a very high timeout can make your retrieval process inefficient if the server is consistently slow or unresponsive.
The “General Settings” tab also offers a range of output configuration options. It provides various options to output data in XML format, name the output column and replace relative URLs with absolute ones.
The final output setting is the ability to extract cookies from the website. Cookies are small pieces of data stored by a website on a user's browser to remember information about them. When it comes to web scraping, extracting cookies can provide meaningful insights such as understanding a website's user tracking mechanisms.
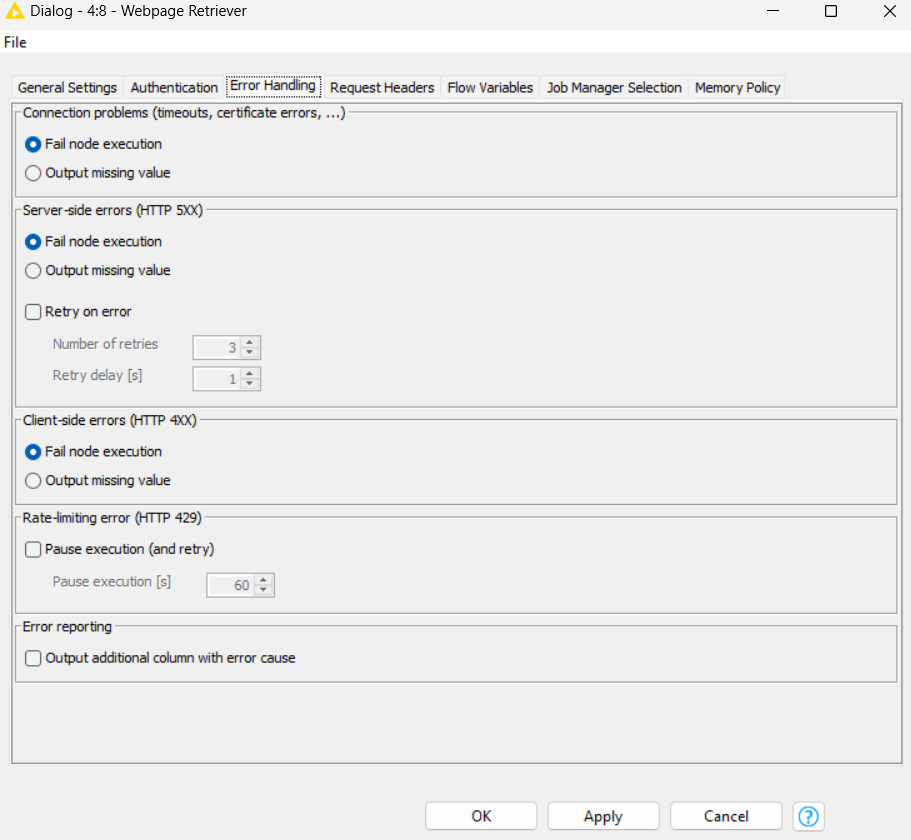
Similar to other nodes in the KNIME REST Client Extension, the Webpage Retriever also has an “Error Handling” tab. This tab offers capabilities to manage a variety of connection and HTTP errors. In cases of connection issues such as timeouts and certificate errors, the node provides mechanisms to efficiently detect and handle these faults.
For server-side errors, denoted as HTTP 5XX, the node includes error handling protocols to report these errors. Similarly, for client-side errors, categorized as HTTP 4XX, the node is capable of recognizing these errors.
An additional feature available under this tab is the option to add an extra column to the output, dedicated to error reporting. This column will display the cause of any errors that occur during execution.
These error handling features may either result in node execution failure or output a missing value, as per the chosen settings. This flexible approach allows users to customize how the node behaves under various error conditions.
The “Error Handling” tab may, however, not cover all potential exceptions or errors that can occur during the execution of a workflow.
This is where the implementation of Try and Catch Error nodes comes into play. Inside the Chunk loop, we have the Try and Catch Error nodes for manual error control, along with the Webpage Retriever node for web scraping. Let’s dive into the functionality of these nodes.
The Try and Catch Error nodes allow workflow developers to handle exceptions and errors in a more detailed and customizable manner. The Try node tries to execute a node or a series of nodes, and if an error or exception occurs, the Catch node catches this error and gives information about it.
The Try (Data ports) node marks the beginning of a try-catch block to account for any potential failures. After sending the URL to the Webpage Retriever, the upper input port of the Catch Errors (Data Ports) node simply passes on the input of the execution, if the execution was successful.
Should the execution on the top branch fail (and a matching try node was connected before the failing node), then the input from the lower port will be forwarded and the flow variable output port will contain information related to the identified error by selecting “Always populate error variable” in the configurations of the Catch Errors node.
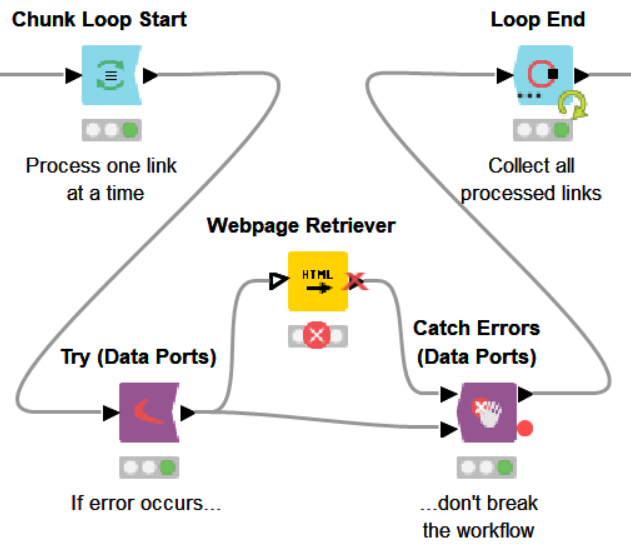
Using the Variable to Table Row node, we can then extract the errors into a table and store them using one of the many writer nodes (e.g., the Excel Writer node) for logging purposes.

Finally, after collecting all information from processed links and removing the missing rows with the Row Filter node, we’re ready to derive some meaning out of data.
Step 5: Analyze and visualize results
In the “Static Dashboard” component, we build two parallel branches.
In the first branch, we use the Row Sampling node to extract a sample of 3 web pages for a sanity check. Then, we employ the Tile View node to interactively engage with the text, displaying each row as a tile.

In the second branch, we utilize the String Manipulation node to count the occurrences of the word ‘KNIME’ in the text. We visualize this count using the Histogram node and access descriptive statistics like min, max and mean values with the Statistics node. With an occurrence count, the interactive view of the Histogram node displays how many times the word ‘KNIME’ occurs in different bins.
The Statistics node offers a statistic view and 3 different table outputs of statistics, nominal histogram and occurrences. For instance, the word ‘KNIME’ occurs an average of 18.4 times in blog posts. The least amount of times it occurred was 9 and the most amount of time was 32.

Web scraping techniques accessible to everyone
Use this workflow to get the necessary tools and techniques to extract meaningful information from web pages and communicate your findings in simple yet engaging visualizations. By leveraging the low-code/now-code KNIME Analytics Platform, the process of automated data extraction and visualization becomes accessible to all.
