
We recently introduced a new feature: the refresh button gives users more flexibility when building data apps. This feature allows composite views to be dynamically refreshed on demand and all content to be displayed on a single page.
In this article, we cover how to build interactive, composite views in KNIME Analytics Platform. Once built, you can choose to deploy these views as data apps with KNIME Server.
Building a composite view with KNIME Analytics Platform involves the following steps:
- First, build a workflow using widget and view nodes
- Second, create a component by encapsulating the workflow
- Lastly, edit the appearance of the component's composite view with the Visual Layout Editor
From there, you can control the underlying workflow from a user-friendly interface: the composite view:
- First execute the component
- Open its interactive composite view
- Then interact with views by selecting and filtering and/or inserting values
- Apply your new settings by injecting the human interaction back into the workflow behind the composite view
In order to perform the last step, you previously had to re-execute the entire component each time you wanted to apply the new configurations from the composite view.
The new Refresh Button Widget node allows a user to execute parts of the underlying workflows, rather than the entire workflow within a given component. This means an entire data app can be built within one component, and it will include the entire UX on a single page.
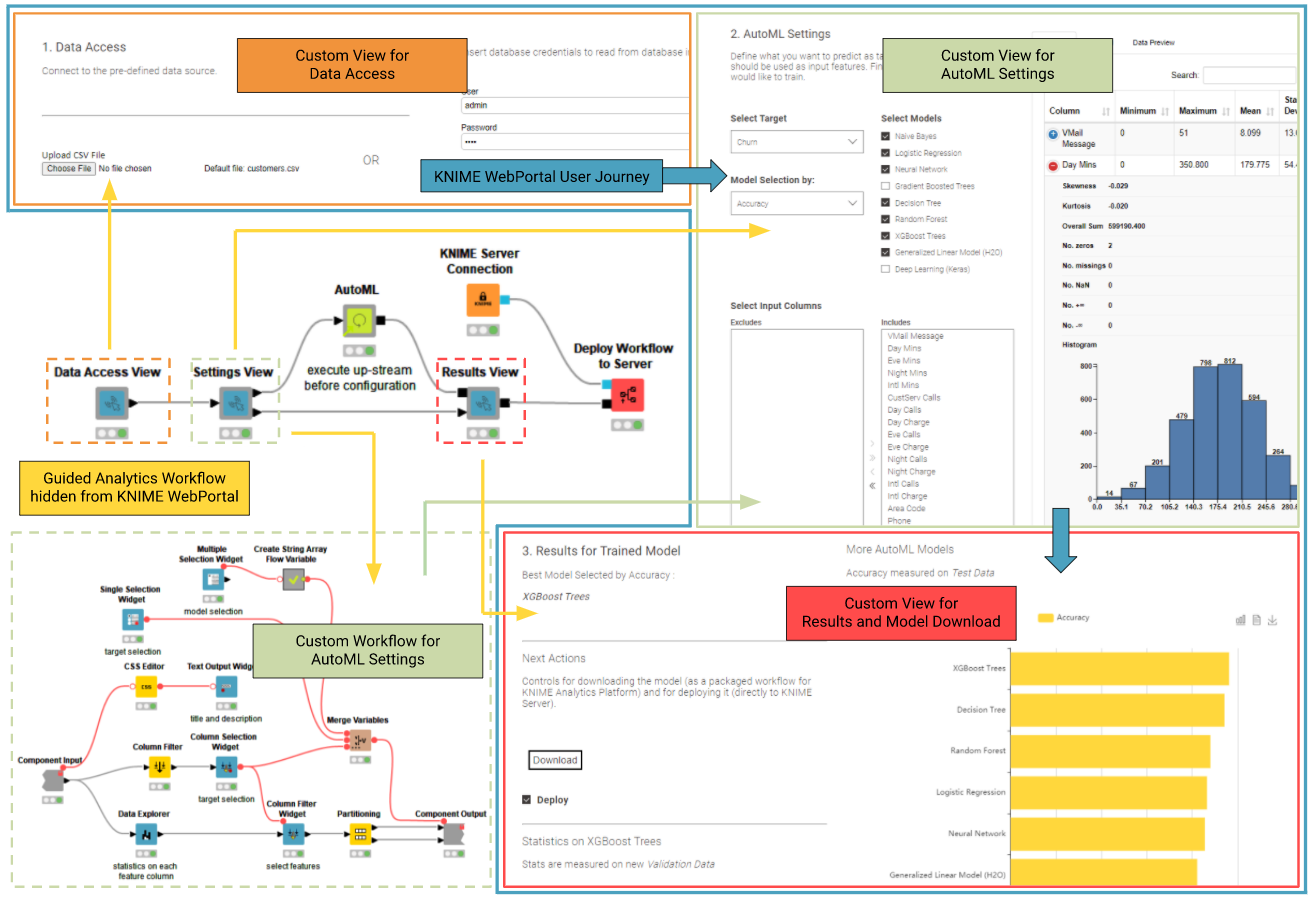
Now Re-Execute Only The Necessary Parts of the Workflow
The new Refresh Button widget node creates a button in the component's composite view. Depending on where the node is placed within the component workflow, you can decide which workflow segments should be re-executed. The execution is controlled by simply pressing the button in the view. Building a user interface with visual programming has just become extremely flexible by simply using one more widget node.
Download Eight Examples of Using the Refresh Button Widget Node
Below we are going to look at eight examples of how the Refresh Button Widget node can be adopted. We have kept the workflow as small as possible for you to focus on the important details. We are going to cover topics from basic UX design concepts to complex visualization and data science techniques. All eight examples simply require you to download and open the component view containing the new widget on your KNIME Analytics Platform and press the button. Hold on now, it is about to get flashy!
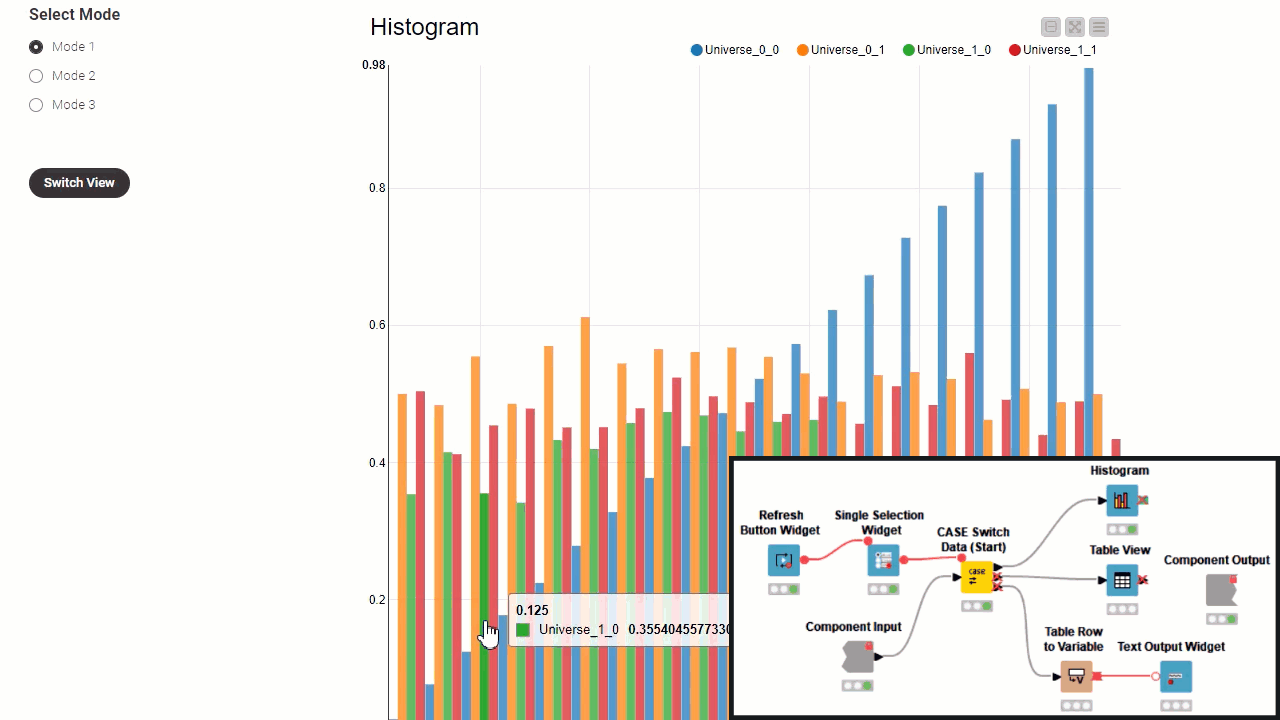
1. Dynamic Content: Swap displayed content with other content
When designing a component composite view you usually were forced to display all the available view and widget nodes. However now by combining the Refresh Button Widget node with an additional widget, in our case the Single Selection Widget, and any switch nodes, like for example the Case Switch Data (Start) node, you can decide which view should be activated and displayed. Besides simply selecting what is displayed on the frontend, this strategy can be used to control in general what is being processed in the backend upon user interaction.
Download the Dynamic Content workflow that demonstrates this example from the KNIME Hub.
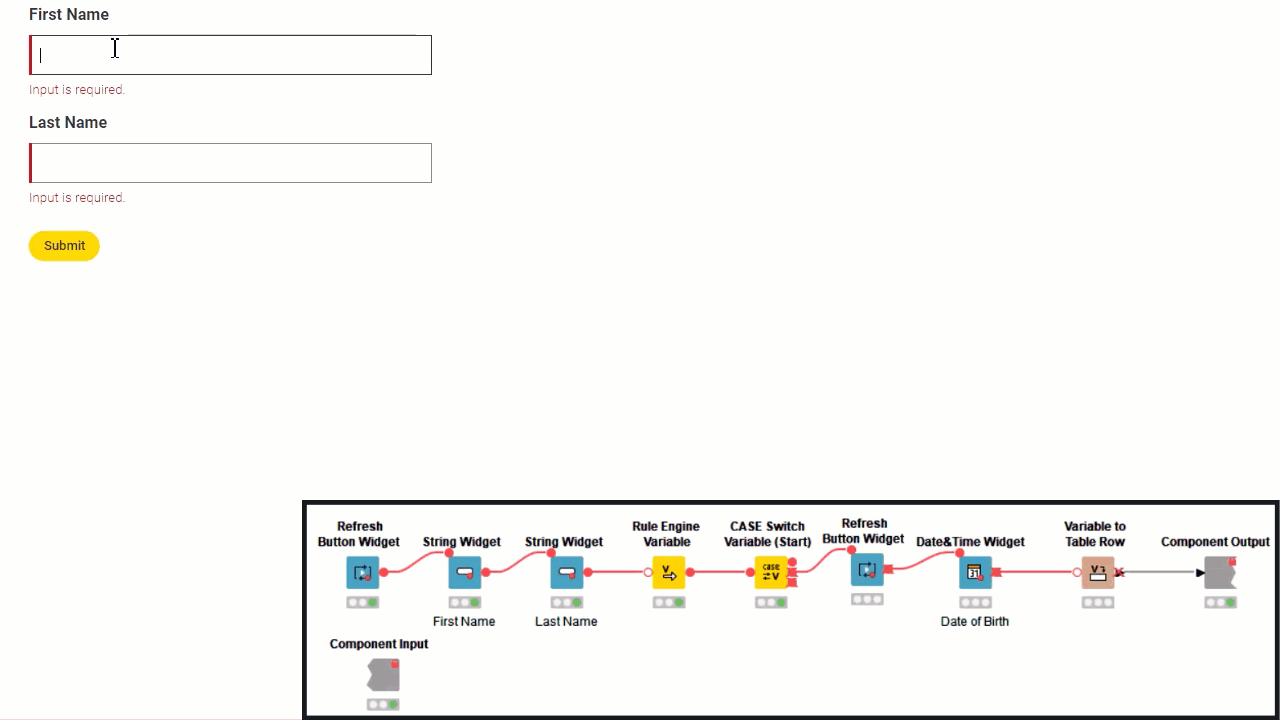
2. Sequential Logic: Show more and more content based on user progress
Often you might want to hide some of the views and widgets to the user until a few settings are provided. This is usually seen in forms where the next field appears only after the previous one is filled in correctly. In this case you need to combine the Refresh Button Widget with the interested Widgets and a Rule Engine Variable node will validate what the user is inserting and trigger the downstream switch node accordingly.
Download the Sequential Logic workflow that demonstrates this example from the KNIME Hub.
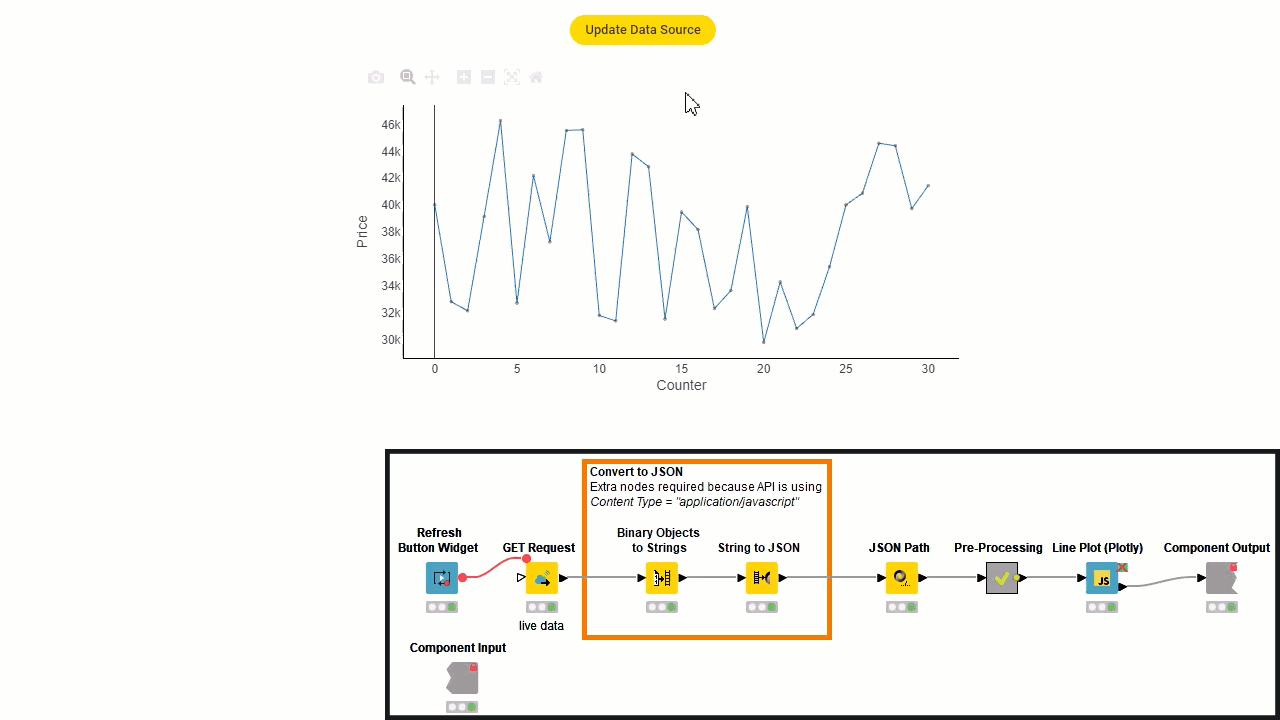
3. Update Data Source: Display new results by loading fresh data
Visualizations are only as good as the data they are displaying. While inspecting results from a live feed of data you might need to refresh often, making sure what you are seeing visualized is still relevant. By placing the Refresh Button Widget on top of any KNIME node that is able to fetch new data you can easily control this. In our example we coupled the new widget with a GET Request node from a free API returning responses in JSON format. Despite this the same strategy can be generalized for real time data visualization from a DB Reader, from a CSV Reader connected to a File System Connector, or even from a Kafka Consumer. Endless new ways to refresh new data into the interactive view.
Download the Update Data Source workflow that demonstrates this example from the KNIME Hub.
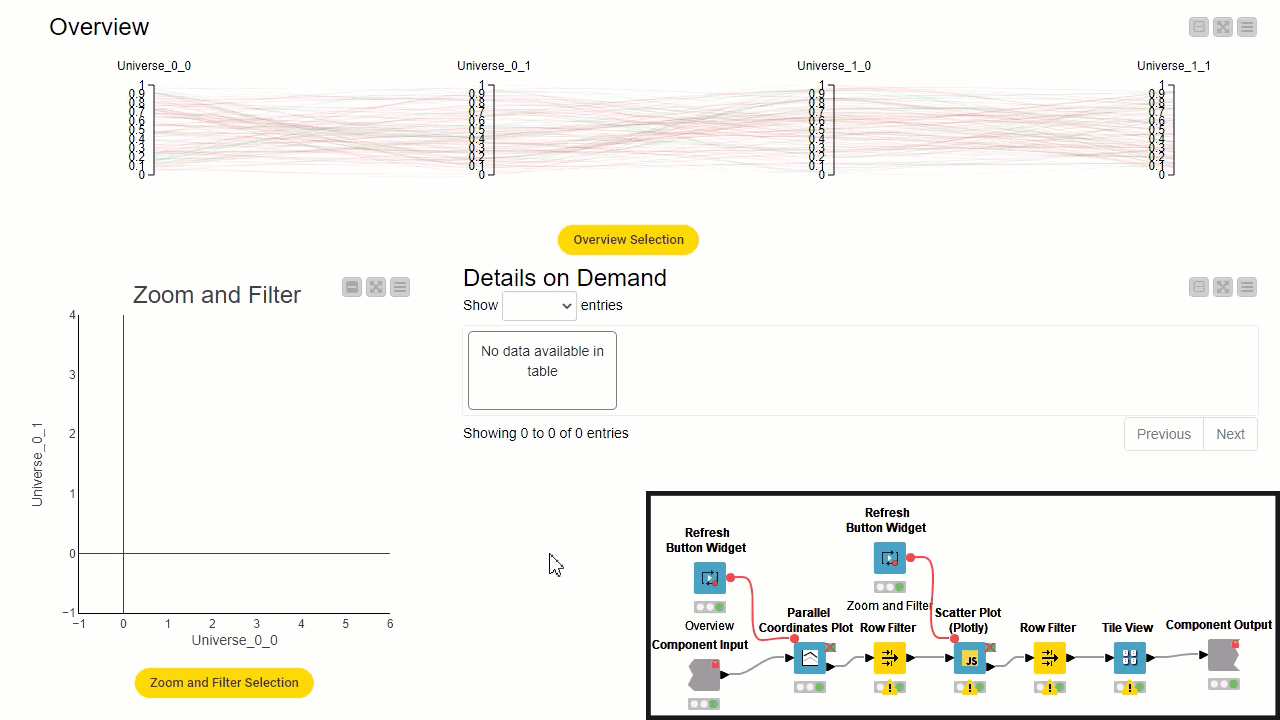
4. Concurrent Selections: Overview first, zoom and filter, details on demand, repeat
While performing a complex data exploration you might want to have multiple charts visualizing different sets of data points and features. Usually this technique visualizes data in these stages: visualize first all features and all data points (overview); visualize only a subset of data points that look interesting to you (zoom and filter); display in detail the single feature values of a handful of data points (details on demand), then start over again. Most views in KNIME Analytics Platform offer interactive selection and once re-executed store the selection in a column at the output table. By coupling with a Refresh Button Widget, a View, a Row Filter and repeating this sequence again and again you can go from overviewing the datasets to getting details on single rows.
Download the Concurrent Selections workflow that demonstrates this example from the KNIME Hub.
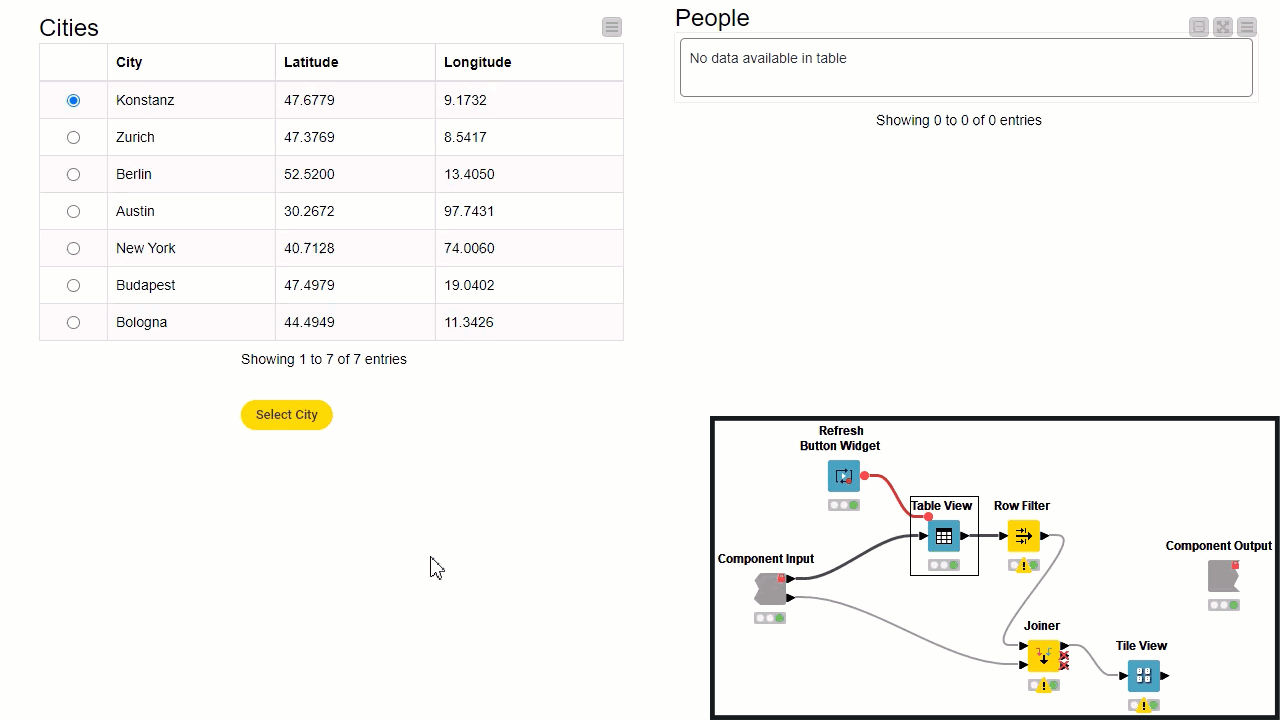
5. Selections on Related Tables: Select from one table, display selection in another table
When visualizing a complex dataset you might have more than one table available. The tables are usually connected via a common identifier column. Wouldn’t it be great to select data points in one table and see the related data points selected in the other table? Like in the previous example we can select some data using the Refresh Button Widget followed by a View and a Row Filter. This time however we also add a Joiner data which joins the two input tables on the selected data points, then a View node again and we can visualize the selection in the second table.
Download the Selections on Related Tables workflow that demonstrates this example from the KNIME Hub.
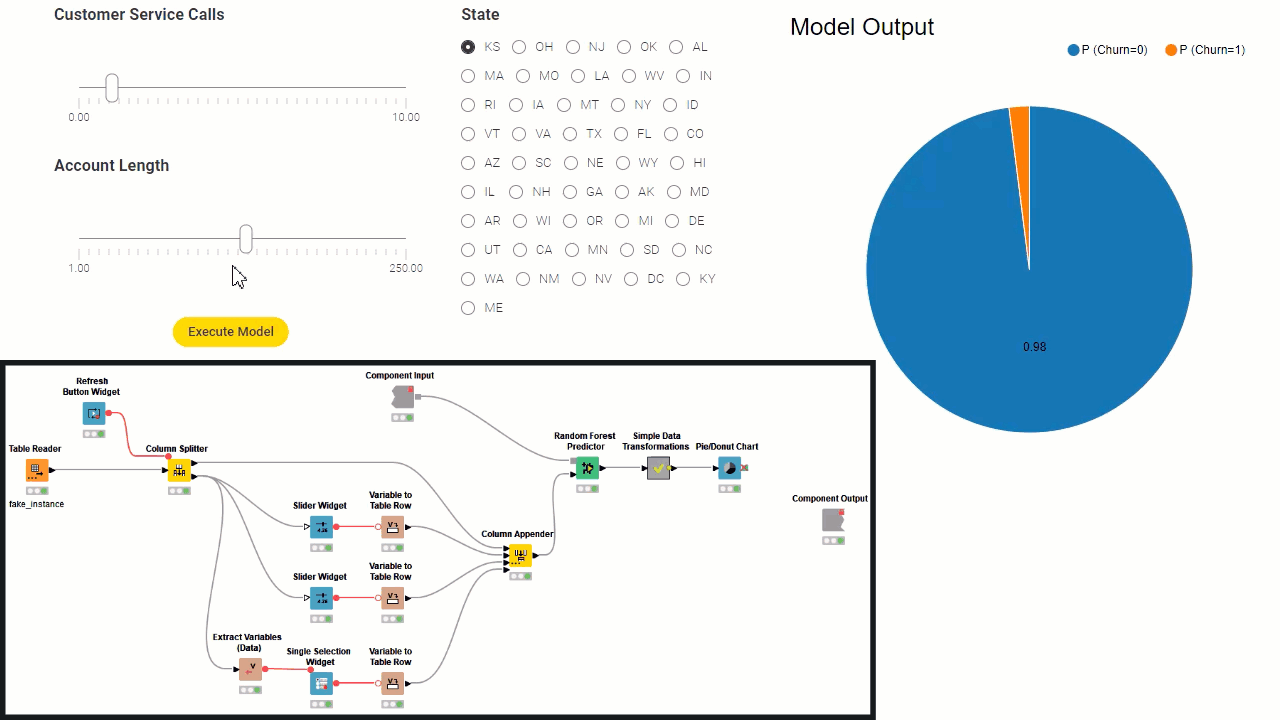
6. Trigger ML Backend: Train, Predict, Optimize…
Visualizing data or simply displaying information about the model status is key when deploying machine learning. Designing a front end on this kind of data requires knowledge on the complex ML processes running behind the user interface. By coupling the Refresh Button Widget and a few Widgets with any of the ML nodes KNIME offers, a data scientist can easily design complex events triggered by a simple button. In the example below, we control a trained Random Forest to predict an artificial data point provided by the interactive view user. The user can understand how the model works by tweaking the input of the model via sliders and radio buttons and see how the output prediction reacts.
Download the Trigger ML Backend workflow that demonstrates this example from the KNIME Hub.
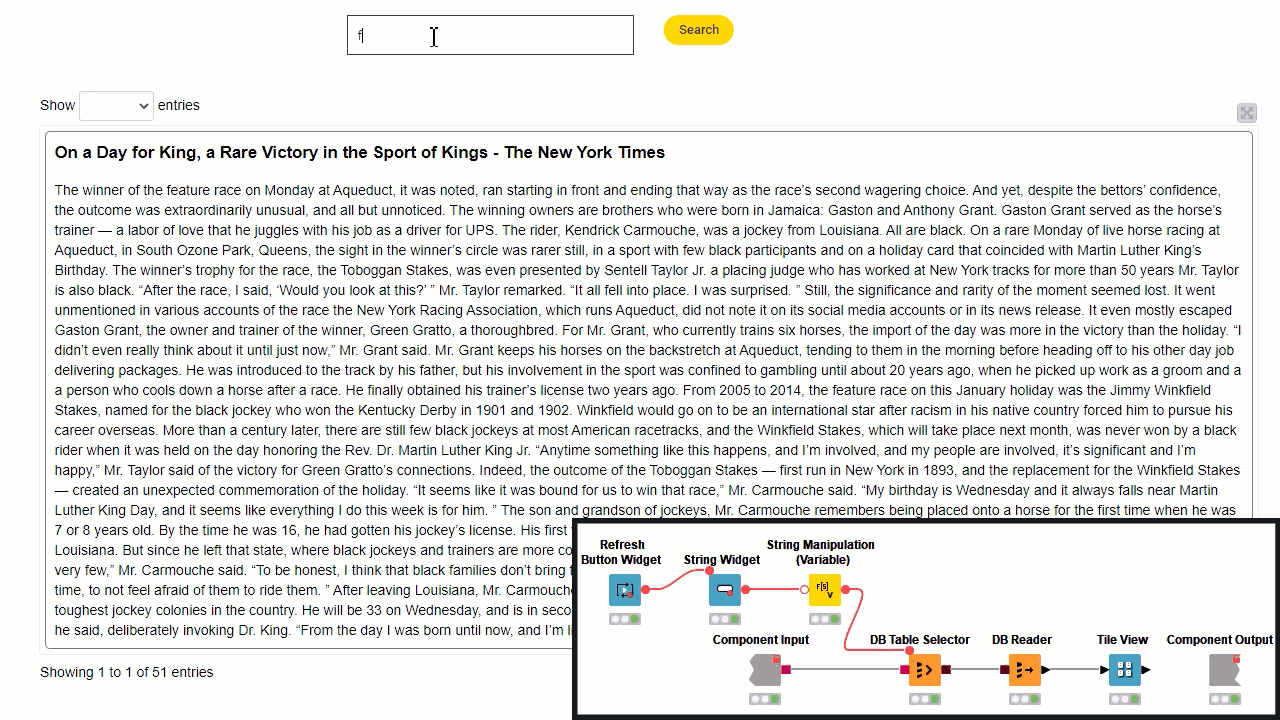
7. Trigger DB Backend: The first search engine ever built without coding
Search engines are deployed in most web and mobile applications and the majority of their users ignore what happens behind the scenes. A KNIME user however can understand and build one pretty easily. All we need is a Refresh Button Widget followed by a String Input Widget and the DB nodes, injecting the user parameter into the database query. This works not only for DB nodes but for any KNIME node able to load data based on the user search input: Twitter Search, Google Analytics Query, Salesforce Simple Query and so on so forth.
Download the Trigger DB Backend workflow that demonstrates this example from the KNIME Hub.
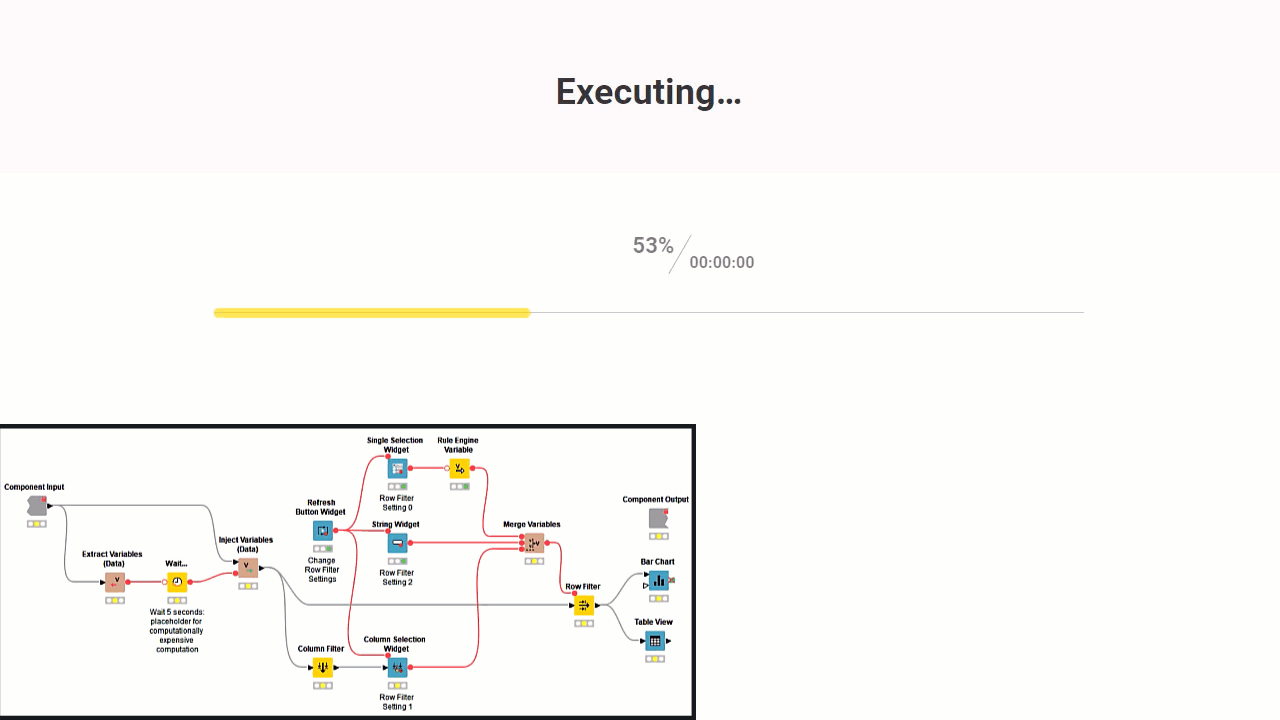
8. Efficient Component Re-execution: Change any node settings and re-execute only downstream
Now that we have seen a few examples we can generalize the use of the new Refresh Button Widget even further. This new node allows you to re-execute workflow segments inside the component while before you were always forced to re-execute the entire component workflow. You need to re-execute a workflow segment when you want to change one or more of the node settings in there and get new results. Every time you change a few node settings, you do not want to re-execute every node in the component because some of them might be slow to execute and -- given that they are upstream of the component workflow -- return exactly the same results from the first execution. In the example below we show how the button changes the settings of a Row Filter without executing the Wait... node upstream, which would take a few seconds. This strategy allows full control of the component settings via a user friendly interface, but keeps the overall user experience super fast and responsive.
Download the Efficient Component Re-execution workflow that demonstrates this example from the KNIME Hub.
Deploy Data Apps to 1, 10, or 1000 End Users
All of the examples above work locally on your KNIME Analytics Platform. The true potential of data apps relies on making these interactive views available to any user in your organization via a web browser.
Deploy the underlying workflows to a KNIME Server and give end users access to the resulting data apps through the KNIME WebPortal. The data app you built by dragging, dropping and connecting nodes can be then shared with anyone either via a public or private link. Share your dynamic, interactive data apps with a colleague, a team of business users, or across the entire organization.
Read more about how to Build a Data-Powered Organization with KNIME Data Apps.