
Recently on social media we asked you for tips on tidying up and improving workflows. Our aim was to find out how you declutter to make your workflows not just superficially neater, but faster, more efficient, and smaller: ultimately an elegant masterpiece! Check out the original posts on LinkedIn and Twitter.
In this collection of your feedback, we isolate and discuss a few areas worthy of investigation in the post-development phase of your workflow. Inspired by Marie Kondo’s approach to tackling things category by category, this article is tidily organized into the following sections:
- From confusion to clarity: Improve the transparency of your workflow.
- Reorganize your workflow: Imagine your ideal workflow
- Efficient enough? Increase the efficiency of your workflow
- Ask yourself if there is another technique: Insert a dedicated node/Inquire among your peers
1. From Confusion to Clarity
As you build your workflow, the twists and turns that it takes can produce quite some levels of confusion. We all build messy workflows because we are assigned a task and the specs are either not known at the beginning or they change on the way. This is normal. At the end - in the post-processing phase - we need to look back at the mess we have potentially made and reorganize it in a more efficient and structured manner, putting logical blocks into encapsulated functions, and adding documentation.
1.1 Document what happens inside your workflow
You can document these blocks and individual nodes by providing annotation notes and comments. Use the Annotation Note feature to mark sections of your workflow and describe what is being done in this part of the workflow in the note. And use the Comment function to note down what individual nodes are doing. This video describes “Documenting Your Workflow”.
If you share workflows or results with your colleagues, they can then easily understand the individual steps and provide feedback. And if you share your workflow on the KNIME Hub, this information makes your workflow easier to understand for the community.
Backward compatibility across all versions of KNIME Analytics Platform ensures that the work you've done today can be safely used and deployed in the future. So, if you’re returning to a workflow after a longer period of time, it’s much easier to see at a glance what each part of the workflow does if it is well documented.
1.2 Document your workflow's metadata
So much for commenting the single pieces inside a workflow. What about explaining what it does? Each workflow has metadata, which are not only useful when you open the workflow in KNIME Analytics Platform, but also when you search on the KNIME Hub: If you search for “Guided Analytics”, for example, you’ll see a description of the workflow and the tags associated with each workflow result. The tags are of particular importance for a successful search of your workflow. If you plan to share a workflow on the KNIME Hub, choose the tags carefully!
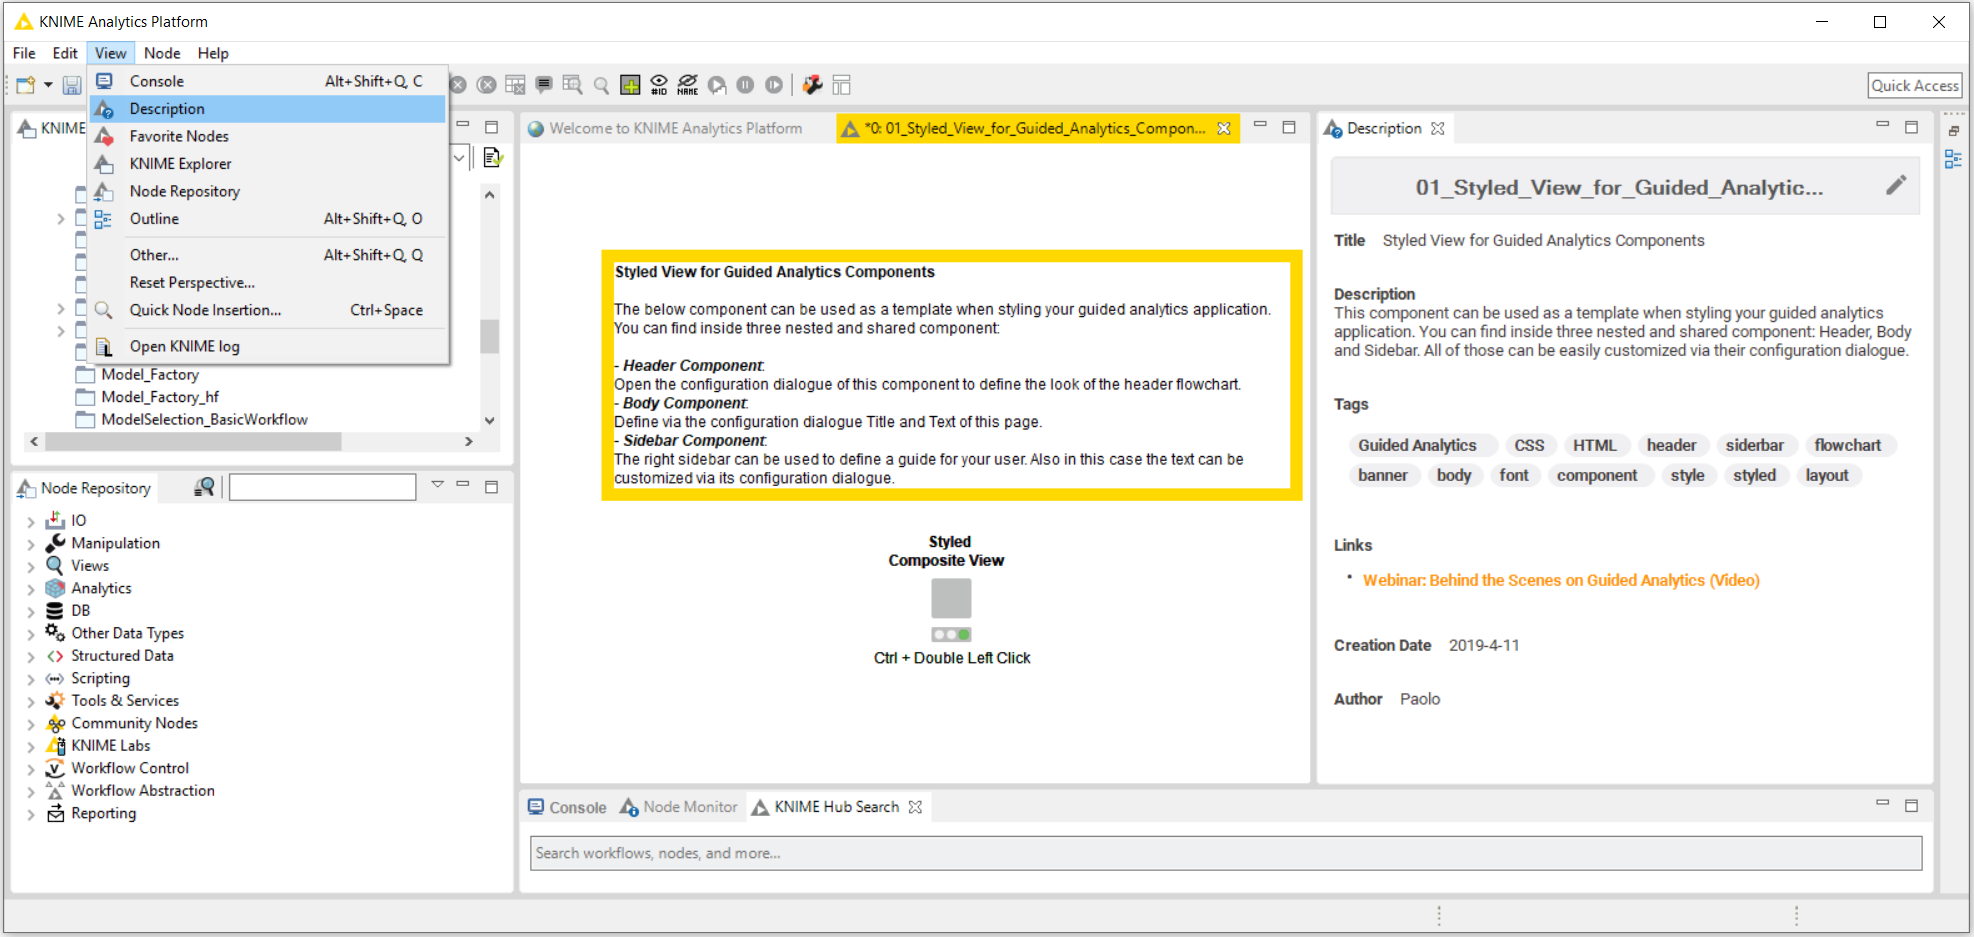
Editing workflow metadata
It’s very easy to edit these metadata with the Description view, which you can access after you have selected a workflow in the KNIME Explorer.
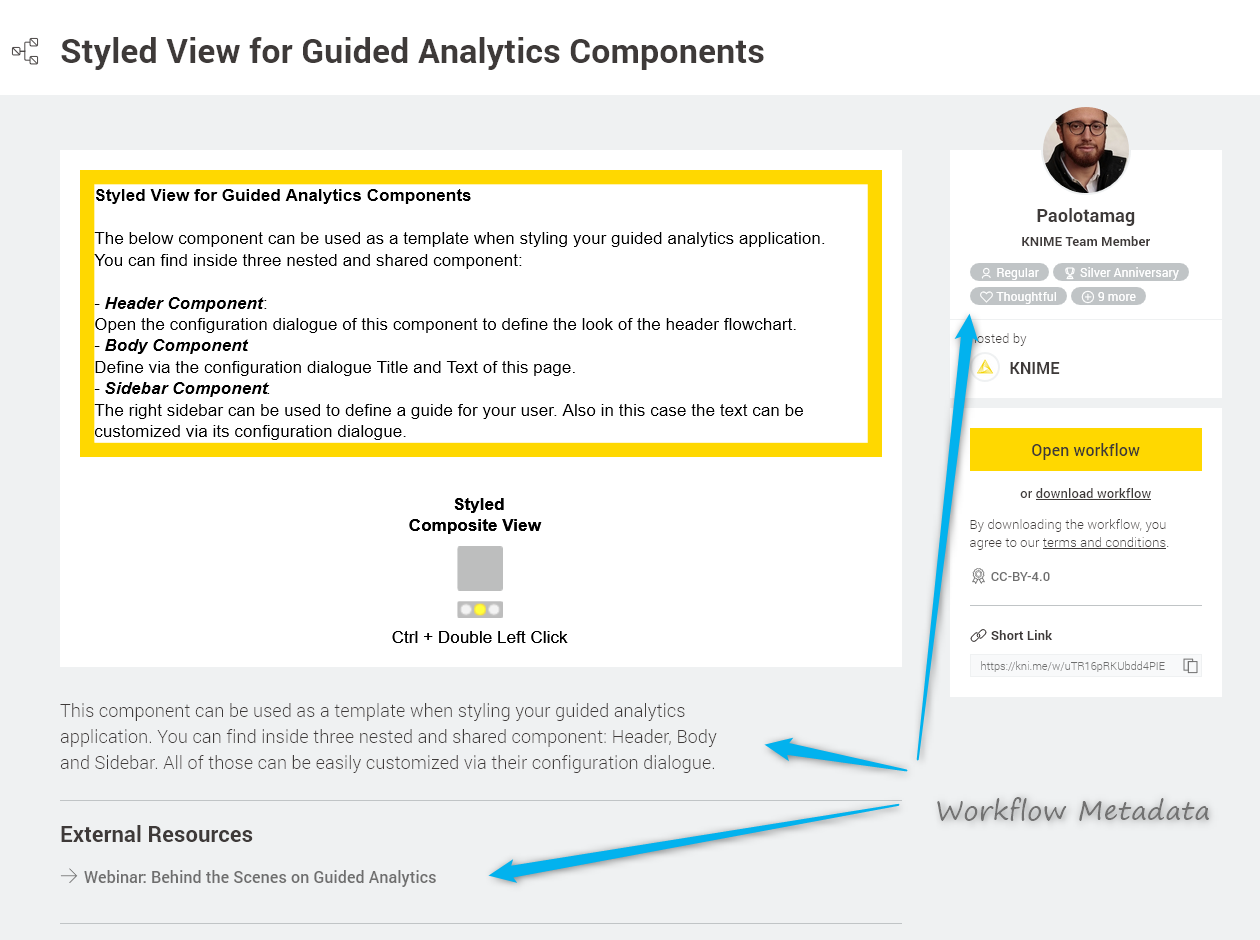
Below, in Fig. 3 you can see where your workflow metadata will be shown when the workflow is uploaded to KNIME Hub.
2. Reorganize Your Workflow
Look at your workflow and then imagine how it should be ideally. With fresh eyes, it’s often easier to see how a complex process could be simplified and better organized to be more efficient. Check whether any of the tasks inside the workflow are autonomous and could be encapsulated and reused. Can the workflow be stripped of any redundant operations to be made leaner? Can the workflow be reorganized into layers of operations to aid transparency and understanding? Now let’s look at how to tackle this.
2.1 Break up your workflow into metanodes & components
Any complex task can be broken into smaller, simpler pieces. As can your workflow. John Carr suggests to always look at your complex workflow from a distance at the end of the development phase and then restructure it into simpler smaller sub-flows.
As for all software development projects:
- Step 1: Identify self-contained logical blocks of nodes. The advantage of this is that you find out which operations are redundant and can be removed or simplified. Which, of course, makes the whole workflow leaner and faster.
- Step 2: Encapsulate these self-contained blocks into either a metanode or a component, which can then be reused for the same task in other workflows; not only for yourself but for colleagues or the Community too; grouping into smaller, self-contained, leaner and non-redundant logical blocks improves the efficiency and understanding of your workflow at first glance.
On this same note, Joshua Symons points out that “using a metanode is not just hiding the mess. A well-formed metanode is reusable across multiple workflows.” He brings up the example of calculating TF * IDF in a text processing workflow or cascading String Manipulation nodes for complex string operations. The whole operation consists of a series of Math Formula or String Manipulation nodes that can be easily grouped into a component.
This brings us to the topic metanode vs. component. What is the difference and how are they used?
Metanode:
Essentially a metanode allows you to organize your workflow better, taking part of a larger workflow and collapsing it into a gray box, making it easier for others to understand what your workflow does as you can structure it more hierarchically.
Component:
A component not only hides the mess but also encapsulates the whole function in an isolated environment. To paraphrase a famous sentence about Las Vegas: What happens in the component stays in the component. All flow variables created in a component remain inside the component. All graphical views created in the component remain in the component’s view. This makes your workflow not only cleaner on the outside but also on the inside, keeping the inevitable flow variable proliferation under control, for example.
Tip: If you want to let a flow variable in or out of the component, you set the component’s input and output nodes respectively. Cem Kobaner comments “Use flow variables and create generalized metanodes with parameterized node configurations”. He calls this dynamic visual programming.
Sharing components:
A component can also be reused in your own workflows and shared with other users via the KNIME Hub or KNIME Server.
If you want to have the component handy for reuse in your KNIME Explorer, create a shared component by right clicking it and selecting Share... in the menu. After you’ve defined the location where you want to save it, specify the link type. This defines the path type to access the shared component. Similar to a data file, it can be absolute, mountpoint-relative, or workflow-relative. Now, after clicking OK, you can find the shared component in your KNIME Explorer and you can drag and drop the shared component to your workflow editor and use it like any other node.
If you save the shared component in your My-KNIME-Hub, you’ll be able to see, reuse, and share the component via a KNIME Hub page. To open this page, right click the shared component under your My-KNIME-Hub and select Open > In KNIME Hub in the menu. From the KNIME Hub page that opens, you and other users can drag and drop the component to their workflow editors, and also share the short link that accesses this specific KNIME Hub page.

Note that the KNIME EXAMPLES Server provides shared components for parameter optimization, complex visualizations, time series analysis, and many other application areas. Find them on this KNIME Hub page and in the “00_Components” category on the EXAMPLES Server.
So how can you best determine which parts of your workflow can be reorganized?
2.2 Checklist to reorganize your workflow
When we asked you for feedback on social media, a lot of people responded with their best practices and tips for improving writing workflows. We grouped your feedback and came up with this checklist for reorganizing workflows:
- Ask yourself what the objectives are
- Take an iterative approach to writing workflows - always go back and check what you have done
- Identify repeating sections of your workflow and then create a template to do that task
- Think carefully about whether there is a more efficient way to do what you’re doing
- Look for redundant blocks of nodes
3. Efficient Enough?
To write efficient workflows you probably need to check that the nodes you have used really are the best nodes for the job. We’ve grouped together a short list of our nodes and practices and those you sent to us on social media. See if there’s something you might like to try out yourself.
3.1 Don’t repeat operations: Sorter node after Groupby node
Rosaria Silipo commented: “One thing that I have learned the hard way is that you should not use a Sorter node after a Groupby node. In fact the Groupby node already sorts the output data by the values in the selected group columns. So, you see if you add a Sorter node after the GroupBy node you waste time and resources to sort twice the same set of data. Now if the dataset is small this is not a big problem, but if the dataset is big … the slow down in execution can be noticeable."
3.2 Many nodes in cascade vs. multiple expressions in a single node
Sometimes simple math operations or string manipulation operations end up in a long sequence of the corresponding nodes. Is there a way to avoid the cascade of nodes performing math or String Manipulation operations?
“It’s always a good idea to understand how the tools work and what they can do. For example the Column Expressions node allows you to have multiple expressions for multiple columns in a single node, which helps keep things really neat, clean, and simple,” says John Denham.
The Column Expression node lets you append an arbitrary number of columns or modify existing columns using expressions. For each column that’s appended or modified, you can define a separate expression - created by using predefined functions similar to the Math Formula and String Manipulation nodes.There’s also no restriction on the number of lines the expression has and the number of functions it uses. You create your very own. This also increases the workflow’s execution speed for a big bulk of cascading operations.
3.3 In-database processing / SQL Code
Julian Borisov advises - whatever can be done in-database, should be done in-database! For example, SQL code can replace operations implemented via a sequence of nodes.
The example workflow on the KNIME Hub - the In-Database Processing on SQL Server workflow - performs in-database processing on a Microsoft SQL Server. Performing data manipulation operations within a database eliminates the expense of moving large datasets in and out of the analytics platform. Further advantages of in-database processing are parallel processing, scalability, analytic optimization and partitioning, depending on the database we are using. This is particularly true when using a big data platform.
Boost in speed
Performance has been a major focus of the latest release. KNIME Analytics Platform 4.0 and KNIME Server 4.9 use system resources in the form of memory, CPU cores, and disk space much more liberally and sensibly. Specifically, they:
- attempt to hold recently used tables in-memory when possible
- use advanced file compression algorithms for cases when tables can’t be held in-memory
- parallelize most of a node’s data handling workload
- use an updated garbage collection algorithm that operates concurrently and leads to fewer freezes
- utilize an updated version of the Parquet columnar table store that leverages nodes accessing only individual columns or rows
As a result, you should notice considerable speedups of factors two to ten in your day-to-day workflow execution when working with native KNIME nodes. To make the most of these performance gains, we recommend you provide KNIME with sufficient memory via your knime.ini file. You can do this as follows:
- In the KNIME installation directory there is a file called knime.ini (under Linux it might be .knime.ini; for MacOS: right click on KNIME.app, select "Show package contents", go to "/Contents/Eclipse/" and you should find a Knime.ini).
- Open the file, find the entry -Xmx1024m, and change it to -Xmx4g or higher (for example).
- (Re)start KNIME.
3.4 Measure execution times: Timer node
There will always be execution bottlenecks. So how can we detect them - especially those that waste execution time? A precious ally in the hunt for execution bottlenecks is the Timer Info node. This node measures the execution time of the whole workflow and of each node separately.
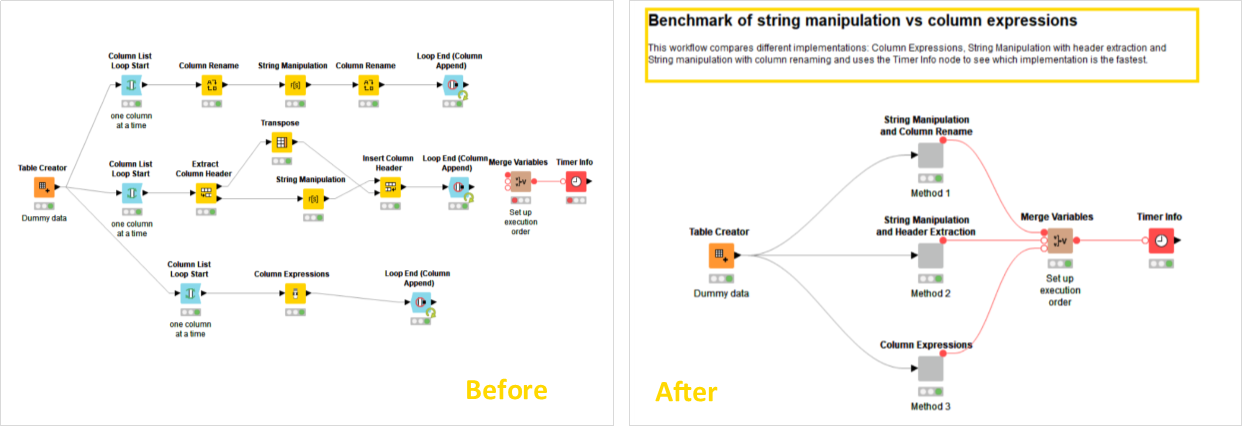
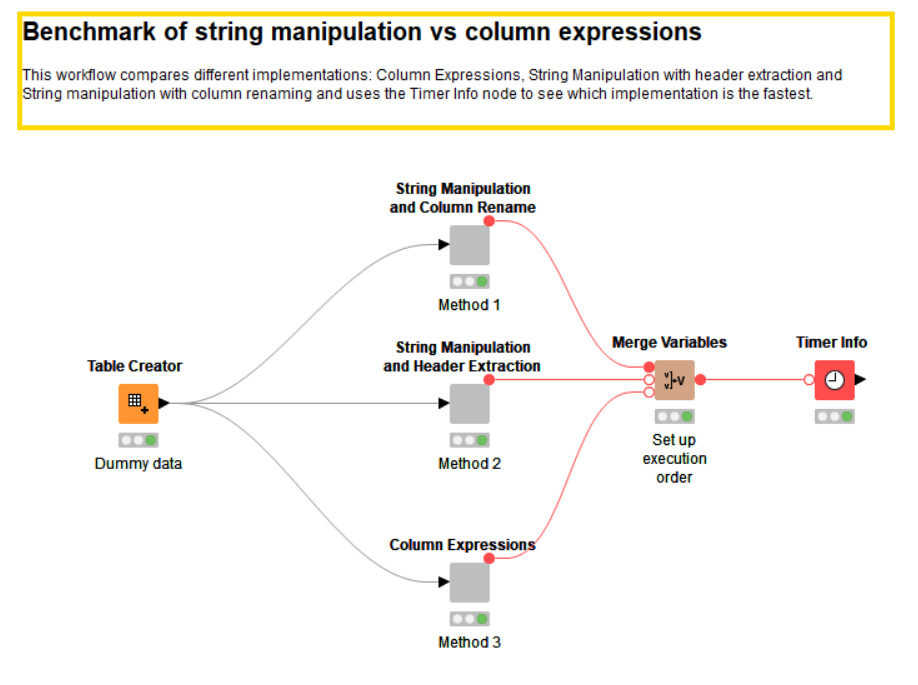
There’s a proverb about all roads leading to Rome. Translated to a workflow, there will always be several workflows to get to your final goal but you’ll want to pick the shortest and fastest one. In Misha’s example workflow in Fig. 5, he compares different implementations for the same goal - column expressions, string manipulation with header extraction and string manipulation with column renaming - and uses the Timer Info node to see which implementation is the fastest.
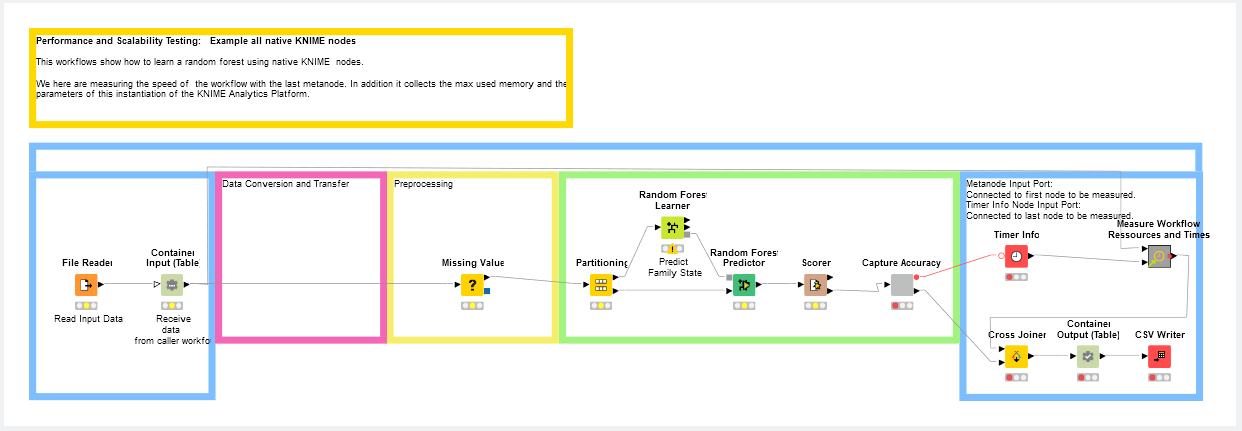
In the next example, Performance and Scalability Test, Iris and Phil investigated performance measures on workflows. They not only compare the speed of the different workflows but also how much memory were used from the different workflows. For this setup they compare different parameters and data sizes. The final metanode “Measure Workflow Resources and Times” is used to collect the maximum used memory and the start parameters of this instantiation of KNIME Analytics Platform. Also note the use of the Timer Info node. It tells you how longs which node and even which components take to execute. Just execute it after executing the previous nodes to find bottlenecks in execution time.
4. Ask yourself if there’s a better technique. Is there a dedicated node?
KNIME Analytics Platform works on data tables all together, not on the single data rows. Dedicated functions working on a whole data table are available. You don’t need to reprogram it from the start. This makes the usage of loops less necessary.
“When I use a loop, I always have in the back of my mind this idea that somewhere in the Node Repository there is a node that does exactly what I am trying to achieve with the loop in a much more complicated way.” says Rosaria Silipo (KNIME).
For example, if you are currently using a loop, for example to remove numeric outliers in different columns you can do the same thing with a dedicated node - the Numeric Outliers node. It removes values that lie outside the upper and lower whiskers of a box plot. If you do the same process with a loop, you would need quite a lot of data manipulation nodes inside to do so: Auto-Binner, GroupBy, String Manipulation, Math Formula, Rule-based Row Filter, and even more. The Numeric Outliers node can replace the whole loop, since it can remove outliers from multiple numeric columns at the same time.
But sometimes you cannot avoid using a loop. In this case, you need to choose the most suitable loop construct for your problem.
Chris Baddeley says: “Nesting of transformations within string manipulation can reduce concurrent string manipulation nodes and looping over a process vs. running parallel processes can reduce clutter”.
There are lots of loops to choose from: Counting Loop Start, Chunk Loop Start, Generic Loop Start, …..” Armin Ghassemi Rudd has written a blog post about them all! Look here for how to find the right loop for your purposes - on statinfer. Or check out our short video series on Looping in KNIME
Note: Remember that loops over nodes slow down the workflow execution speed.
4.1 Inquire among the community
If you want to find out if there is a more efficient way of ‘doing what you’re doing’, it can be a good idea to ask a colleague, or the KNIME Community.
- The KNIME Hub is a useful resource to see if you can find nodes that are maybe more efficient than the ones you’re already using. You can read more about how to use the hub on our About KNIME Hub pages
- Check on the KNIME Forum to see if other people know different KNIME tricks for performing a particular data manipulation.
By searching the Hub and talking to the Community on the KNIME Forum, you might find out about nodes with functionality you hadn’t heard of before.
Summing up:
To summarize how to tidy and improve your workflow:
- Good documentation and metadata improves your workflow’s readability
- Metanodes are great for tidying away sections of your workflow that distract visually from the focus of the workflow and for isolating logically self-contained parts.
- Components are excellent containers for repeatable functionality in your workflow, for avoiding the flow var proliferation, for creating new nodes with a configuration dialog, and can also be shared with your team and the KNIME Community
- The KNIME Hub and KNIME Forum are the places to go to look for other nodes that might be able to perform the specific task more efficiently and also useful platforms to share your workflows and ask the Community for feedback
Thank you to everyone who responded to our messy workflow campaign on social media!
And we will be watching out for the Declutter node as suggested by Mohammed Ayub “I would imagine, one day, we will have just one button called "declutter" which runs some AI stuff on the dependency graph of the connected/unconnected nodes and automatically groups/creates metanodes in the left --> right order of "Data Reading Nodes", "Data Manipulation Nodes", "Data Modelling Nodes", "Data Writing/Output Nodes" etc etc.”