
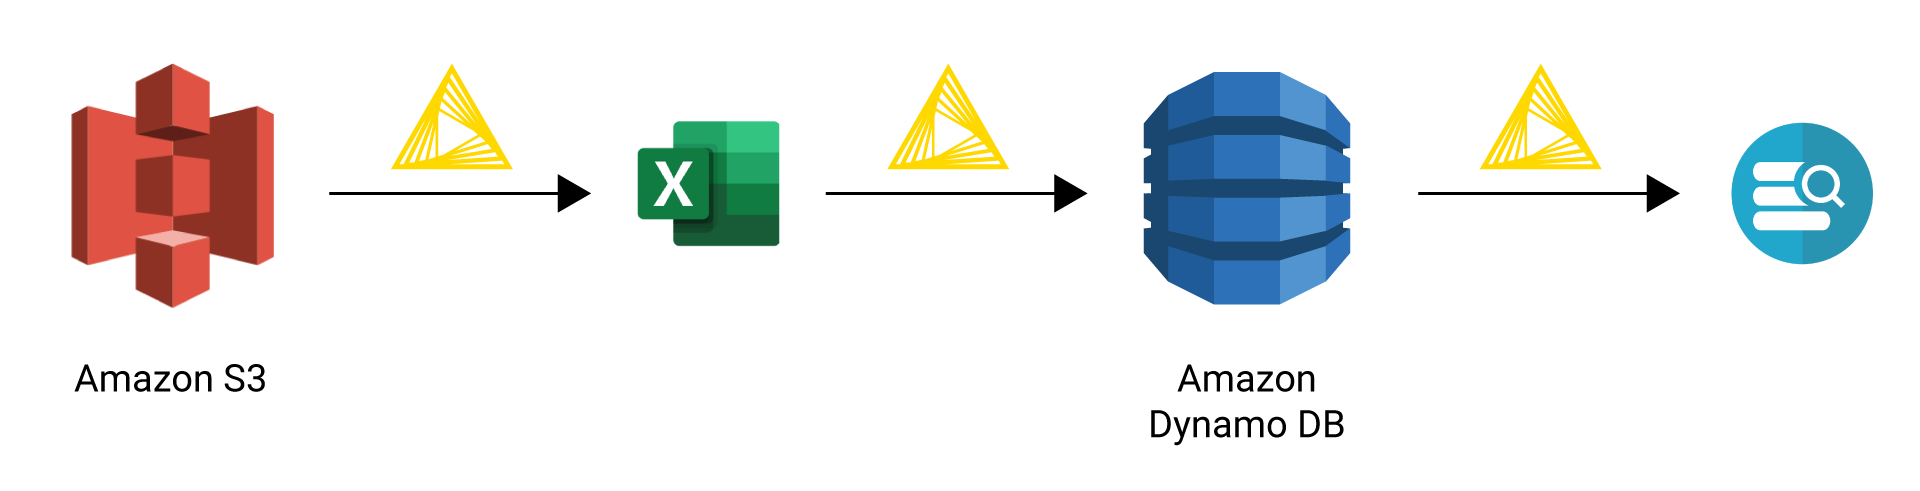
In this challenge, Amazon S3 meets DynamoDB and we see if we can combine AWS services to access and query data without writing a single line of code!
Today we want to use KNIME Analytics Platform to read and write information using Amazon S3, an object storage service, and then access that data directly to create, populate, and interact with Amazon DynamoDB, a NoSQL key-value and document database. KNIME is one of the few tools that allows you to connect to DynamoDB tables using a graphical user interface, without writing any code. All we need are the freely available KNIME Amazon S3 Connector (Labs) and KNIME Amazon Dynamo DB Nodes extensions, and an Amazon account with the appropriate credentials.
The Challenge
In our example, we’ll show you how to authenticate against Amazon services within KNIME, access data with S3, and then create and load a DynamoDB table. We’ll also demonstrate several utility nodes that query against DynamoDB, list and describe available tables, and provide batch operations as needed.
Can we blend Amazon S3 data with DynamoDB tables without writing any code? Let’s get started and find out!
Topic. Extraction, transformation, and loading (ETL) of US Census data.
Challenge. Access data on Amazon S3 and load and manipulate it on DynamoDB, code-free.
Access Mode / Integrated Tool. Connect via KNIME file handling features and nodes to Amazon S3 and Amazon DynamoDB.
The Experiment
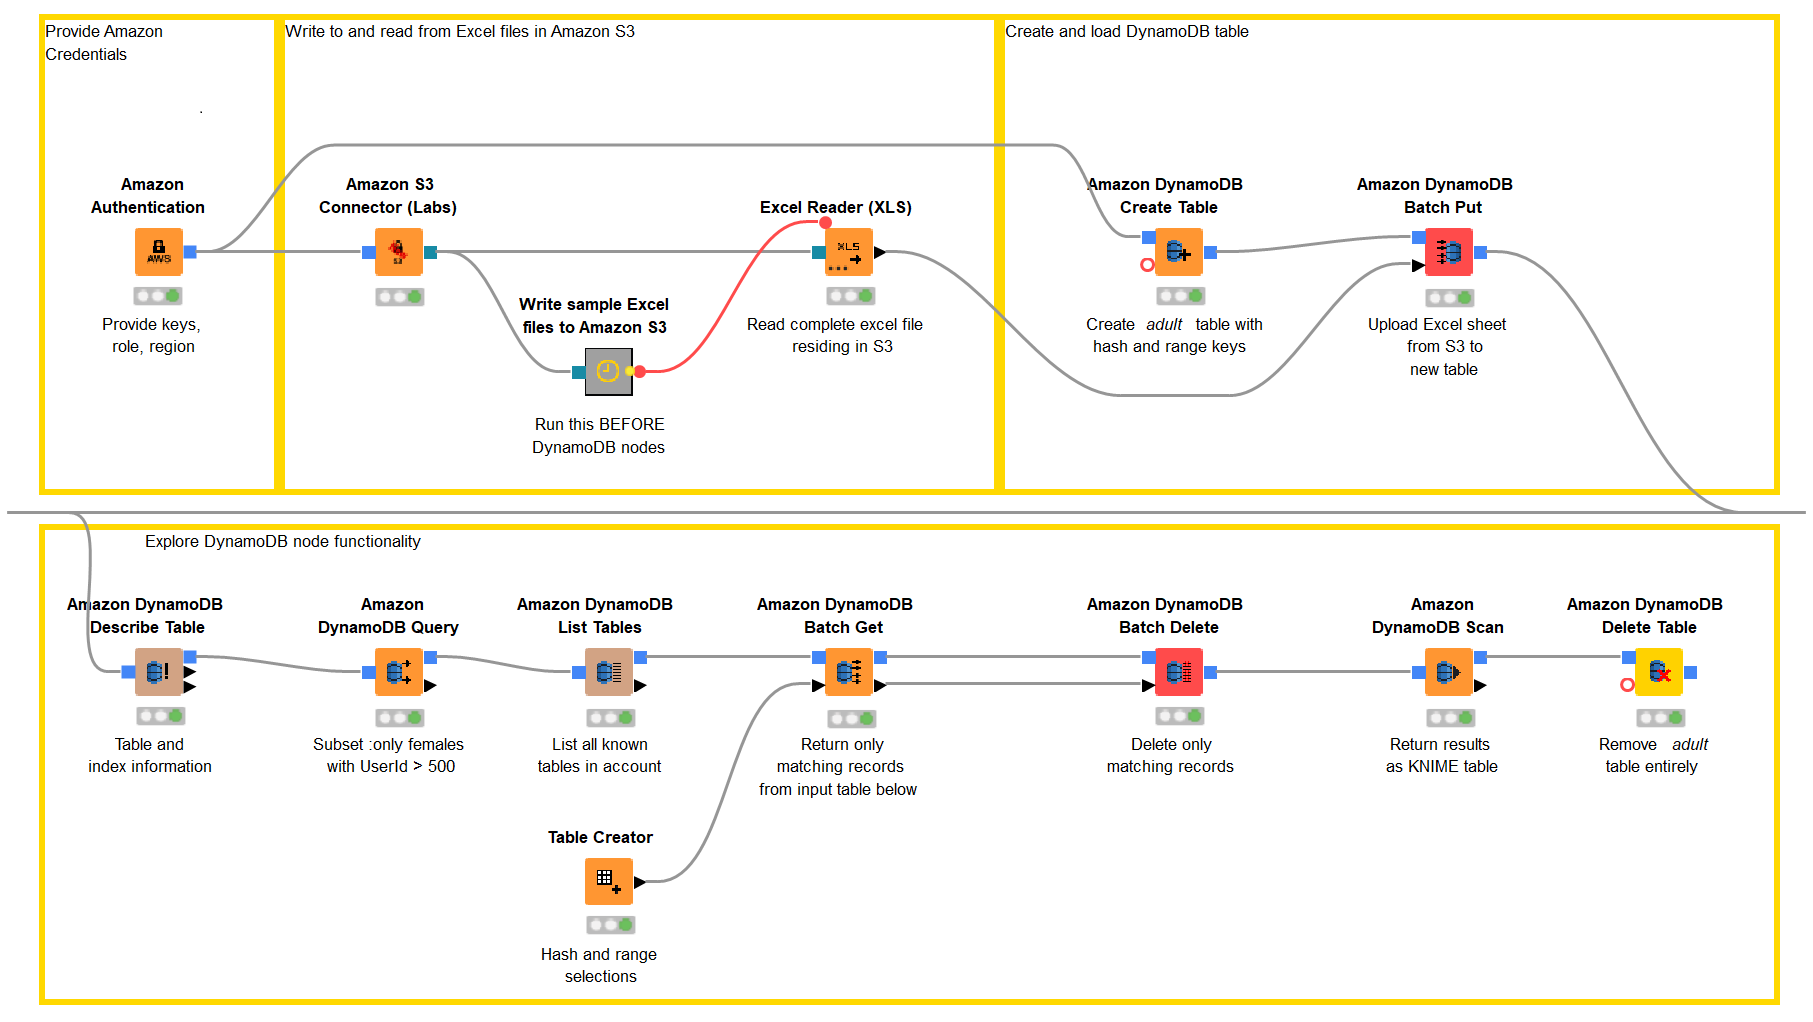
The workflow in Figure 2 below visually lays out our ETL process, which will proceed in four parts, each one implemented within a separate yellow annotation box:
- Amazon authentication
- Connection and file access on Amazon S3
- Creation and loading of an Amazon DynamoDB table
- Exploration of different DynamoDB functions via KNIME nodes
Note. The Amazon S3 meets DynamoDB workflow can be downloaded from the KNIME Hub.
1. Amazon Authentication
Since most nodes in this workflow will require access to an Amazon account in some fashion, let’s start with an Amazon Authentication node. Here, we provide our Access Key ID and Secret Key, and in addition elect to use the Switch Role option, which requires that we provide an associated account and role as well, granting us additional permissions. Once we select the appropriate region, we can click the Test Connection button to ensure all the information we’ve provided is correct.
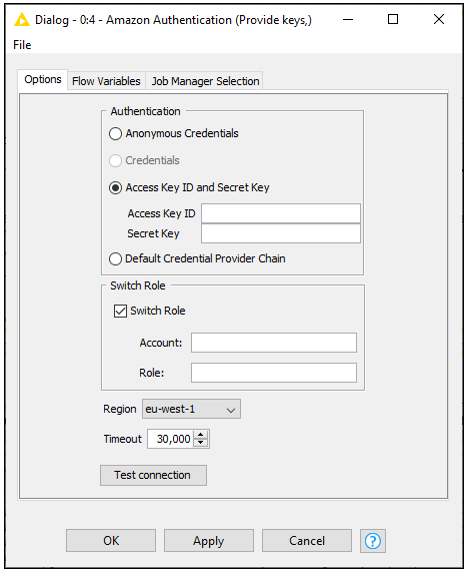
Note the blue square connection port this node provides – the Amazon connection information that it contains - will be propagated downstream to other Amazon nodes, so that we need only provide this login information once.
2. Connection and file access Amazon S3
Now, let’s connect to S3 and upload some data that we’ll eventually transfer into an Amazon DynamoDB table. In this case, we’ll use the well known adult dataset provided by the UCI Machine Learning Repository. The dataset is based on US Census data and contains information on individuals like gender, marital status, location, and so on. To begin, we’ll use an Amazon S3 Connector node. This node will take the login credentials we’ve already provided, and give us access to an S3 bucket to which we can write data – all we need to provide is a path to a working directory. The output port from this node is a teal color, which represents an Amazon S3 connection.
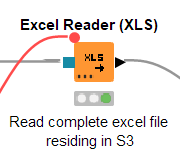
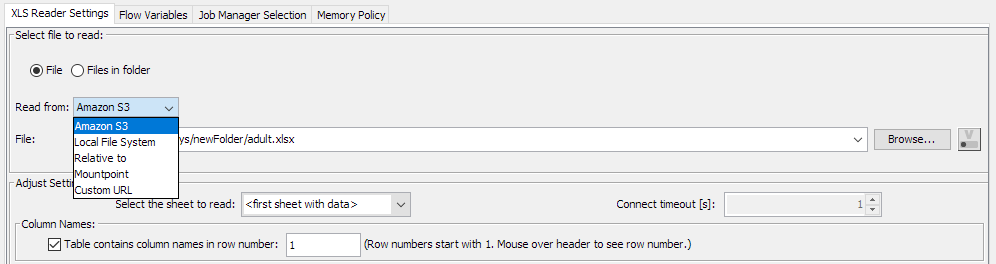
We access the adult.xlsx file on S3 with an Excel Reader node using the file handling features introduced in KNIME 4.1. The Excel Reader node can directly access Excel files available on S3 if an Amazon S3 Connection is provided in its optional input port. This feature is enabled by clicking on the 3 dots on the bottom left corner of the node (Figure 4).
Having directly read data from S3, we can now focus on moving that data in DynamoDB for further exploration and manipulation.
3. Creating and loading an Amazon DynamoDB table
The next thing we’d like to do is create an empty DynamoDB table. For that, we need to specify a table name and a primary key that uniquely identifies each item in the table. There are two kinds of primary keys in DynamoDB: simple and composite.
- A simple key consists of a partition key (hash attribute) that determines the partition (physical storage internal to DynamoDB) in which the item will be stored. In this case, the partition key should be unique for each item.
- A composite key consists of a partition key (hash attribute) and a sort key (range attribute). All items with the same partition key value are stored together and sorted by the sort key value. In this case, the partition key is possibly not unique, but the sort key value should be unique for the items with the same partition key.
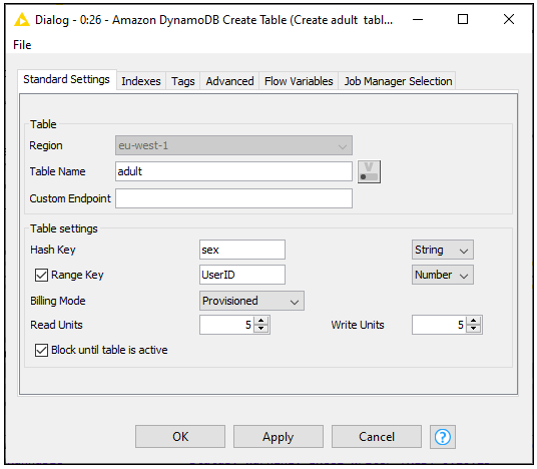
We can create the table using the Amazon DynamoDB Create Table node. In its configuration we are presented with several options to choose a table name, define appropriate hash and range keys (and their associated types), choose a billing mode, and set read and write units. Here we’ll choose a hash key of sex (not unique) and a range key of UserID (unique), being careful to match case with the existing fields in our S3 table. For other choices, we’ll stick with the default values. Note that on a separate tab, we also have the ability to add indices and tags for our tables, if desired.
Now that the table is ready, we can use the Amazon DynamoDB Batch Put node to load our data from S3 into it. The configuration allows you to browse existing DynamoDB tables in your account, and choose an appropriate batch size.
4. Exploring different DynamoDB functions via KNIME nodes
With our data now loaded, there are a number of different nodes available in the Amazon DynamoDB extension for querying, exploring, and other utility functions:
- Amazon DynamoDB List Tables: See what tables are available on our account.
- Amazon DynamoDB Describe Table: Delve into the structure of individual tables. This node has two notable output ports: one that provides detailed information on a table, like its AmazonID, arn, status, size, creation date, and many other features; and another that yields specific information on indices that may exist.
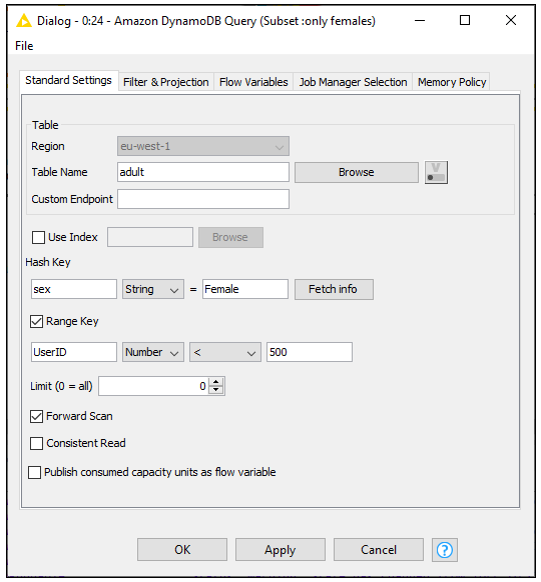
- Amazon DynamoDB Query: Write direct queries on hash and range keys that we’ve defined. For instance, in our adult dataset, maybe we’re only interested in females with a UserId less than 500. Since we already defined sex as a hash key and UserID as a range key, the configuration dialog of the node makes this very easy:
We also have the option to provide filter, projections, and name/value mapping on an optional tab:
- Amazon DynamoDB Batch Get: Match particular records in the table. This node takes input from a KNIME table that defines particular combinations of keys I’m interested in – in this case, sex and UserID.
- Amazon DynamoDB Batch Delete: Remove records from my table. The node will accomplish this using a dialog similar to the Amazon DynamoDB Batch Get node.
Finally, after I do some querying on my table, maybe I’d like to read the current state of a DynamoDB table back into KNIME native tabular form for additional processing, or just remove the DynamoDB table if I’m done with it. That’s possible with these nodes:
- Amazon DynamoDB Scan: Read Amazon DynamoDB table into KNIME
- Amazon DynamoDB Delete Table: Delete tables on the Amazon DynamoDB database
The Results
In the end, it’s my choice – I can use either S3 or local data for loading into DynamoDB. Once it’s there, I have lots of options for querying and manipulating my dataset directly in DynamoDB, without writing any code. And ultimately, I always have the option to bring my data back into KNIME for more processing, model development, visualization or deployment.
So when looking at KNIME, S3, and DynamoDB, it’s safe to say – yes, they blend!