
From KNIME Analytics Platform 4.6, you can write KNIME nodes completely in Python and share within teams, just like other KNIME extensions. This includes node configuration and execution, as well as dialog definition and node views.
Data routines are present at all stages of the Data Science Life Cycle. Organizations adopting KNIME Analytics Platform can choose from thousands of nodes to easily execute their data routines in a few clicks. In addition to the capabilities available out of the box, KNIME has a robust open ecosystem, with dozens of additional KNIME extensions available for download from KNIME Hub.
KNIME offers a no-code approach which enables the automation of data operations without the expensive and slow adoption of coding, saving time and money. Despite this, sometimes the required operations are domain-specific, and a KNIME node might not exist yet.
In this case, two options are available (see below):
- Adopting a low-code approach, where snippets of code can be added in special scripting nodes directly in KNIME Analytics Platform to create workflow and components;
- Adopting a pure-code approach, where new nodes are implemented and then added to the organization node repository.
Previously, KNIME offered the pure-code approach only in Java. With the release of the KNIME Python Extension Development, we offer Python developers an easy and fast way to develop a new set of nodes via a KNIME extension completely in Python!
With this new feature, the Python open source community can fully leverage KNIME:
- Python developers can offer no-code users their library without requiring any coding skills.
- As Python developers develop new nodes, KNIME users can tap into the wealth of constantly expanding capabilities available in existing Python libraries.
With this new feature, your Python team can:
- know when it is worthwhile to implement a new KNIME extension,
- see how easy it is and where to find detailed documentation,
- understand how to share the extension either internally with your organization or with the entire KNIME open source community.
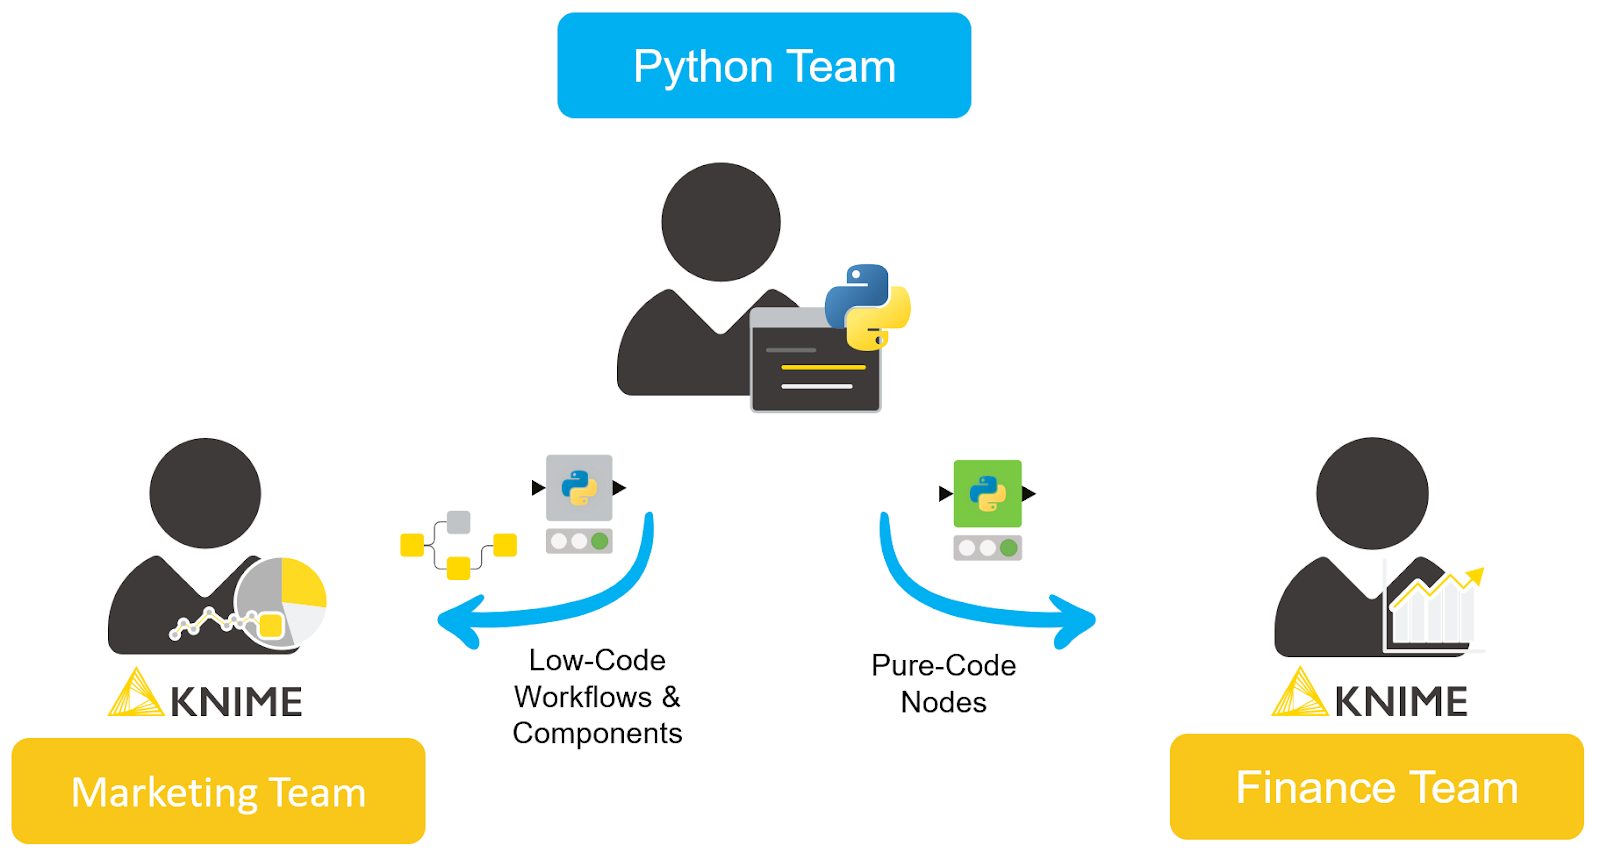
When to use a no-code, low-code or pure-code approach
Data projects are notable for their rapid growth in totally different domains and industries. Soon after a project begins, you see a large number of experts working on the project, as well as adopting its results. These experts prefer to work in their comfort zones given a variety of different backgrounds:
- Some prefer visual programming, adopting no-code tools.
- Others prefer low-code, alternating small scripts of code and no-code tools.
- Many prefer pure code—usually Python, but also R, Java, etc.
There are two important things to keep in mind for any data project to succeed:
- One should adopt technology and tools to accommodate different data experts' needs and let them freely choose. Such collaboration lets different teams integrate their ideas, fosters creativity, and paves the way for innovation. KNIME has always been a key player in providing such a platform. Experts can work in synergy with a low-code/no-code/pure-code approach in the same workflow. On top of that, users can easily share each other's workflows and components on KNIME Hub spaces.
- One should take into account the pros and cons of each approach and pick what is suited to the use case at hand. In some cases, your team should avoid coding for transparency purposes. It won’t matter that your script works if stakeholders don��’t trust or understand it. In other cases, it makes sense to adopt a domain-specific technique only available in Python. But do you then adopt a low-code or pure-code approach? With pure code, can you still produce a transparent and visual workflow that experts of different backgrounds can customize?
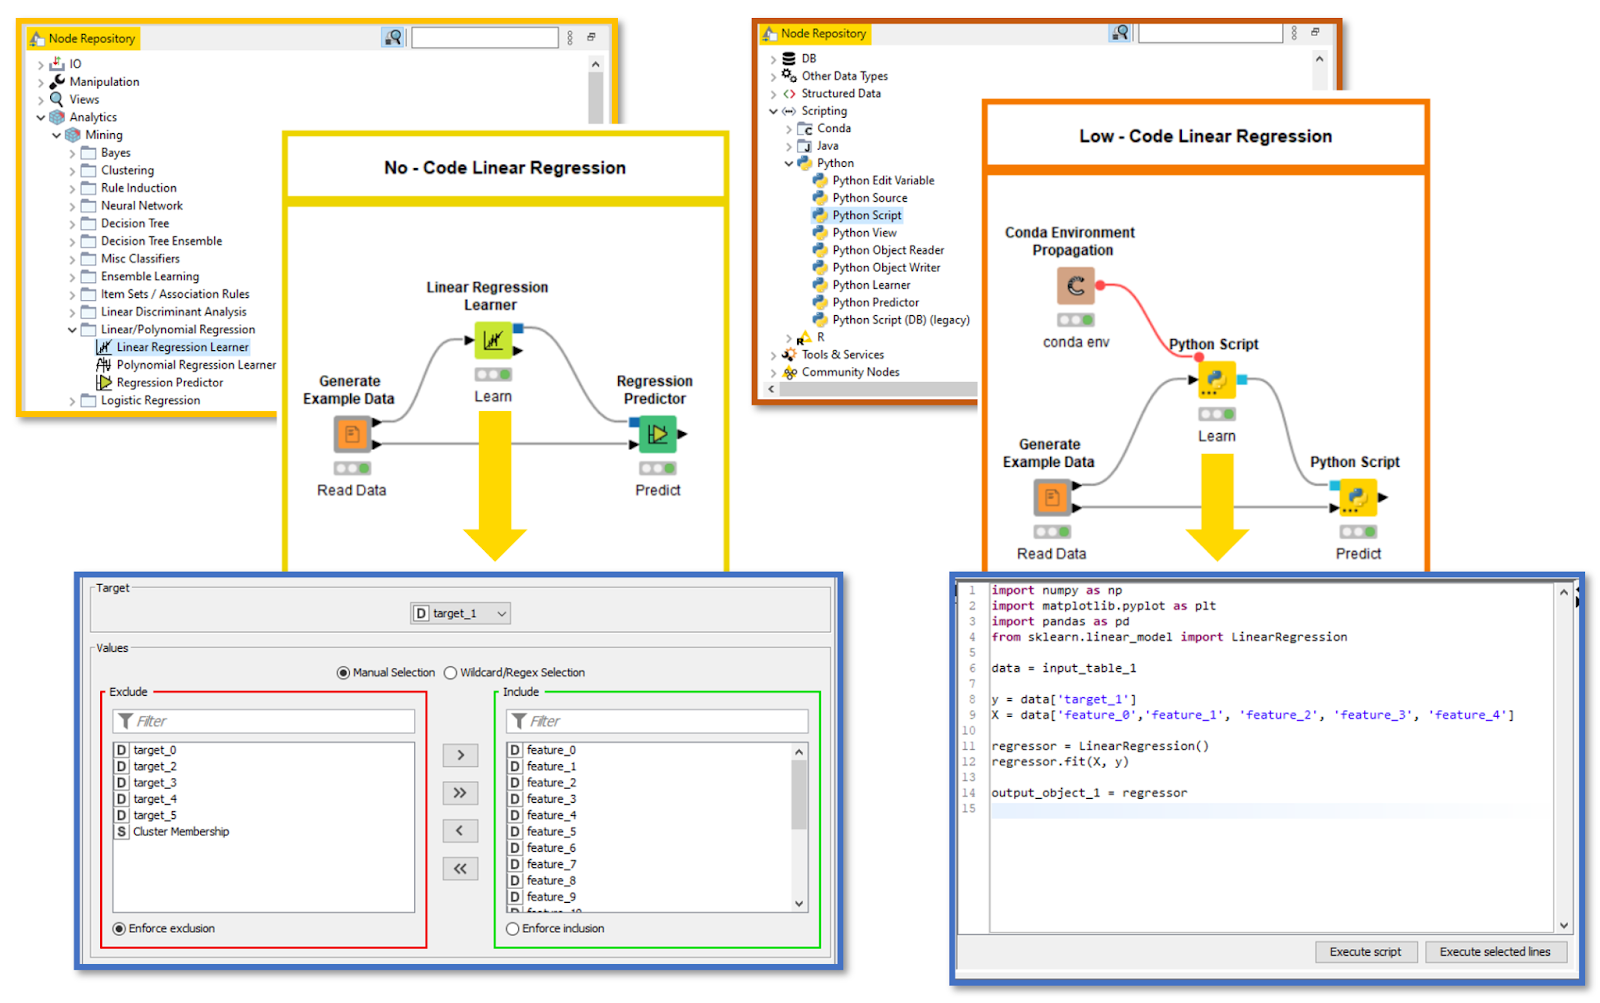
On the left, training a model with KNIME native nodes (no-code approach). On the right, a similar model is trained with Python Scripts and Conda Environment Propagation nodes (low-code approach).
To dig deeper into this second aspect, let’s imagine you are part of a team that needs to build a simple model for other data experts. Given that members hail from different backgrounds, you try both a no-code and low-code approach in KNIME (see above).
In the majority of cases, a no-code approach will do just fine and is preferred, since it’s easy to deploy on different machines — all you need is KNIME, and if necessary it will install all the required KNIME extensions for you. The workflow your team built can be shared to all stakeholders to inspect and execute in a few clicks.
In some cases, however, a low-code approach will return better results. For example, let's imagine you are adopting a brand-new data science technique. Such a technique is maintained by a trustworth institution as an open source and free Python library.
A KNIME node might not exist for it yet, but you wrote some code in the Python Script node dialog and provided an environment with the special library installed via a Conda Environment propagation node. To learn more about this topic, read “Share Python Scripts in Components: Faster Collaboration.” Your team wants to then make this model widely available, but two issues arise. This workflow adopting a low-code approach (and this specific Python library) can be executed/deployed within your organization if the other machines with KNIME or KNIME Server have:
- A conda package manager provided by Anaconda—for example, the slim installer Miniconda.
- Properly configured KNIME Python Integration in KNIME Preferences.
- The connection to download and install packages from an Anaconda online repository during the first workflow execution.
To learn more about these requirements, take a look at the blog posts “KNIME Python Integration Guide” or “How to Set Up the Python Extension.”
Please note that KNIME does not always require that you manually install Anaconda software to run Python scripts. We have a list of popular Python libraries for you to use automatically when installing the new KNIME Python Integration (Labs). When adopting these libraries (for example
pandas,numpy,matplotlib-base, orscikit-learn), all you need to do is install the extension, add the script to the dialog, and execute the node. Read more on the new Python Script node in “Lightning Fast Data Transfer between KNIME and Python.”
Adopting a low-code approach is flexible and quick, and quite handy in small teams. But in large organizations (or in general when sharing the workflow with many users), fulfilling these requirements on a generic machine running KNIME becomes difficult. Would it not be worth it, then, to implement new nodes? They would be adopting the unique Python library you need, but can still be shared and installed just like any other KNIME extension.
The users of your workflows won’t need to install Anaconda or mess with their KNIME Preferences anymore. When opening the workflow, they would get a prompt to install your KNIME extension, just like with any missing nodes. Furthermore, this lets you develop the solution in your favorite Python IDE while updating the workflow live to test the changes in your code (see below).
Developing KNIME nodes in Python is easy
We'll explain the ease of developing a KNIME node by means of a simple business case. Imagine your Python team is working for a logistics company that’s a leader in parcel delivery. You’re dealing with location data and GPS coordinates. A bunch of other teams rely on yours. You are frequently asked to compute the distance between two coordinates. Since Python is your forte, you have built a pipeline in Jupyter notebook using Python libraries, where you enter the GPS coordinates and a code snippet computes the distance in kilometers between the locations. You have been able to cater to the queries of multiple teams, but those queries are increasing every day, straining your bandwidth. Wouldn't it be nice if these teams could make the computations on their own?
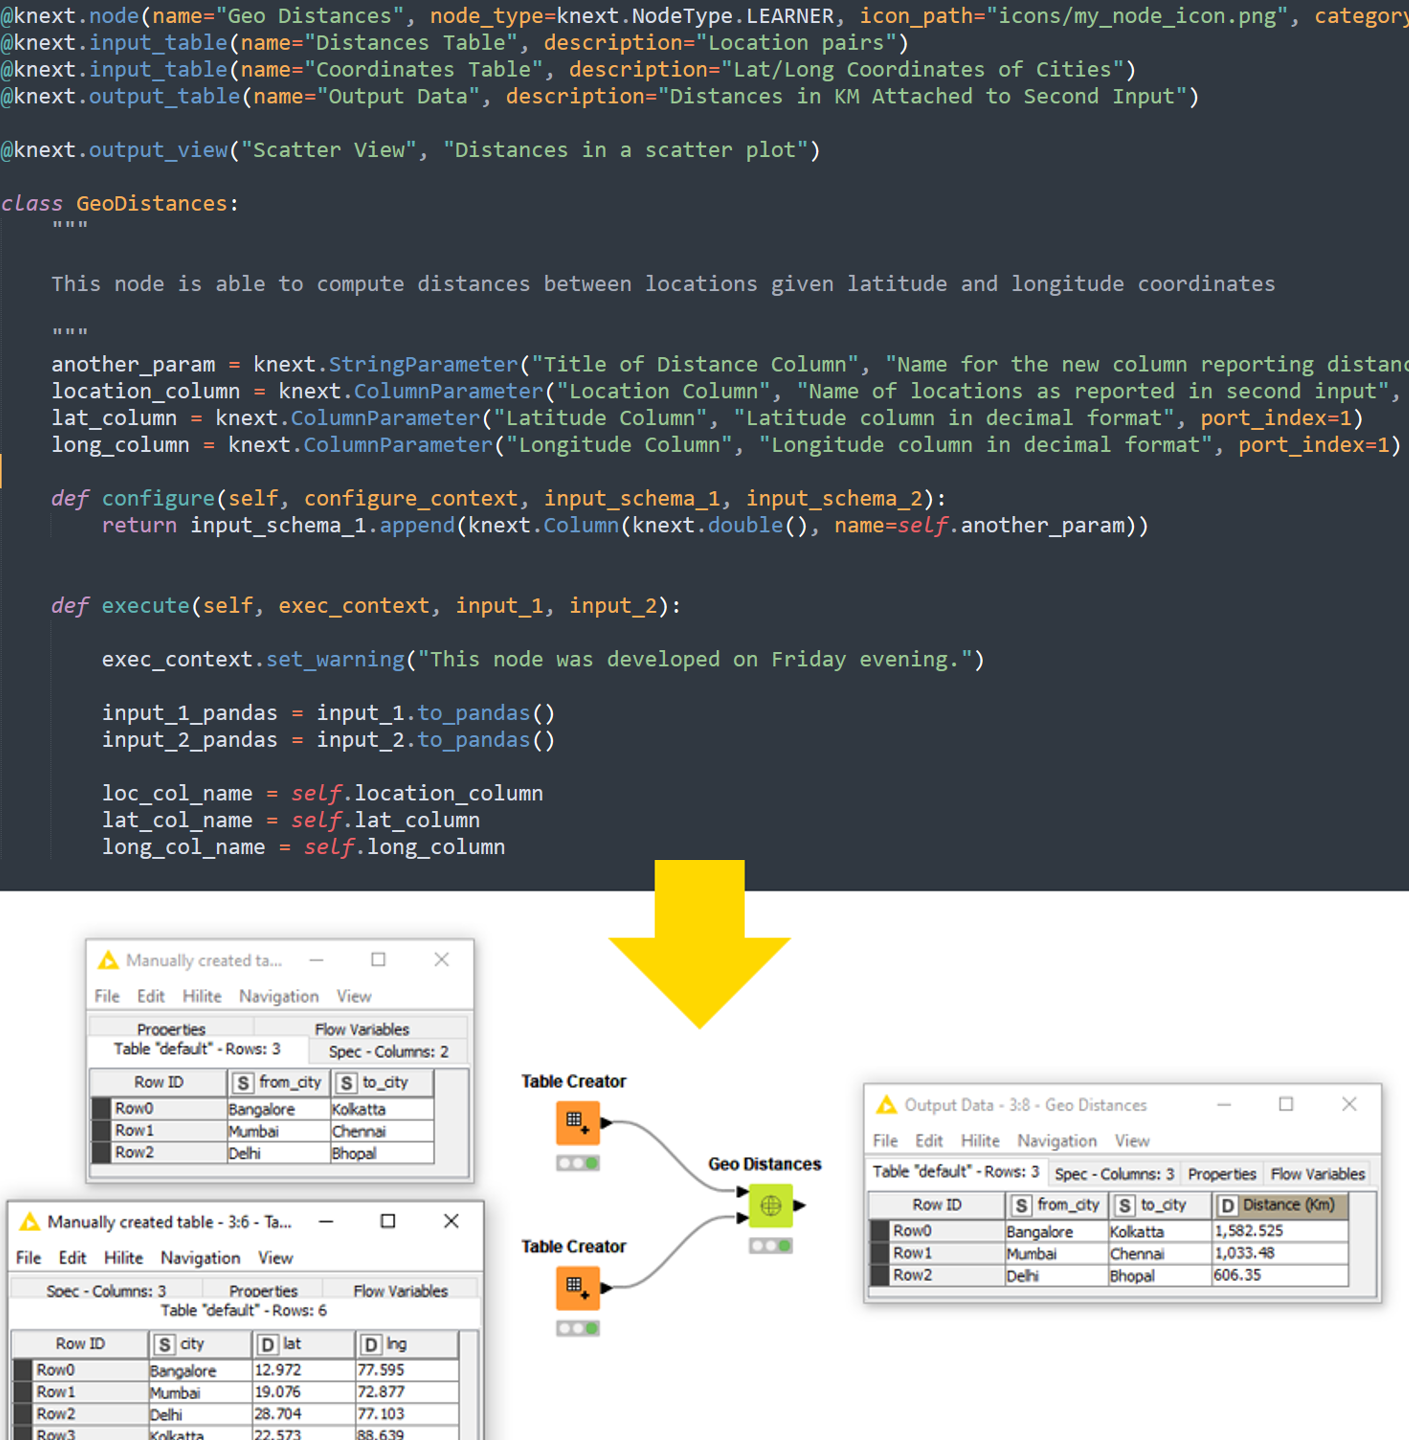
From KNIME 4.6 upwards, you can develop nodes using Python that can be made available to other users. For our scenario, we will develop a node for distance calculation given GPS Coordinates (see below).
Further, we will make this node available to all the teams in our organization, so that they can compute the distances using KNIME. The other teams in your logistics company can compute locations on their own using a no-code approach in KNIME, so you can focus on more important goals.
Here are the steps we’ll take to develop this node:
- Step 1: Install and Configure KNIME + Dev Folder
- Step 2: Establish Connection Between KNIME and Dev Folder
- Step 3: Adopt the KNIME Python Extension Development API
- Step 4: Add Custom Python Scripts and External Libraries
There are a lot of additional possibilities: logging information and warnings, tracking progress, creating views, and others. See KNIME Docs for detailed instructions.
Python node building in 4 steps
For more detailed information and the download of tutorial files, please see the documentation “Create a New Python based KNIME Extension.”
Step 1: Install and configure KNIME + Dev folder
To get started, install KNIME 4.6 or higher. Then install miniconda, the lighter version of Anaconda. Open KNIME and install the extension KNIME Python Node Development Extension (Labs). Finally, if you are on Windows, open the Anaconda Prompt. If on Mac or Linux, simply open your terminal. From the terminal, create a new conda environment to ensure we are working in a Python environment with all the libraries required to create a KNIME node. Finally, download the basic.zip from the KNIME Docs and unzip on your desktop. The unzipped folder “basic” is going to be your dev folder, where you’ll code your Python nodes (see below).
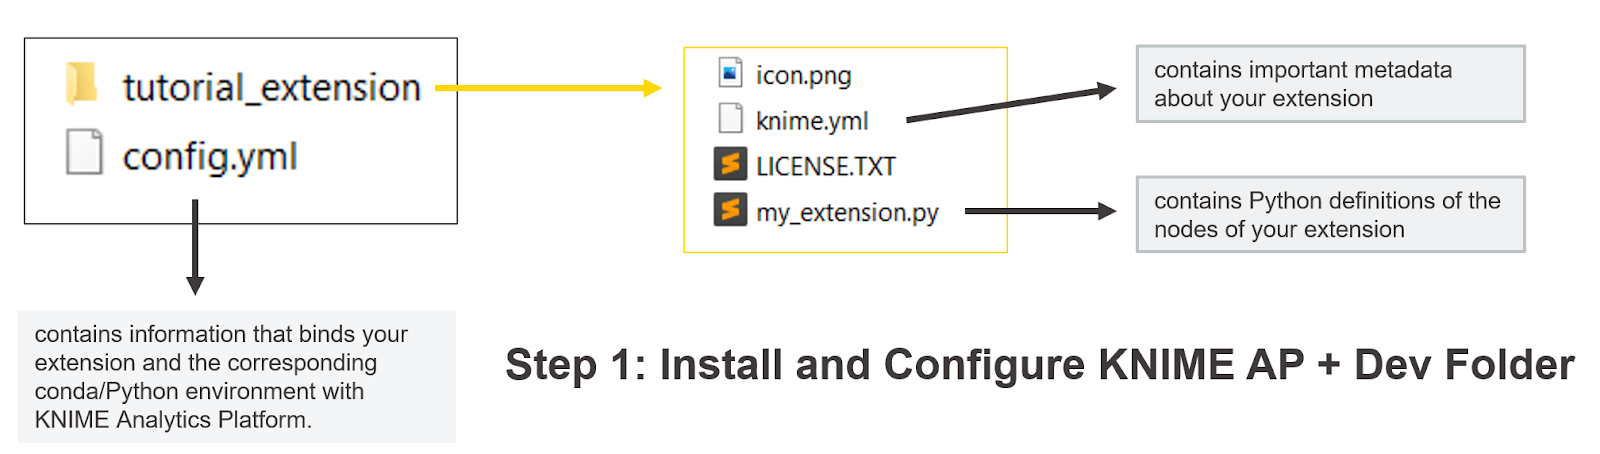
An overview of the files needed to develop a KNIME Extension with one or more nodes in Python. For more details, check the dedicated section on KNIME Docs.
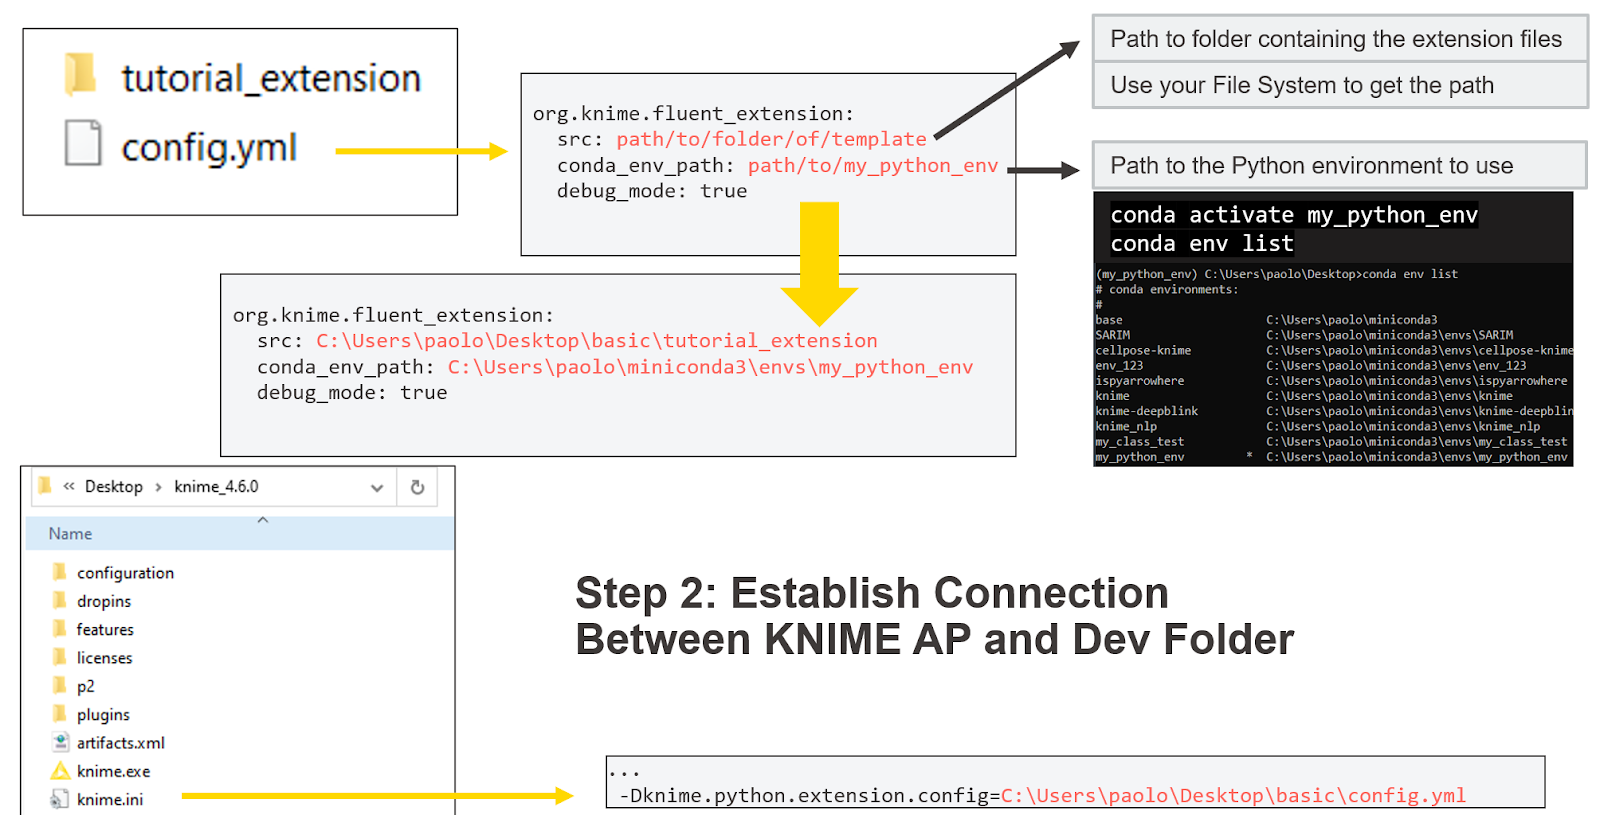
Step 2: Establish a connection between KNIME and Dev Folder
To test our Python code, we need to make sure KNIME finds it. We open the
file and provide two folder paths on our local file system:
srcshould show the path to the foldertutorial_extensionconda_env_pathshould have the path to the newly created environment. This can be found in your Anaconda prompt or terminal viaconda env list.
Locate the installation folder for KNIME inside knime.ini . There add the path to config.yml via a special command (see below). If this works, you’ll see new template nodes in KNIME after a restart.
Step 3: Adopting the KNIME Python Extension Development API
The KNIME Python Extension Development API offers special Python commands and templates that are prebuilt for you. To define a simple KNIME node, you need (see below):
- The node class. This is the same as creating any class in Python.
- The class decorators. These are going to make the created class a node class, defining the node name, type, inputs, outputs, etc.
- The parameters. These are dedicated functions you can call to set up the node dialog.
- The configure and execute methods. The functions that you define to implement what the node does during configuration and execution.
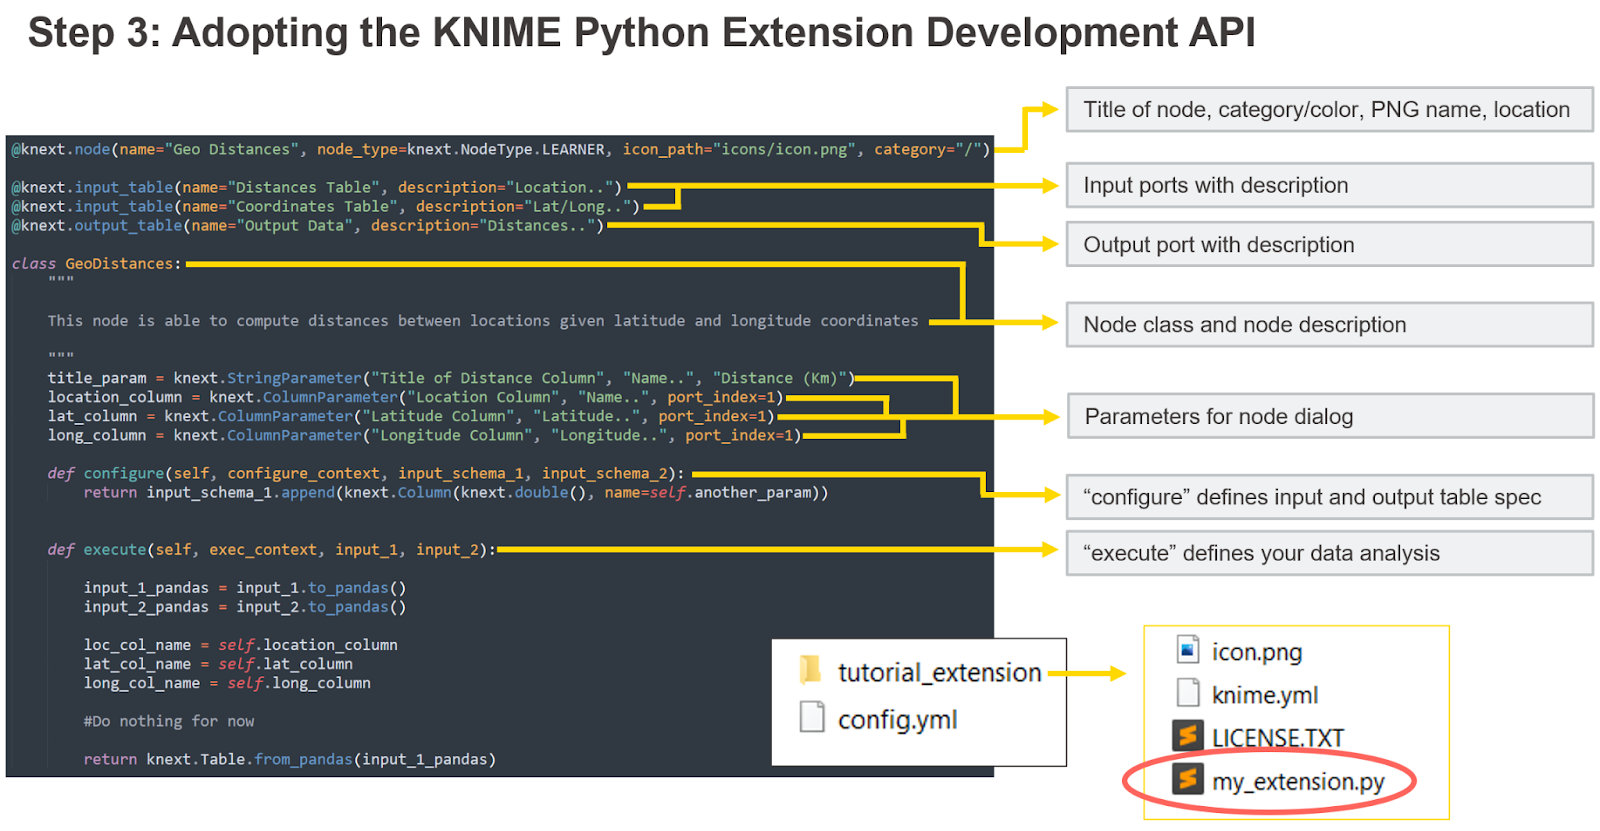
The API offers different commands and templates to create a node. The main ones are listed in this graphic. For more details, check the dedicated section on KNIME Docs.
Here is an overview of each of those commands and templates.
Creating the class node is simple: class AnyNameYouWant: . You define the node description as a string between triple quotes, which is called “docstring.” To develop more than one node in the same extension, you can define more classes in the same file or in some imported file. Before the class definition, you need to add the prebuilt decorators. The most relevant ones are:
@knext.node, used to define the new node. Provide the title of the node, its type (which defines its color), the icon, and the category in the KNIME Node Repository where it should appear.@knext.input_tableand@knext.output_table, which define one input and output of table type and their order, respectively. Adding more occurrences of this line of code adds more ports.
Find more decorators for your node on the dedicated section on KNIME Docs.
Inside the class, we also define the node dialogs by defining a class attribute per parameter. Each parameter is going to add one input element in the node dialog. All require as arguments a label to display in the node dialog, a short description to be displayed in the node description, and a default value. For example:
knext.StringParameterfor the name of the new column.knext.ColumnParameterto select which column is which in the second input of the node.
Find more parameters for your node dialog on the dedicated section on KNIME Docs.
Finally, we have two methods that should be defined to perform the transformations between node input and node output based on the provided parameters:
- The
configuremethod defines the input and output table schema of the node. Ininput_schemaandoutput_schema, this Python framework stores what in KNIME is called table spec — how many columns, their names, and their data types. If you return the same schema that is received at the input of this function, it means that you do not intend on changing the names of the columns you received at the input. Changeoutput_schemabased on what your node should return. - The
executemethod is where the data transformations happen. Define here the transformations your node should apply to input data and return the output of the node.
When editing with all these commands, it is good practice to keep KNIME open with a workflow executing the node to test your code in real time. If you set the debug_mode to true in the config.yml file, you can see your edits to these two methods and existing parameters in the current instance of KNIME without any need to restart it. Editing the decorators (e.g. the node ports) or the description, or adding/deleting a parameter, will still require you to restart KNIME to see changes under development. More details on the debug mode are on the dedicated section on KNIME Docs.
We adopt all the above API commands and templates for our “Geo Distances” node via the following code:
We should now have a node with its own name, type, settings, description, input, and output. Despite this, the node simply returns its input as output, doing nothing to it. Here’s how to make it do something useful.
Step 4: Adding custom Python scripts and external libraries
It’s common practice for Python experts to work on their favorite IDE reading from the raw data and perform their analysis entirely in Python. It is recommended to choose wisely the section of Python script that should go in the node. Many transformations can also be performed customly via already existing KNIME nodes, placed before or after the Python node you are creating. Keep this in mind to give your users more freedom by reducing how many transformations are automated by the node.
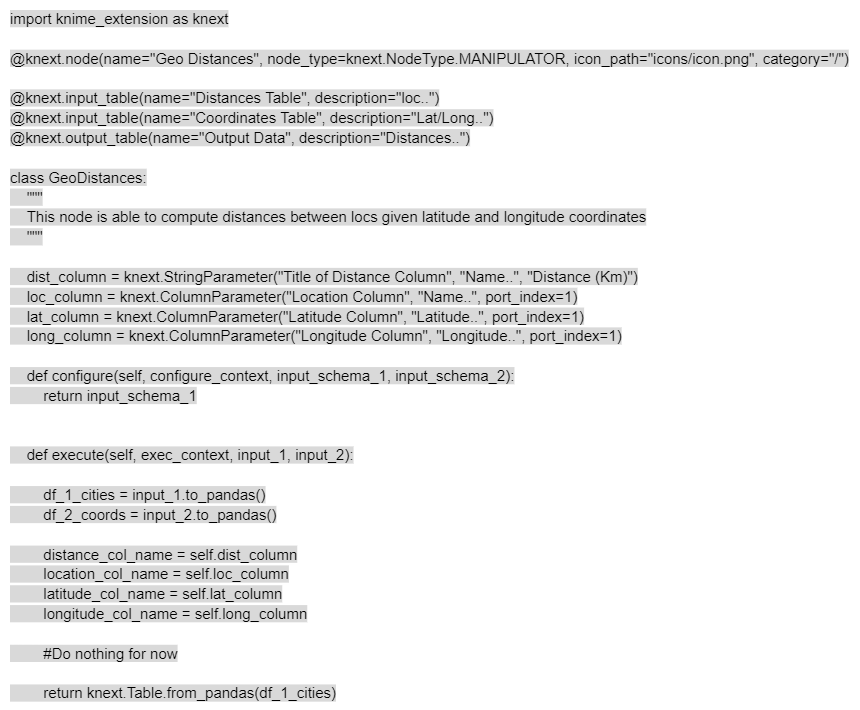
For our simple example, we built a Jupyter notebook with some Python script to take two pandas dataframes, compute the geographical distances from the coordinates, and return a new pandas dataframe with the geographical distances attached in a new column. We now want to move part of this analysis into a KNIME node (Fig. 8).
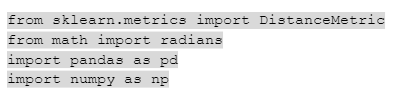
First, we need to import the libraries for our transformations. In our case, we are using sklearn, math, pandas, and numpy. To make sure these libraries can be imported, we install them in the conda environment we created in Step 1.
We need to move the script from the Jupyter notebook to the execute method, which defines the transformation performed by the KNIME node. This is easy. We only need to transform the input tables input_1and input_2 to pandas data frames via the function input.to_pandas(). Then we need to get the parameters from the node dialog (e.g. self.name_of_parameter ). Finally we copy past the script from the Jupyter notebook and add the parameters where needed. Of course, the transformations need to be performed on the pandas dataframes converted from the input. We return the output dataframe using knext.Table.from_pandas() method.
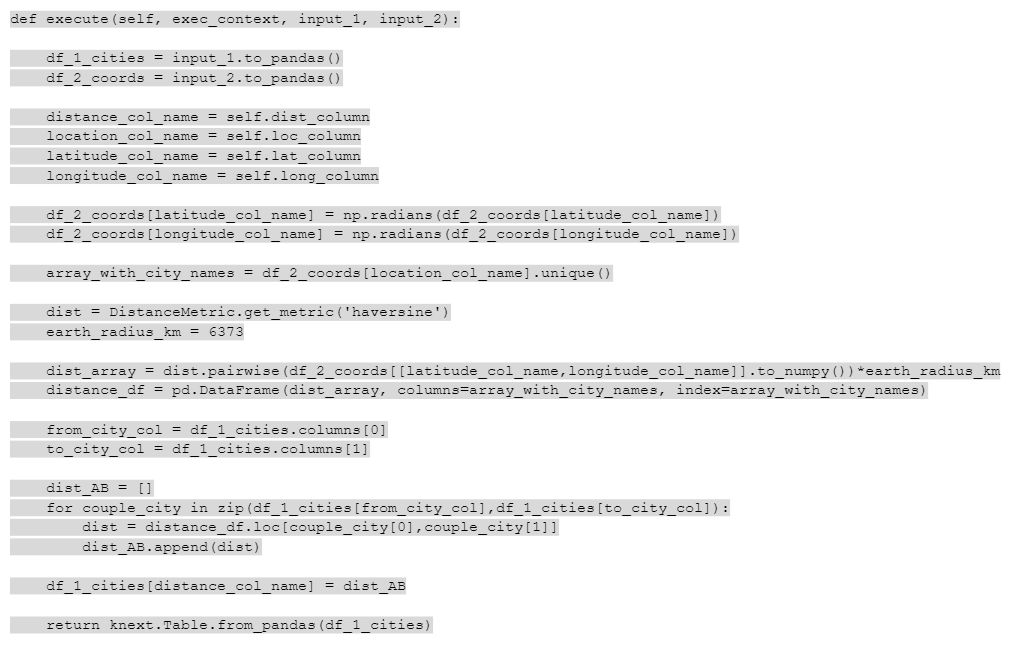
The configure method needs to be updated too. We are no longer returning exactly the same columns of the first input, input_schema_1. We are now exporting one or more columns with the distances in kilometers in double format. Therefore, we make sure the configure method returns the same input_schema_1 with added one double column. To do this, we use the function append and we create a new KNIME column with knext.Column(knext.double()).

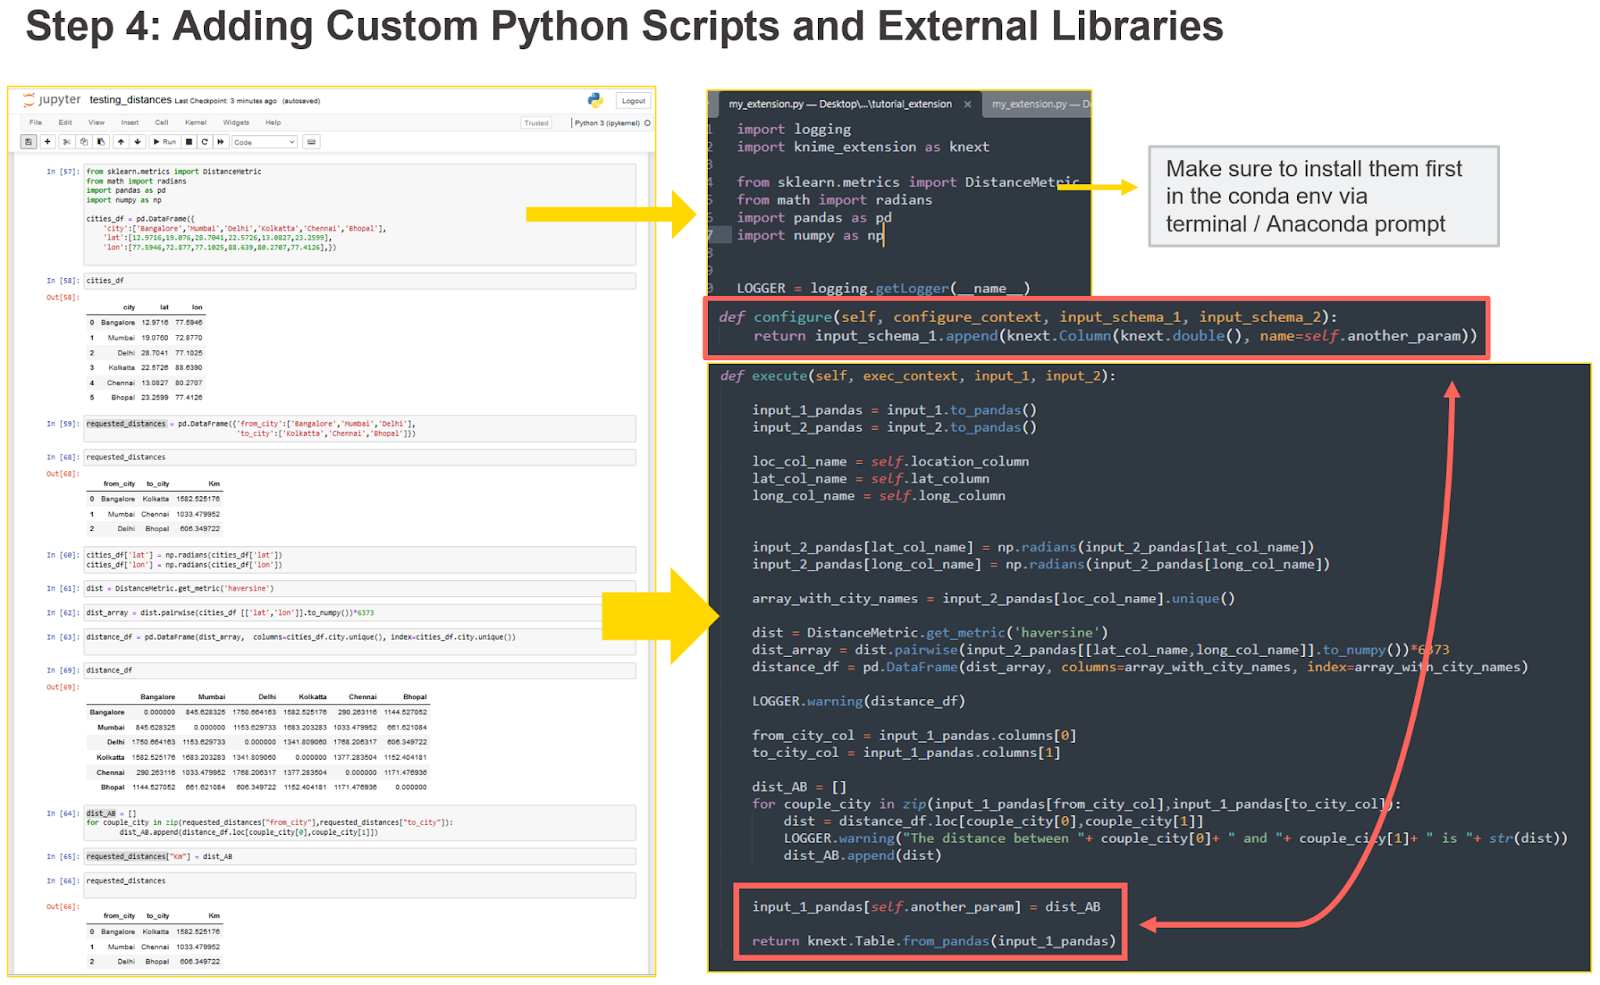
How code from another IDE can be moved into the configure and execute methods of the KNIME Python Extension Development API. You’ll also need to install all the required libraries in the conda environment created in Step 1 and import them outside the node class. The configure method needs to be updated based on what the execute method is returning. For more details, check the dedicated section on KNIME Docs.
To see the code in the Jupyter notebook in more detail, and how it was adapted to create a KNIME node, consider visiting this GitHub repository, where all mentioned files can be found.
Bundling and sharing
After building one or more nodes in Python and testing them thoroughly on KNIME Analytics Platform, you decide to share them with your users. First you need to create a new environment.yml file describing your conda environment and knime.yml describing your KNIME Extension (templates available in KNIME Docs within basic.zip). You can discard the config.yml, this file is only needed to build the nodes, not to share them.
Usually there are two ways to share your new Python nodes:
- Sharing internally to your organization by creating a private update site.
- Sharing externally to the entire KNIME community via the KNIME Hub.
Internal sharing is possible by bundling the whole KNIME extension into a zip file with a specific conda command found on KNIME Docs. This zip file represents the update site you can deploy and KNIME users can connect with:
File > Preferences > Install/Update > Available Software Sites > Add.
Once the update site is added, your users can install the extension via “File > Install KNIME Extensions” as usual.
External sharing to the whole KNIME community on KNIME Hub requires sharing your code in a publicly available git repository (e.g. BitBucket, GitLab, GitHub), providing some testflows, and sending the link to community-contributions@knime.org. We will run some automated tests and get back to you. More details on KNIME Docs.
Time to start hacking KNIME nodes!
In this post, we covered why and how a Python team should create a new KNIME extension with a new pure-code feature, compared to the low-code approach we already offered. We introduced the scenario in which a Python team could easily develop a no-code solution for other data experts in their organization. Other data experts can then serve their own requests when a KNIME node is not available. We used as an example a simple use case where geographical distances had to be computed and we show how easy it is to get started with KNIME Docs tutorials.
It is now time to get your favorite Python libraries into KNIME Analytics Platform, and get the best from both open source offerings!