
Each year, the Melbourne Cup proves itself to be one of the biggest events in Australia. On this day in almost every office, a sweepstake is organized to make the race that little more exciting. For us here at Forest Grove, it is a long-standing tradition of chicken lunch, watching the race, and participating in a sweepstake. Each year one of us had to manually keep track of the tickets, draw horses out of a hat and allow a first-come-first-serve approach to the unallocated horses. However, in this digital age, we were thinking we could improve this old manual method by combining some cool technologies.
This thought got our creative juices flowing and we came up with the sweepstake app using PowerApps, Microsoft Flow, and KNIME.
To create our app, we wanted to use a tool that would enable us to integrate easily with other software components – which in our case were Microsoft Flow and PowerApps. Let’s have a look at an architectural view of how we combined everything. KNIME takes care of transforming the data and creating an application programming interface, or API – to access the data and interact with our other software components, letting them talk to each other.

Deployment - Using KNIME Server to create a REST API
In our application, we needed to create an application programming interface to access data and interact with other software components, i.e. let the different programs talk to each other. The use of KNIME Server Medium enabled us to create a so-called REST API: an interface that enables us to search for something and get results back from the service we’re requesting from.
The REST API in our example is called via a Microsoft Flow, which is triggered from our app, made in PowerApps. Our sweepstake app uses multiple GET and POST requests to receive and send the data.
We designed it to automatically handle:
- Random selection of horses to employees,
- Emailing of selected horses to each employee,
- Calculating unallocated horses
- A bidding system for unallocated horses
- Calculating the final winners & the $ amount
Let’s look at how we did it.
GET and POST global variables
We'll look first at how we handled the GET and POST global variables, which were required to open and close the sweepstake bidding automatically
- GET global variables
- POST global variables
GET global variables
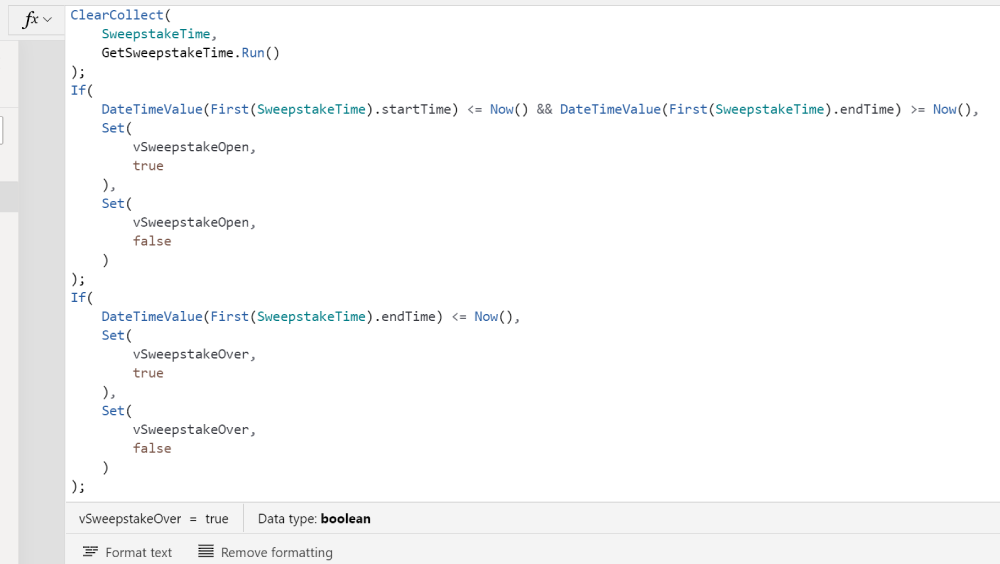
The sweepstake app uses global variables to open and close the Sweepstake Bidding automatically based on time values.
KNIME workflow
The start and end-time values are stored in a KNIME table on the KNIME Server.
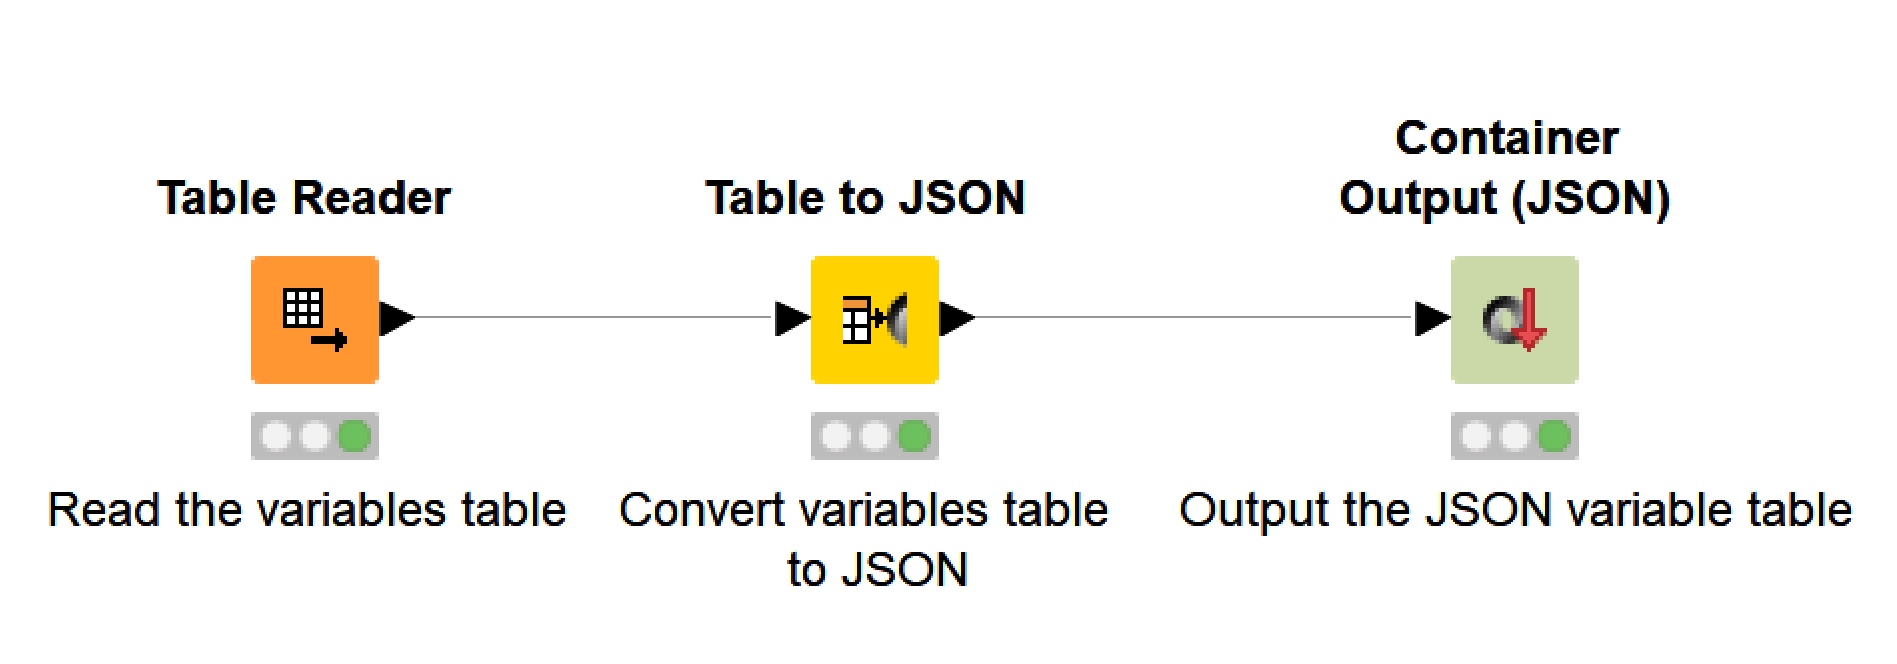
To get the start and end-time values, we create a basic KNIME workflow, which takes care of three things:
- Reads the variables table, which in this instance is a KNIME table, however this could be any source table
- Converts the table to a JSON.
- Outputs the JSON string
When the workflow is executed, it returns a JSON message in the following format:
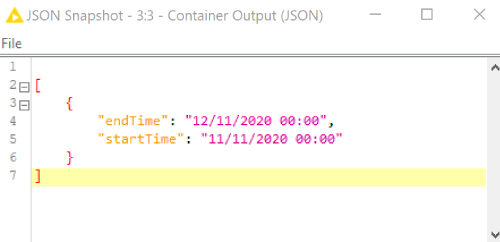
The next step is to deploy the workflow to a KNIME Server. Deploying the workflow allows us to execute the workflow via an API call.
To test this, right click the workflow on the KNIME Server and select “Show API Definition”. This will open a web-browser with a Swagger page with all the API information you will need.
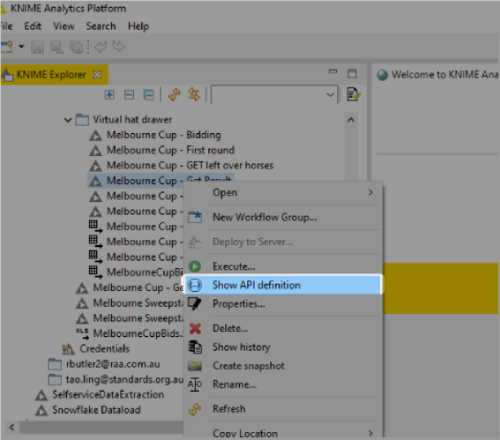
On the Swagger page, the “Execution” tab contains two different URLs: a POST and a GET URL.
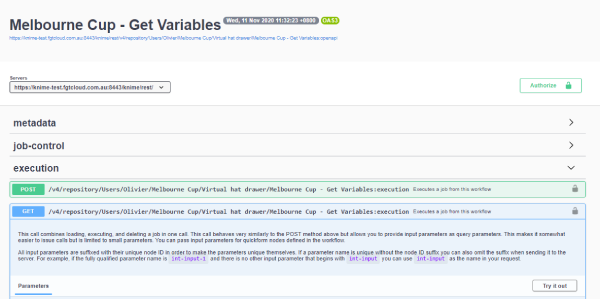
From the Swagger page we can execute the API call and see what the response is. If we successfully executed the GET API, we get the following response:
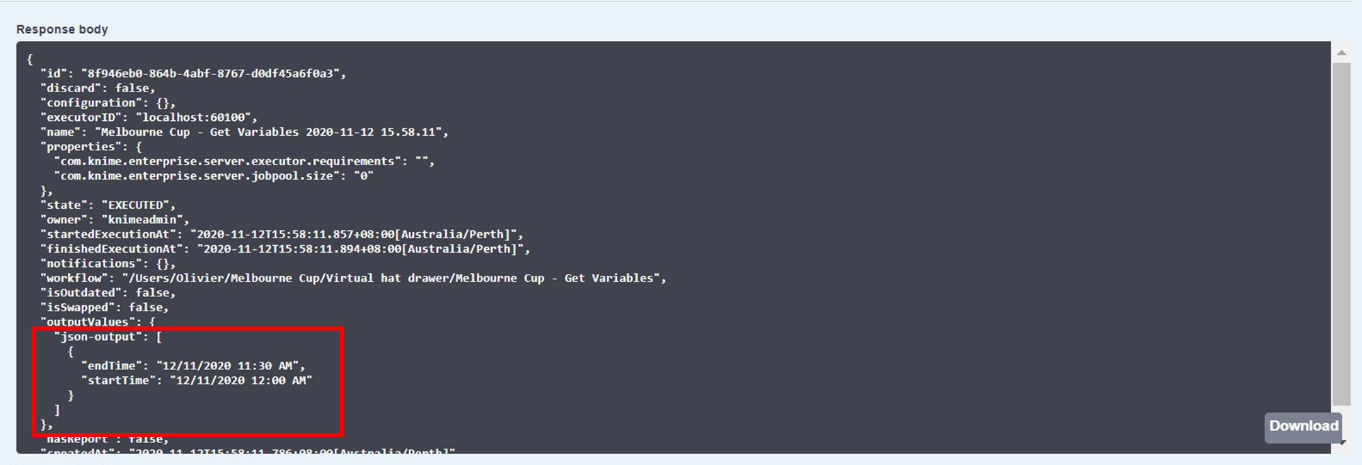
The response of the API call should contain the same JSON message as the JSON output in the workflow, as well as other information around the workflow itself. This API call shows us that our workflow can be triggered from the app and return our time variables to be used inside the app.
Microsoft Flow
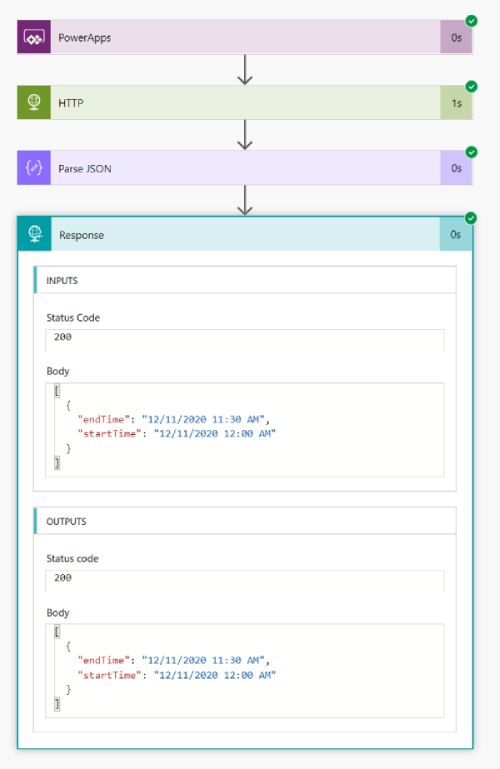
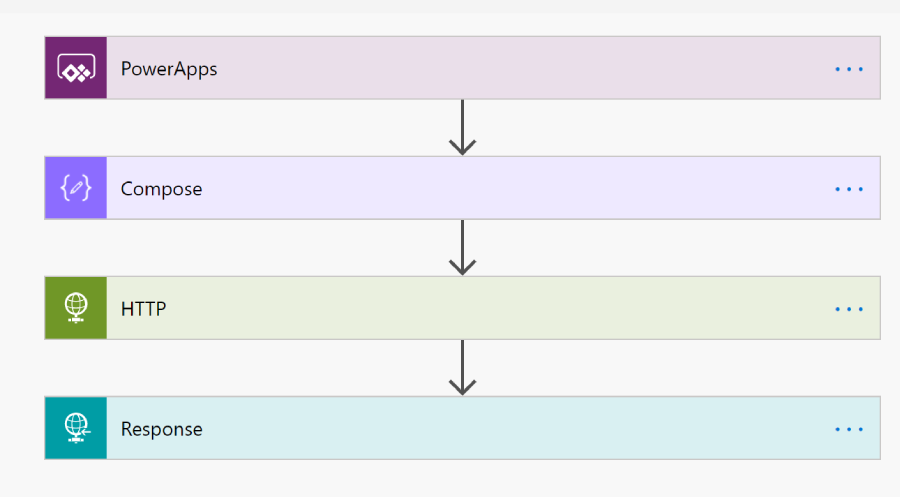
The next step handles getting these values inside the PowerApps application. PowerApps does not allow us to execute an API call, therefore we need to use a separate tool for that called Power Automate or Microsoft Flow. The flow is structured as shown in Figure 8 below. If we run this flow, we should get the same result as in the first run of our workflow in KNIME itself.
The flow structure:
- PowerApps - The flow is triggered from within the PowerApps application.
- HTTP - The API call is made by executing the GET URL
- Parse JSON - The JSON response is then parsed as we only require certain parts of the JSON message: json-output.
- Response - Returns that specific message into PowerApps.
Now that we successfully created a flow, we can integrate this with our PowerApps application
Integrating with PowerApps
In order to obtain the values in the app, we import the flow via the toolbar “Action” menu and by selecting “Power Automate”. This gives us a list of all the available flows that can be used in the app.
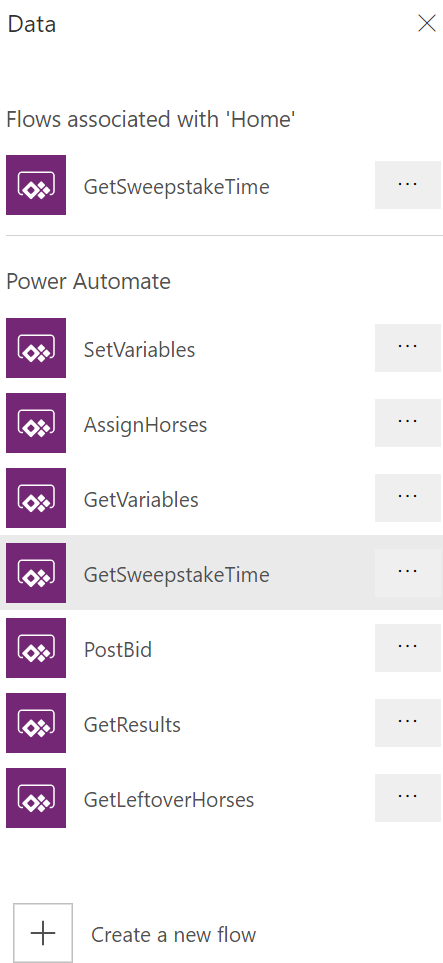
The flow is imported by selecting the flow; this will then populate the formula bar with the flow.

If we run the flow, the data will be returned but not captured in the app. In order to capture the data we need to use a Collection via a ClearCollect()
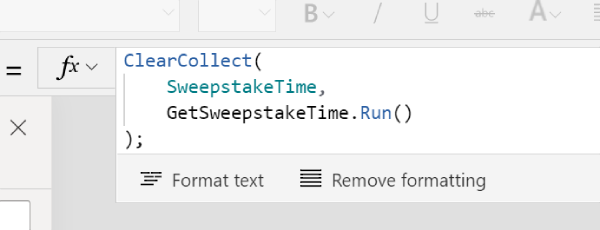
This stores the values from the JSON message into a collection (in this instance we have named this “SweepstakeTime”) and makes this available to be used e.g. startTime. This still returns a table datatype, but when using a First() function, we can select the first line of the collection, e.g. First(SweepstakeTime).startTime .
And that is it.
Note: By changing the workflow we could add further data steps, for example reading from a database, or combining information from different sources before returning the JSON string. Now let’s have a look at a POST request.
POST global variables
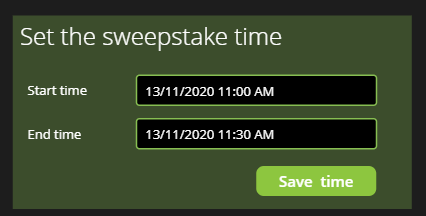
As we mentioned before, the global variables are set from inside the application. We use two input fields to set the start and end-time and the flow is triggered on the click of a button.
The only difference with sending a POST request compared to a GET request, is that we need to send the data with the request.
KNIME workflow
Let’s start again with our KNIME workflow and make our way up to the app.
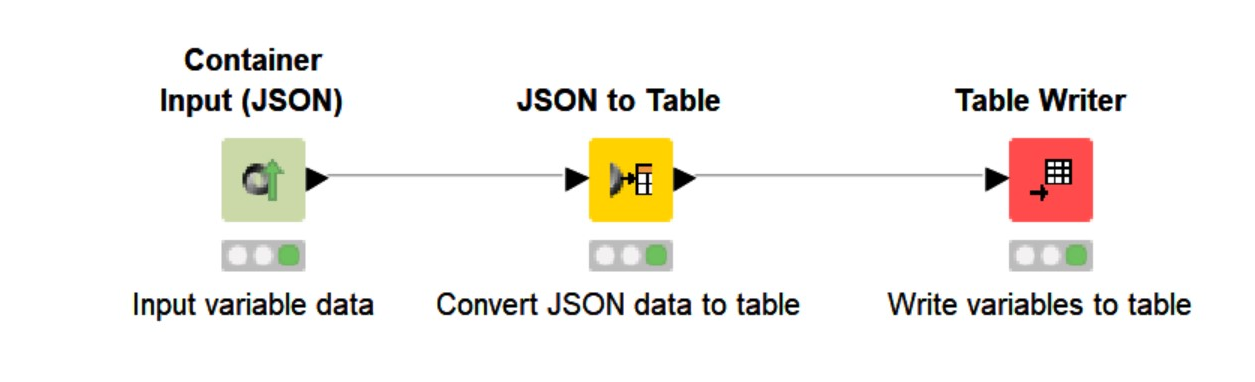
We know that we will receive a start and end-time in a JSON format, and so we need to start the workflow with a JSON input node. From the JSON input node, we convert the JSON message into a table and finally save it into a KNIME table.
As before, to call the workflow via an API, we need to deploy the workflow to a KNIME Server. Once deployed, we can get the API URL via the same steps in the GET request using Swagger. Once we get the URL we can move onto Microsoft Flow.
Microsoft Flow
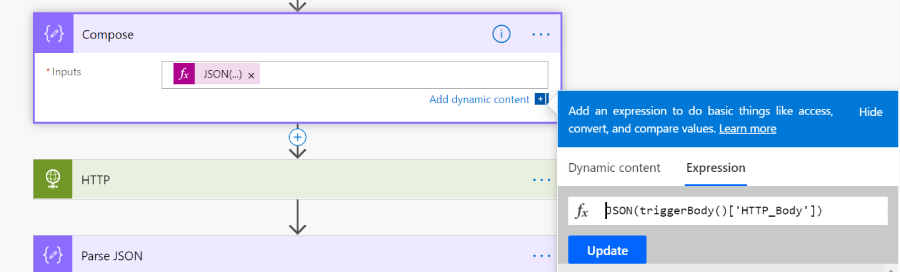
In Microsoft Flow we create a similar flow to that for the GET requests. The flow starts with a trigger from PowerApps, but in contrast to the GET request we first need to capture the input data and compose it into JSON format so we can add it to the HTTP call as a body.
In Compose, we add a dynamic content which requests a parameter when the flow is run in PowerApps. In this case we called it “HTTP_Body”.
PowerApps
The last step is to use the Microsoft Flow in the app. We start again with importing it on the button and set it on the variable “OnSelect”.
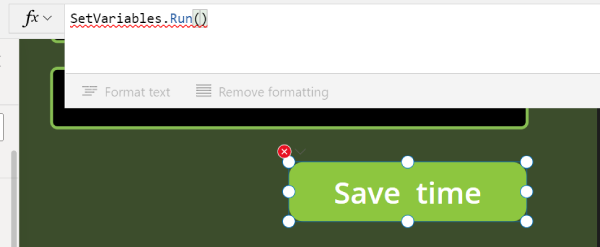
As you can see, this produces an error. This is because our “HTTP_Body” is required when the “SetVariable” flow is run. Adding a JSON message built up from the input fields as the “HTTP_Body” parameter resolves the error:
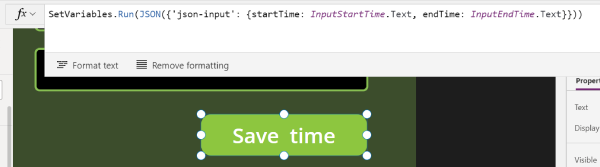
And that is it.
With these simple steps we can make a fully functional app, where data is pushed and pulled.
The end-to-end architecture
Let’s now have a look at how we realized automation of
- The random selection of horses to employees,
- The Emailing of selected horses to each employee,
- Calculating unallocated horses
- A bidding system for unallocated horses
- Calculating the final winners & the $ amount
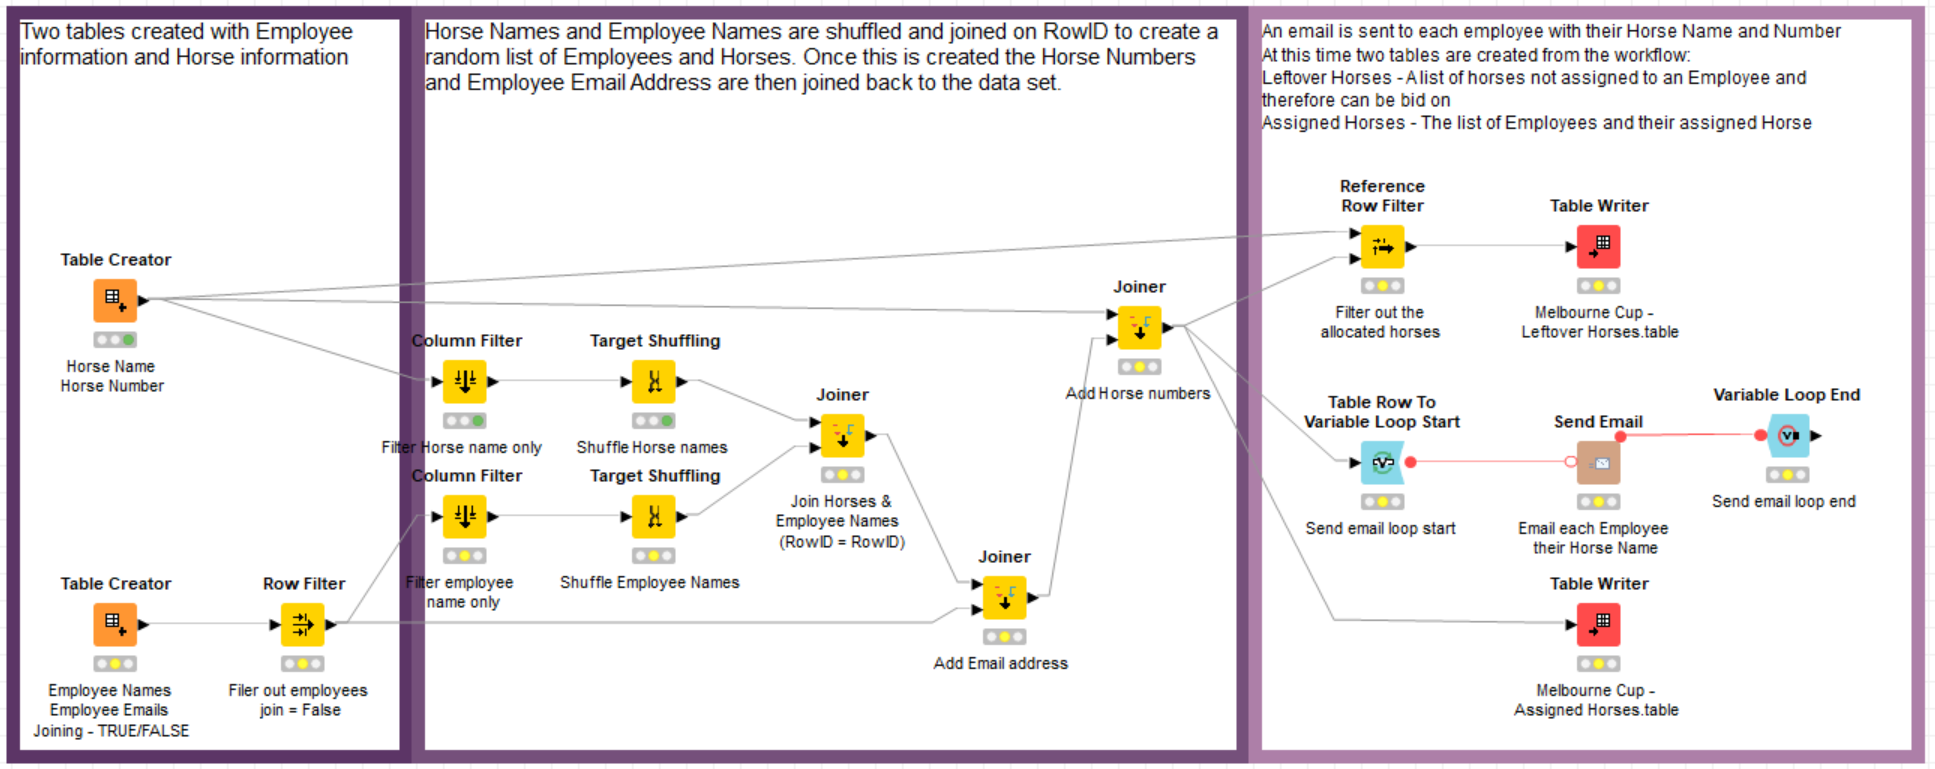
Allocating horses - Emailing to employees - Calculating unallocated horses
Due to time constraints, to start the workflow we manually input a list of horses with their number, and a list of employee names with their email addresses. To randomly assign a horse we shuffled both the employee names and the horse names joining these two on RowID. We then brought the horse number and employee email address back to the list of employee names and horse names.
We created two tables: "Leftover Horses" – a list of unallocated horses and "Assigned Horses" – the full list of employee names and their assigned horse. Finally, each employee received a bespoke email with their allocated horses name and number.
The bidding system
As above, the ‘bidding system’ was housed on PowerApps and utilized data from the KNIME workflows.
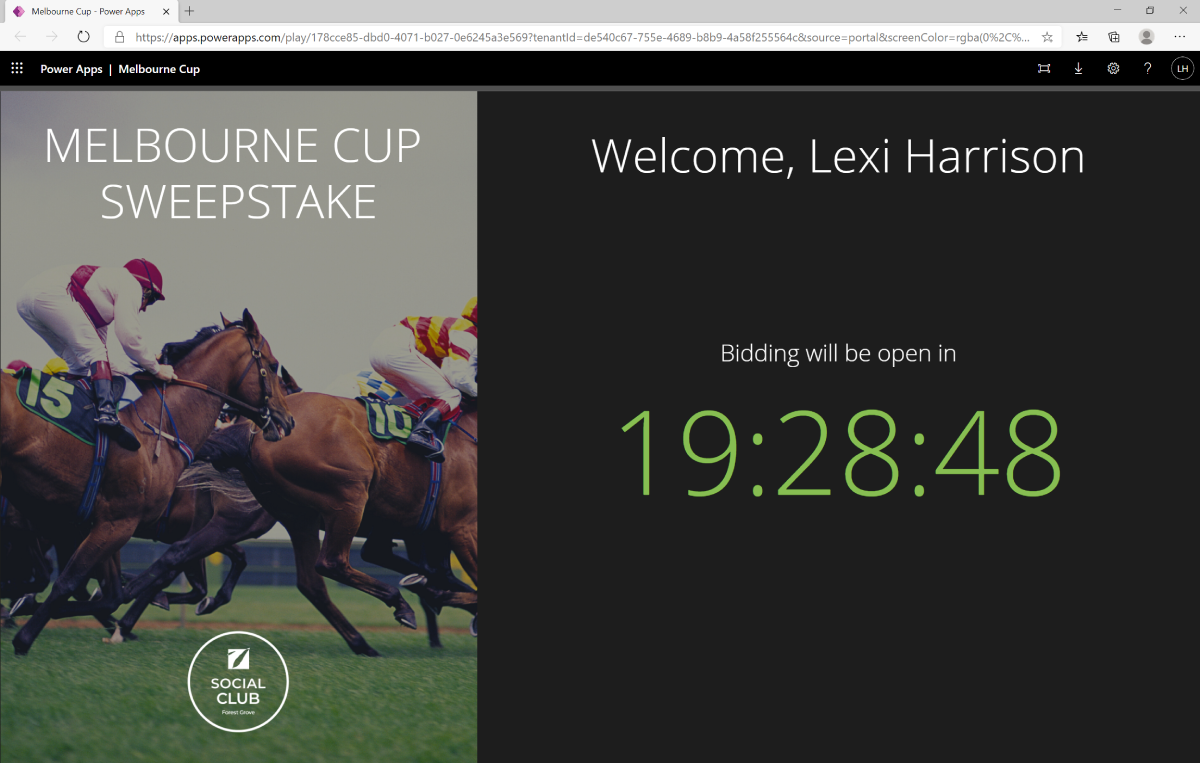
Until bidding was opened, end users would be presented with a holding screen, as shown below:
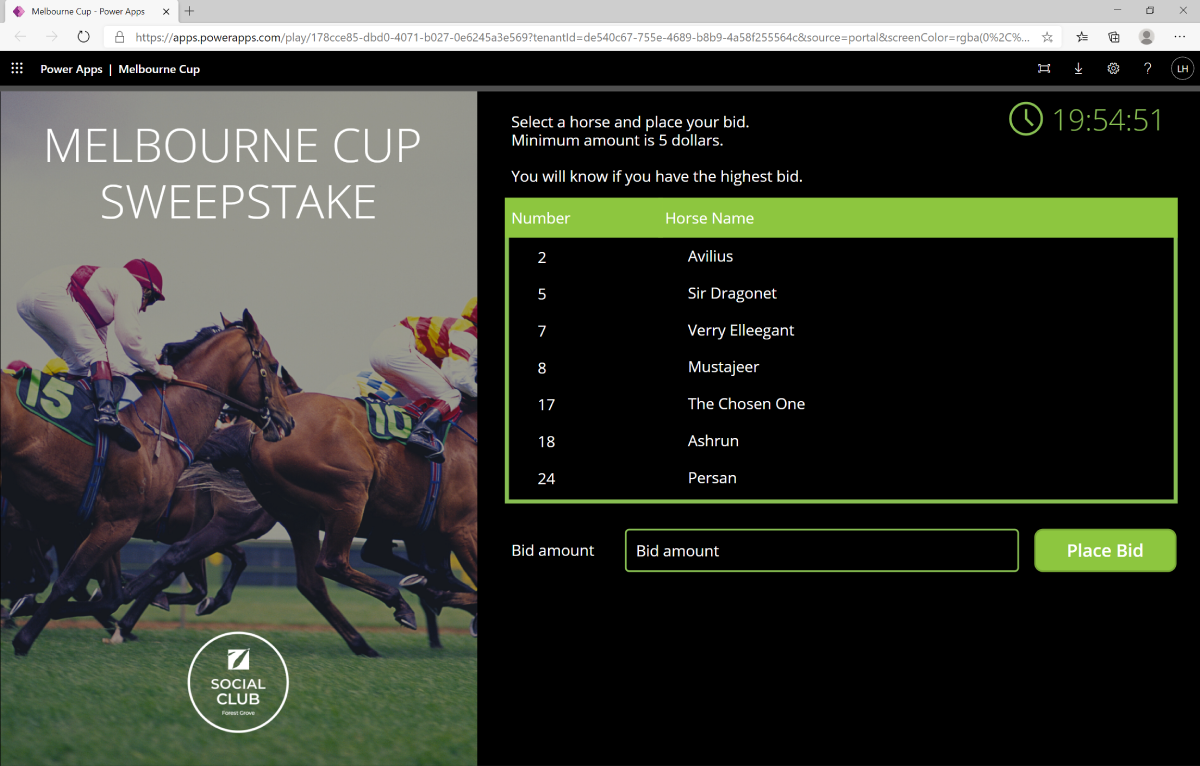
Once bidding opened, end users would be presented with a list of horses to bid on (Leftover Horses table in KNIME) and a text area to add/submit their bid amount.
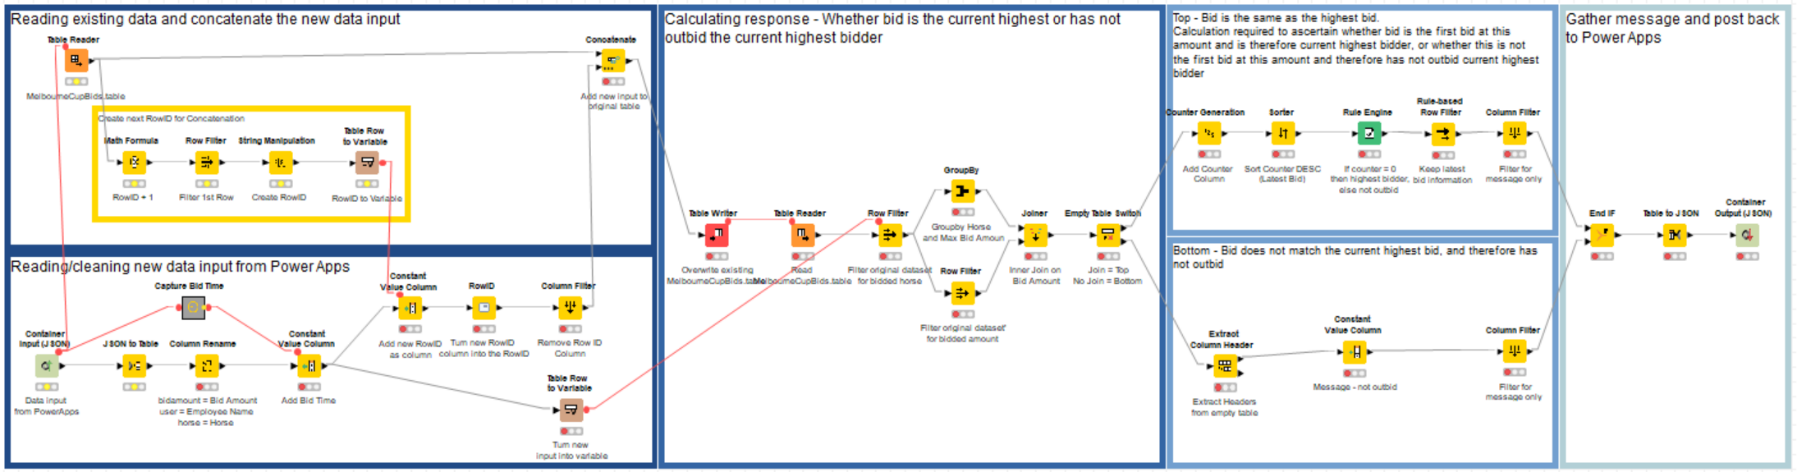
As soon as an end user places a bid, the workflow (below) would run causing the employee name (as per AD Account), the horse and the bid amount to flow into KNIME from PowerApps via API call (POST request). This data are then added to the full table of all bids, MelbourneCupBids.
Next the workflow calculates these three scenarios, based on the new bid for the particular horse:
- If the bid amount is the highest,
- If the bid amount is the same as the current highest bid,
- If the bid amount is not the current highest bid
Messages are the output dependent on the above scenario and sent back to PowerApps via the API call to advise the bidder of their status, which is either:
1. You are currently the highest bidder,
2./3. You have not outbid the highest bidder
Calculating the final winners & the $ amount
Internally we decided each ticket would be $5 for the initial horse allocation and the unallocated horses would be bid on. The final amount from the initial input and bidding would be split as per the below:
1st Place – 60%
2nd Place - 25%
3rd Place – 10%
Last Place – 5%
Of course, we needed a workflow to handle this!
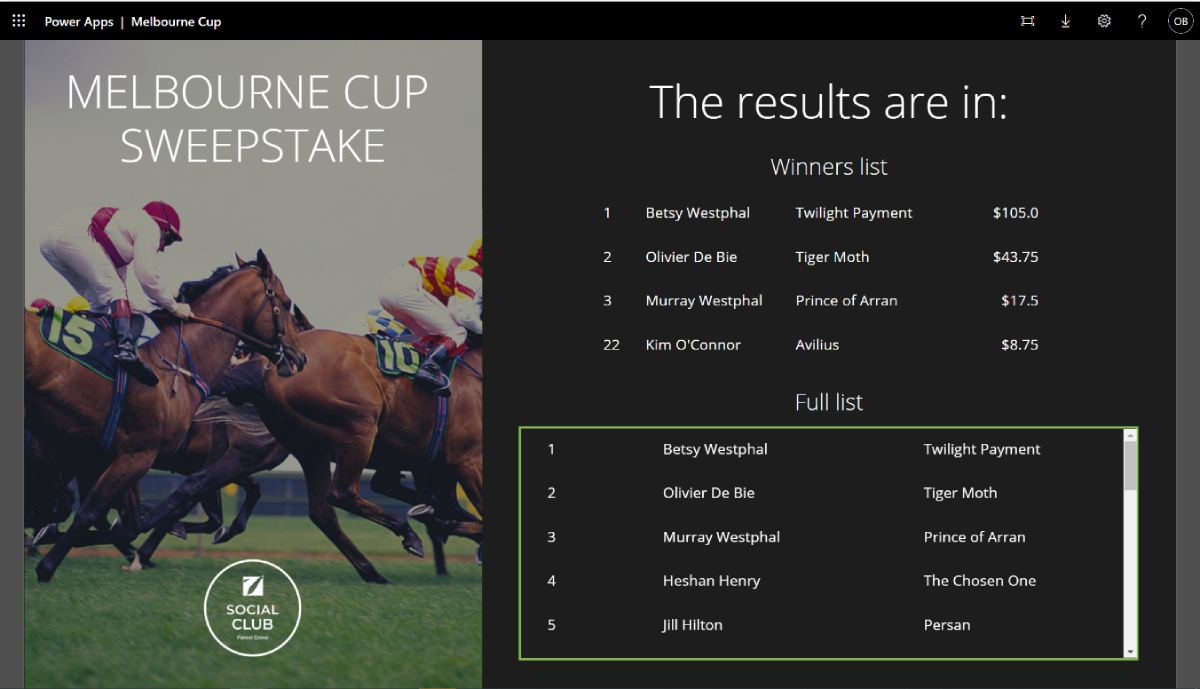
An initial list was calculated using the assigned horses table, adding a constant value column “bid amount” with the value 5 (initial bid amount) and then unallocated horses with the highest bid amount and employee name was concatenated. This list then contained the total amount, in order to be split into the four criteria’s. Next, we needed to bring in the results, to do this we incorporated webpage scraping, in a loop we were able to obtain a full list of horse numbers and their final positions in the race. Due to awarding last place 5% of the total, we also needed to calculate the last place horse, excluding “did not start” and “did not finish” horses. We were then able to create the full list of horses, employees and winning $ amount.
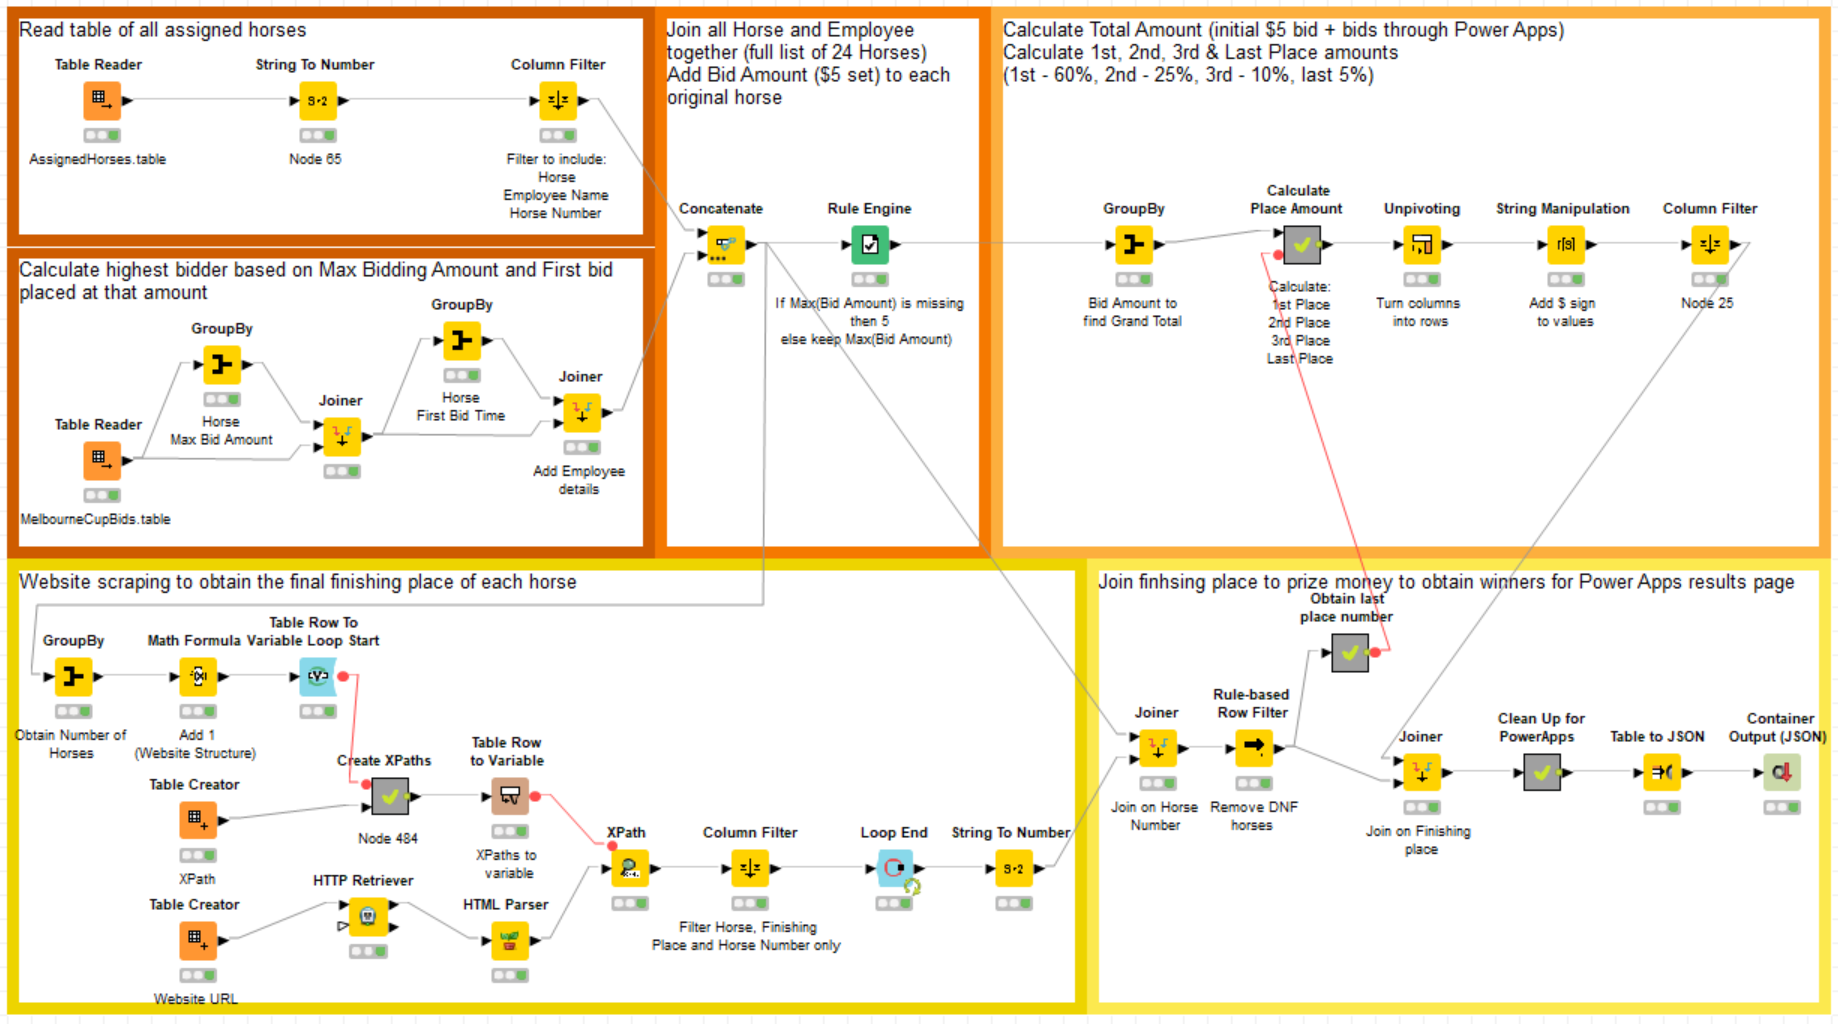
Finally, we were able to send the final results back to PowerApps - using a trusty API call - for everyone to see!
About Forest Grove Technology
Forest Grove provides analytics and finance consulting, solution architecture, implementation and managed services. With over 100 Australian and New Zealand customers, Forest Grove is a collaborative and trusted analytics partner, helping clients from vision to deployment. As KNIME’s Australian distributor, Forest Grove works extensively with the product for data engineering and data science projects. Forest Grove also partners with a range of market-leading finance, business intelligence and analytics software technologies to develop tailored solutions to solve complex business problems.