
You have built a predictive model using KNIME Analytics Platform. It is a very good model. Maybe even an excellent model. You want others to take advantage of your hard work by applying their data to your model. Let’s build an API for that!
An API is an Application Programming Interface. It’s a way to programmatically (i.e. write some code) interface with a computer program. A REST API is a specific sort of API that is used in the world of web service development. REST APIs pass around data in a format known as JSON.
Here are a few reasons for building a REST API for the application of your model:
- Integrate the application of your model with your company’s web site
- Integrate the application of your model with business processes in your company
- Share the application of your model with the outside world (with some controls on top)
- Sell the application of your model as a service
As you can see from these example usages, APIs are all about sharing and integrating.
Deployment as a REST Service with KNIME Server
Once you have a model built in KNIME it’s a short journey to deployment. KNIME includes two extremely helpful nodes that will get you there. They are:
- Container Input (JSON) – formerly known as JSON Input
- Container Output (JSON) – formerly known as JSON Output
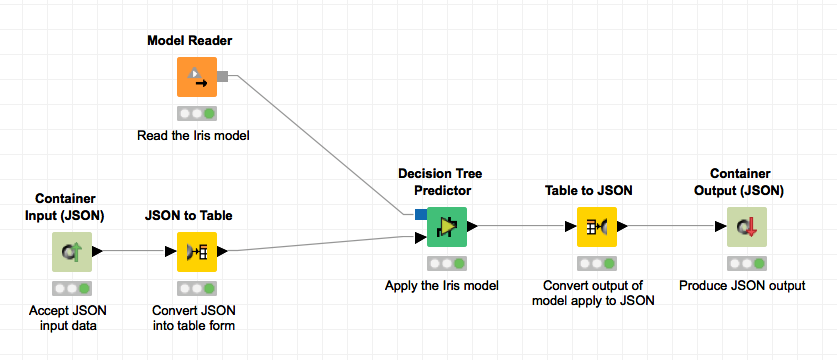
The workflow below applies a classification model trained using the Iris dataset. The goal is to accept attributes about an Iris plant and predict the Iris type. The workflow demonstrates a general pattern for applying a model using the container nodes for JSON. As their name implies, the container input and container output nodes are containers for JSON. The input node is a placeholder that will accept JSON when the workflow is executed. The output node will hold the JSON data it receives so the execution environment can extract it.
Figure 1: Deployment workflow applying a classification model. Notice the Container Input (JSON) and Container Output (JSON) nodes to enable JSON input / output for the REST service.
That’s interesting. But what does that have to do with APIs? Well, there’s a little KNIME magic involved. Whenever a workflow is deployed to KNIME Server, the Server generates an OpenAPI (Swagger) API definition and an API for the workflow. The API includes methods to manage and execute the workflow. Thanks, KNIME Server!
The magic happens when the workflow is executed by using the workflow’s REST API. KNIME Server extracts the JSON payload of the REST call and copies the JSON to the Container Input (JSON) node. The workflow is then executed. After execution, the Server extracts the JSON from the Container Output (JSON) node. The extracted JSON is sent as the payload of the REST reply.
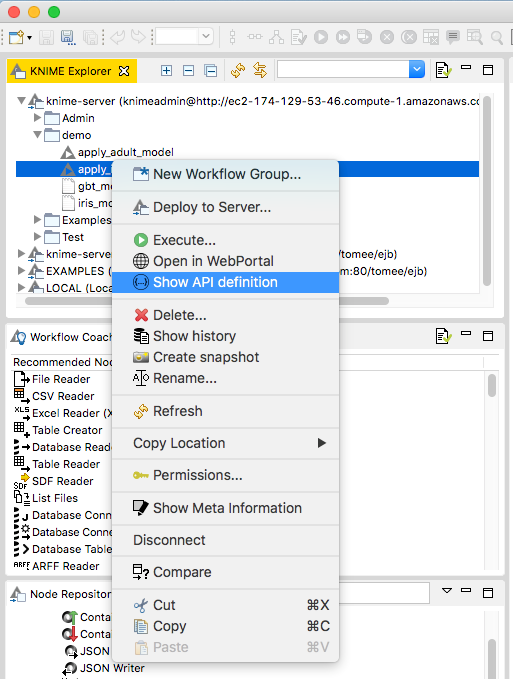
The screenshot below shows how to access the OpenAPI (Swagger) definition for a workflow that has been deployed to KNIME Server. Right click the workflow in KNIME Explorer and click the “Show API Definition” option. A page opens in your web browser containing the REST API definition for your workflow. You can even test out the API using the Swagger web page.
Figure 2: Right-clicking the workflow in KNIME Explorer and selecting the “Show API Definition” option shows the REST API definition.
A fragment of the Swagger web page can be seen in Figure 3. The POST method is shown that supports execution of the workflow. The page is fully functional allowing you to test all of the resource methods. This includes sending JSON data to POST requests and viewing the results. This is a handy way to allow others to learn about your API and how to use it. APIs are all about integration after all!
Figure 3: OpenAPI (Swagger) page for the model application workflow on KNIME Server
Adding Features with Amazon API Gateway
Now the workflow that applies your model is deployed and ready to invoke via a REST API. But there are few extras you’d like to include, such as:
- A way to monitor the usage of the API
- Have some control over who uses the API
- Version the API since APIs always change
- Throttle usage of the API
- Track usage of your API by distinct groups by tagging
- Create a single API that supports multiple models. You’ve just published your first model and can’t wait to move on to the next one.
Luckily all of these features are supported by the Amazon AWS service called API Gateway. You can read more about API Gateway at https://aws.amazon.com/api-gateway/.
The goal is to build an API using the API Gateway service that acts as a gateway for our KNIME Server APIs. This seems redundant, but it does provide a layer of abstraction that shields users of our API from changes to things like:
- The location of our KNIME Server
- The model application workflows that may affect the API definition
- The data specification of the workflow API (i.e. you added some new attributes as input to the model).
Sounds great, but how do we get started? For the sake of brevity: start with an AWS account and familiarize yourself with API Gateway. We’ve tried to explain this process below in a high-level roadmap.
First, we define our API in API Gateway. This can be done in several ways, but the easiest is by using the AWS Console via your web browser. The screenshot below shows the API after it has been created. Basically, you create an API and then define resources and methods on those resources. One resource has been defined: /model/iris with a POST method. The POST method allows you to pass JSON data to the API and receive JSON data in the reply. Great! That’s just what we need to work with KNIME Server.
Figure 4: An API created using the AWS Console via a web browser.
The Method Request section allows you to set up the expected headers, the expected payload, and other request information. The Integration Request enables you to map the incoming JSON into another format. This is useful since KNIME adds an extra layer of hierarchy in the JSON definition for data input. The API through API Gateway can be flatter and the Integration Request can map the JSON into form needed by KNIME.
Likewise, the Integration Response supports mapping of the JSON returned by KNIME Server. This has been used to flatten the response from KNIME Server.
Testing the Final REST Service
The API can be published once it has been defined and tested. The screenshot below demonstrates invoking the API using Postman (a tool for testing REST APIs).
Figure 5: Testing the model deployment API using PostMan
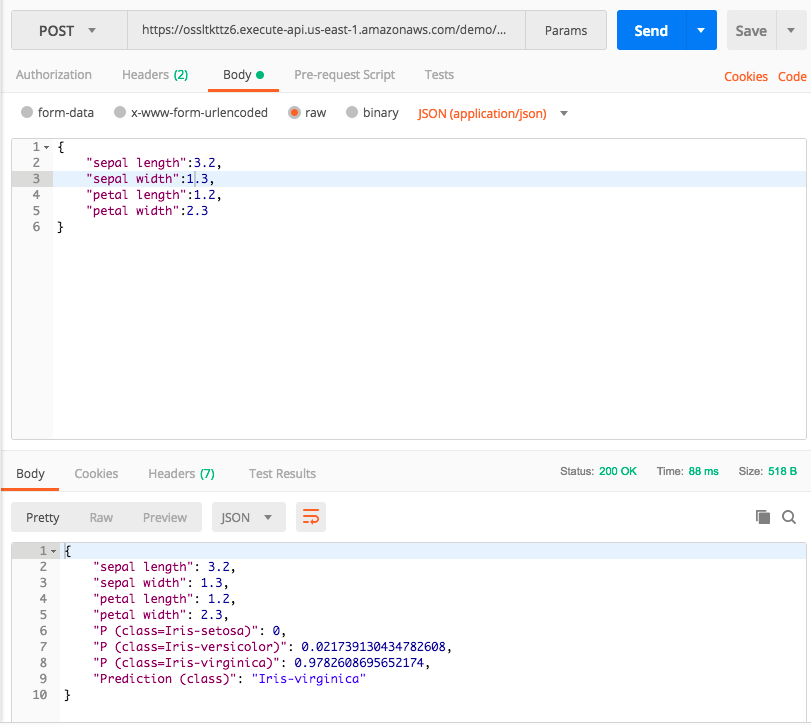
As you can see, JSON data were passed to the model application workflow on KNIME Server and a JSON object was returned. The response data include the input data and additional fields including the predicted value and the probability value for each categorical value. The API works!
API Gateway provides a dashboard for each defined API. The dashboard can be used to monitor the API usage and performance. See the screenshot below from the console for API Gateway.
Figure 6: Dashboard to monitor API usage and performance from the API Gateway Console.
There are many features of API Gateway that can be used in conjunction with KNIME Server. We’ve demonstrated a few of them here. API Gateway is a feature rich service that is worth investigating further.
In this blog, we’ve discussed the usefulness of APIs and how they can be used. We looked at creating KNIME workflows that support REST API invocation along with how to publish workflows to KNIME Server. We also gave a quick overview of the AWS API Gateway service that adds additional features to our deployment. I hope you’ve enjoyed this journey that began with your predictive model and took you to deploying that new model in a way that is universally shareable via a REST API. Happy modeling!
References:
- To find out more about KNIME Software on AWS, visit our product page.
- Download the workflow Model Deployment as a REST API used in this blog post from the KNIME Hub.