
In this blog series we’ll be experimenting with the most interesting blends of data and tools. Whether it’s mixing traditional sources with modern data lakes, open-source devops on the cloud with protected internal legacy tools, SQL with noSQL, web-wisdom-of-the-crowd with in-house handwritten notes, or IoT sensor data with idle chatting, we’re curious to find out: will they blend? Want to find out what happens when IBM Watson meets Google News, Hadoop Hive meets Excel, R meets Python, or MS Word meets MongoDB?
Follow us here and send us your ideas for the next data blending challenge you’d like to see at willtheyblend@knime.com.
Today: A Recipe for Delicious Data: Mashing Google and Excel Sheets
A newer version of this blog post and workflow is available at https://www.knime.com/blog/GoogleSheet-meets-Excel-part2 using the new Google Sheets nodes available with KNIME Analytics Platform 3.5. These nodes make accessing the Google Sheets (private or public) a much easier task!
A newer version of this blog post and workflow is available at https://www.knime.com/blog/GoogleSheet-meets-Excel-part2 using the new Google Sheets nodes available with KNIME Analytics Platform 3.5. These nodes make accessing the Google Sheets (private or public) a much easier task!
using the new Google Sheets nodes available with KNIME Analytics Platform 3.5. These nodes make accessing the Google Sheets (private or public) a much easier task!

The Challenge
Don’t be confused! This is not one of the data chef battles, but a “Will they blend?” experiment - which, just by chance, happens to be on a restaurant theme again.
A local restaurant has been running its business relatively successfully for a few years now. It is a small business. An Excel Sheet was enough for the full accounting in 2016. To simplify collaboration, the restaurant owner decided to start using Google Sheets at the beginning of 2017. Now (2017 with Google Sheets) she faces the same task every month of calculating the monthly and YTD revenues and comparing them with the corresponding prior-year values (2016 with Microsoft Excel).
The technical challenge at the center of this experiment is definitely not a trivial matter: mashing the data from the Excel and Google spreadsheets into something delicious… and digestible. Will they blend?
Topic. Monthly and YTD revenue figures for a small local business.
Challenge. Blend together Microsoft Excel and Google Sheets.
Access Mode. Excel Reader and REST Google API for private and public documents.
Before diving into the technicalities, let’s spend a few words on the data. Both the Excel file and the Google spreadsheet contain the restaurant bill transactions with:
- date and time (DATE_TIME),
- table number (TABLE)
- bill amount (SUM)
The Experiment
The Excel Spreadsheet can be read easily with an Excel Reader node (see blog post: “Will they blend? Hadoop Hive meets Excel”).
The bigger problem here is accessing the Google Sheet. It is possible to access a Google Sheet document via dedicated Google Sheets REST API services. We send a Request for the Google Spreadsheet ID and the range of the data cells to be read and we get the corresponding values back in the Response.
Of course, together with the request parameters, some kind of recognition token is required. This can be a simple API key for a public Google Spreadsheet or an OAuth2 authorization token for a private Google Spreadsheet. In this experiment, we will discuss both access scenarios: to a public Google document and a private Google document.
Accessing a PUBLIC Google Spreadsheet Document via REST API
A Google Sheet document is public when its link sharing option is on. It can be on for anyone, for anyone with the link, for anyone in your domain, and for anyone in your domain with the link.
A public Google Sheet can be accessed with a GET Request through the Google Sheets REST API. A valid URL has the following format:
where:
- SPREADSHEET_ID is the unique identification string for that spreadsheet. It can be found between the "/d/" and the "/edit" in the URL of the spreadsheet.
- SPREADSHEET_NAME is the name of the spreadsheet.
- RANGE is the data cell range to be expressed in the A1 notation.
- API_KEY is a personal identification key for each Google user. In case of a public Google Sheet, the REST Request does not need to be authorized, but the user needs to be identified by means of a unique identifier, such as the Google API key. A Google API key can be acquired through the following steps:
- Activate the Google Sheets API service in the Google API Console. To do so, open the Library page in the Google API console, find the Google Sheets API, click it to enable the service.
- In the same page, open the Credentials page on the left, and get an API key via the menu option Create Credentials -> API key.
- MAJOR_DIMENSION is an optional component specifying whether to operate on the rows or the columns of the spreadsheet. For faster response processing, we set this parameter to “COLUMN”.
For more options (for example, subset of fields or multiple ranges) please check the Google documentation.
The Google Sheet API then returns the data within the specified range of the selected spreadsheet using a JSON representation.
For example, a GET Request to access the data in data cell rectangle A1:C5761 in sheet named “2017” of the document with document ID
In KNIME Analytics Platform, a GET Request to a REST service is sent via the GET Request Node. The Request string shown above is customized for the selected spreadsheet and data cell range, fed into the GET Request node, and used as URL Column setting in the Connection Settings tab. The other node settings are kept at the default values, which means no authentication, no request headers, basic response header only (Status and Content-type).
Storing the data cell range, the spreadsheet ID, and the API key in three different flow variables, we can build the right GET Request String through a String Manipulation node on the fly for a different document, sheet, and data cell range at each run.
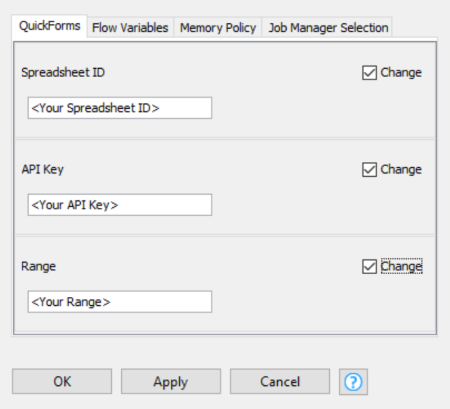
Even better. The String Manipulation node and the three String Input Quickform nodes were encapsulated into a wrapped metanode. Consequently, the settings in the QuickForm tab of the metanode configuration window set the values for the three flow variables necessary to customize the GET Request string (Fig. 1).
Note. You only need to insert the Spreadsheet ID, the API Key, and the data cell range to customize the GET Request appropriately, when executing the metanode. There is no need to open the metanode and the nodes inside it!
The metanode output is the Request String and feeds the GET Request node.
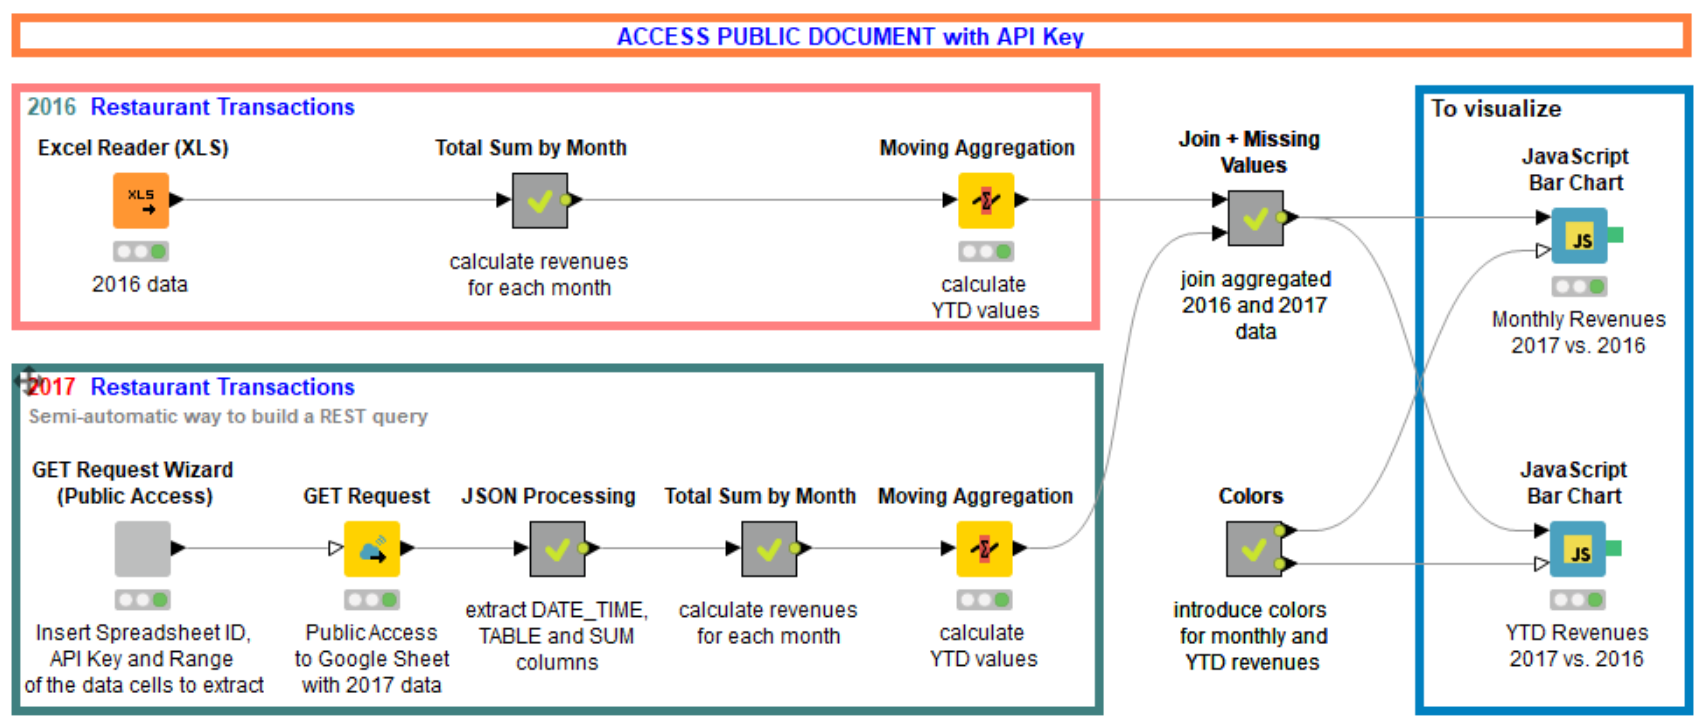
The final workflow is shown in figure 2 and can be downloaded from the KNIME EXAMPLES server from 01_Data_Access/05_REST_Web_Services/04_Public_Google_Sheet-meets-Excel*.
The upper branch reads the restaurant transactions from 2016 from an Excel spreadsheet. The lower branch, labelled “2017 Restaurant Transactions”, retrieves the 2017 data from the Google Sheet. And, just as we want it to, it builds the GET Request in the “Google Sheets Wizard” wrapped metanode and sends it to the Google Spreadsheet REST API service via the GET Request node.
The service Response is parsed and imported into a KNIME table by means of a JSON To Table node inside the “JSON Processing” metanode.
The rest of the workflow calculates the revenues by month as total sum and as Year To Date (YTD) cumulative sum. While the monthly total sum is calculated with a GroupBy node, the YTD cumulative sum is calculated with a Moving Aggregation node.
Accessing a PRIVATE Google Sheets Document via REST API
When accessing a private Google document, things become more complicated. A simple API key is not enough anymore. We need to acquire an access token through the OAuth 2.0 protocol
1. Register the application with the Google Spreadsheet API service
- Activate the Google Sheets API in the Google API Console. To do so, open the Library page in the Google API console, find the Google Sheets API, click it to enable the service.
- Register the application and create the credentials for authorization using the Credentials page, via the menu option Create credentials -> OAuth client ID. Then choose “Other” as application type. It will result in a new OAuth 2.0 client ID producing a new Client ID and Client Secret parameters. Please, note these two parameters.
2. Send a Request to Google's OAuth 2.0 server to get an authorization code
Note. For security reasons this is still a manual step, since it requires logging in into your private Google account.
The Request String should have the following format:
where:
- CLIENT_ID is the Client ID parameter that we obtained when we registered our application for an OAuth 2.0 authorization (see section above).
- REDIRECT_URI defines the channel for the Google authorization response. Since we’re going to manually copy and paste the authorization code, the value in the Request String was set to urn:ietf:wg:oauth:2.0:oob (more options are also available).
- RESPONSE_TYPE specifies the type of response. It should be set to code for installed applications.
- SCOPE regulates the access degree to the document by managing the set of permitted operations. Several scopes might be set in the same Request String separated by an “&” symbol.
Here is an example of a POST Request String to require an authorization code to access a private document:
Now we paste the Request String in the browser URL box. We are then redirected to a Google consent form to login and authorize the application to access the data. If the authorization is successful, we are provided with an authorization code, which we will use in the next step.
3. Exchange authorization code for access token
To exchange the authorization code obtained in the previous step we need to send a POST Request to Google's OAuth 2.0 server. To send a POST Request to a REST API service we can use the POST Request node. In particular, we will be using a POST Request node with the following configuration settings.
In the Connection Settings tab we set the request URL:
In the Request Headers tab we add the following (Header Key:, Value) pairs, both of the type Constant:
Host:
Content-Type:
In the Request Body tab we specify the POST request parameters by means of a String without white spaces:
where:
- AUTHORIZATION_CODE was obtained in the previous set of manual steps.
- CLIENT_ID is the Client ID parameter obtained in the previous steps when authorizing the application on the Credentials page of the Google API Console.
- CLIENT_SECRET is the Client Secret also obtained in the previous steps when authorizing the application on the Credentials page of the Google API.
- REDIRECT_URI defines the channel for the Google authorization Response. Since we’re going to manually copy and paste the authorization code, the value in the Request String was set to urn:ietf:wg:oauth:2.0:oob (more options are also available).
- GRANT_TYPE defines the OAuth 2.0 access process. Here the value must be set to authorization_code.
The parameter String for our POST Request then looks something like this:
The Response to this POST Request is a JSON object which holds a short-lived access token and a refresh token.
The refresh token can be used to obtain a new access token without generating a new authorization code. When using the refresh token to generate a new access token, the parameter String in the POST Request becomes:
where:
- REFRESH_TOKEN is the refresh token we obtained together with the access token
- GRANT_TYPE must be set to refresh_token.
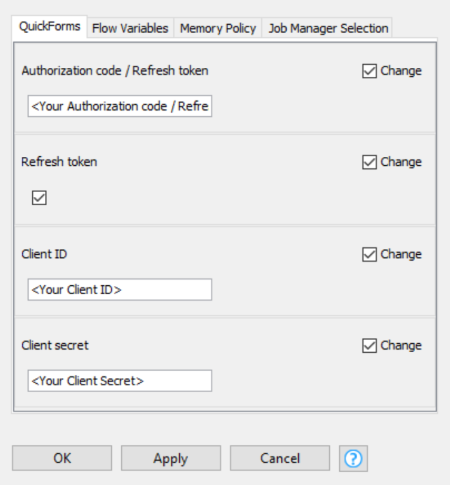
Let’s create a wizard wrapped metanode to produce the right parameter String for the POST Request to generate a new access token. A String Manipulation node and three String Input Quickform nodes are encapsulated into a wrapped metanode. The three Quickform nodes set the Authorization Code (or Refresh Token), the Client ID, and the Client Secret. The configuration window of the wrapped metanode, named “POST Request Wizard”, is shown in figure 3.
Note. You only need to insert the Authorization Code (or Refresh Token), the Client ID, and the Client Secret to customize the parameter String for the POST Request that generates a new access token. There is no need to open the metanode and the nodes inside it!
The metanode output contains the appropriate parameter String and feeds the POST Request node.
The created parameter string will then be used as a request body in the POST Request node. In the Request Body tab, we check the “Use column’s content as body” radio button and we set that column as the value.
The output of the POST Request node contains the Response from the Google Auth2.0 service. The Response contains the desired access token (finally!), which is JSON structured. The JSON structure is converted into a KNIME table inside the JSON Processing metanode, by means of a JSON to Table node. The output of the JSON Processing metanode is the access token.
4. Use access token in GET Request to extract data from Google Sheet
As in the case of a public Google Sheet document, data can be accessed with a GET Request node. Similarly, we need to build a Request String, but with the access token instead of the API key:
In our case, the sample Request String will look something like that:
The GET Request is then prepared in the “GET Request Wizard (Private Access)” wrapped metanode in a similar way as described in the previous section for the “GET Request Wizard (Public Access)” wrapped metanode.
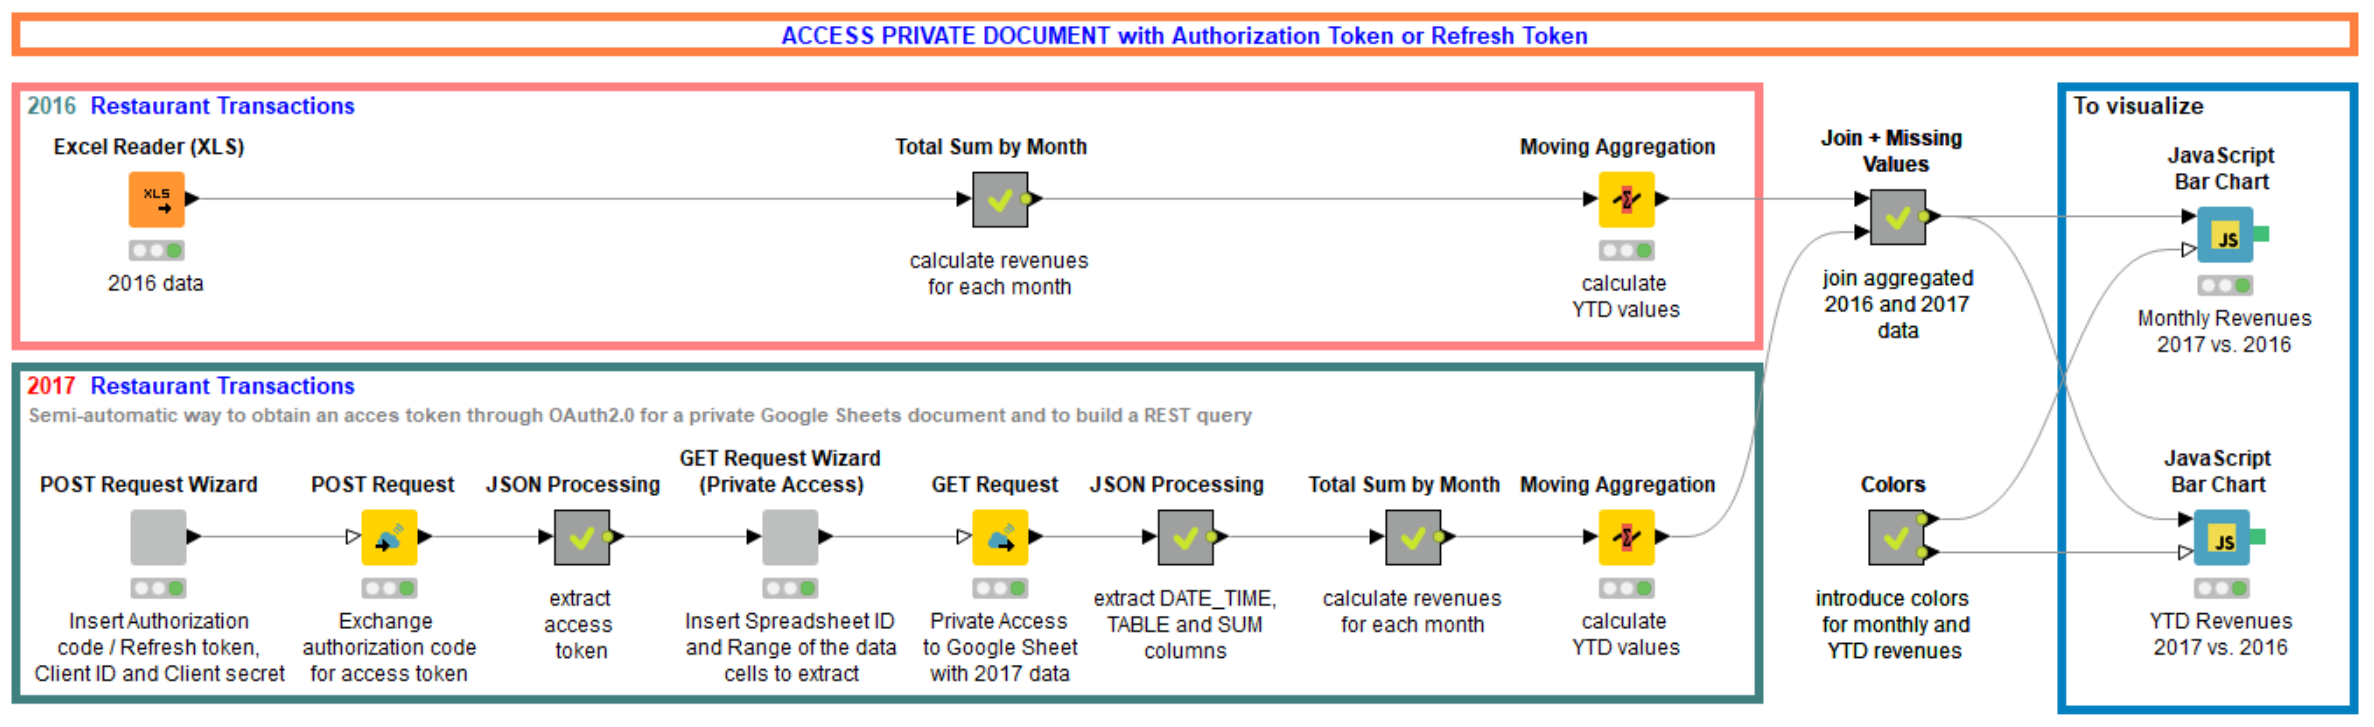
The final workflow is shown in figure 4 and can be downloaded from the KNIME EXAMPLES server from 01_Data_Access/05_REST_Web_Services/05_Private_Google_Sheet-meets-Excel*.
The upper branch reads the restaurant transactions from 2016 from an Excel Sheet. The lower branch, labelled “2017 Restaurant Transactions”, retrieves the 2017 data from a private Google Sheet. And indeed, it sends a POST Request to get the access token and then a GET Request to the Google Spreadsheet REST API service.
The Response to the last GET Request is parsed and imported into a KNIME table by means of a JSON To Table node inside the second “JSON Processing” metanode.
The rest of the workflow calculates the revenues by month as total sum and Year To Date (YTD) cumulative sum. While the monthly total sum is calculated with a GroupBy node, the YTD cumulative sum is calculated with a Moving Aggregation node.
The Results
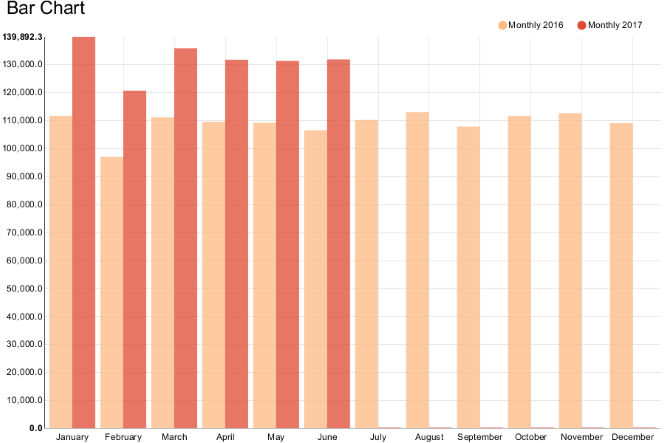
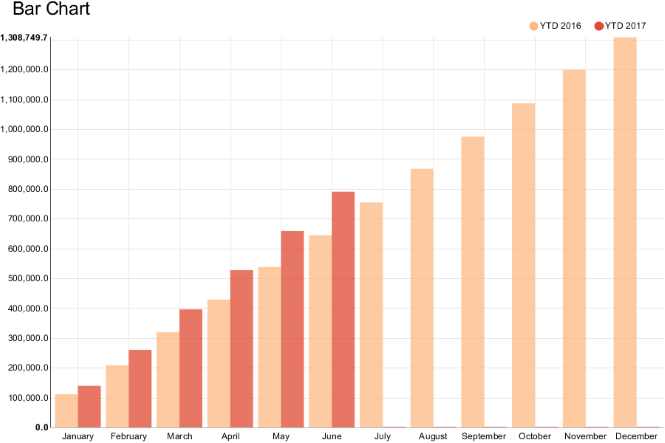
The two bar charts below show the restaurant revenues in euros as a total monthly sum and as a Year To Date (YTD) monthly cumulative sum respectively, for both groups of transactions in 2016 (light orange, from the Excel file) and in 2017 (darker orange, from the Google Sheet document).
We are happy to see that the small restaurant we used as an example has increased its business sales in 2017 with respect to the same months in 2016.
We are also happy to see that Google Sheets and Microsoft Excel spreadsheets really do blend!
In this experiment, indeed, we retrieved and blended data from an Excel spreadsheet and a Google Sheet document. We actually ran two experiments: one retrieving data from a Google Sheet document with public access and the other retrieving the same data from a Google Sheet document with private access. In both experiments our Excel spreadsheets and Google Sheets documents blended easily, to produce a delicious dish for our restaurant business.
So, if you are asked by your friend running a local business whether you can blend data from Excel spreadsheets and Google Sheet documents, the answer is: Yes, they blend!
Coming Next …
If you enjoyed this, please share it generously and let us know your ideas for future blends.
We’re looking forward to the next challenge. There we will tackle the world of CRM applications, trying to bring together Salesforce and SugarCRM. Will they blend?
* The link will open the workflow directly in KNIME Analytics Platform (requirements: Windows; KNIME Analytics Platform must be installed with the Installer version 3.2.0 or higher)