
In my previous blog post “Learning Deep Learning”, I showed how to use the KNIME Deep Learning - DL4J Integration to predict the handwritten digits from images in the MNIST dataset. That’s a neat trick, but it’s a problem that has been pretty well solved for a while. What about trying something a bit more difficult? In this blog post I’ll take a dataset of images from three different subtypes of lymphoma and classify the image into the (hopefully) correct subtype.
KNIME Deep Learning - Keras Integration brings new deep learning capabilities to KNIME Analytics Platform. You can now use the Keras Python library to take advantage of a variety of different deep learning backends. The new KNIME nodes provide a convenient GUI for training and deploying deep learning models while still allowing model creation/editing directly in Python for maximum flexibility.
The workflows mentioned in this blogpost require a fairly heavy amount of computation (and waiting), so if you’re just looking to check out the new integration.
- See the simple workflow here that recapitulates the results of the previous blog post using the new Keras Integration.
- There are quite a few more example workflows for both DL4J and Keras which can be found on the KNIME Hub.
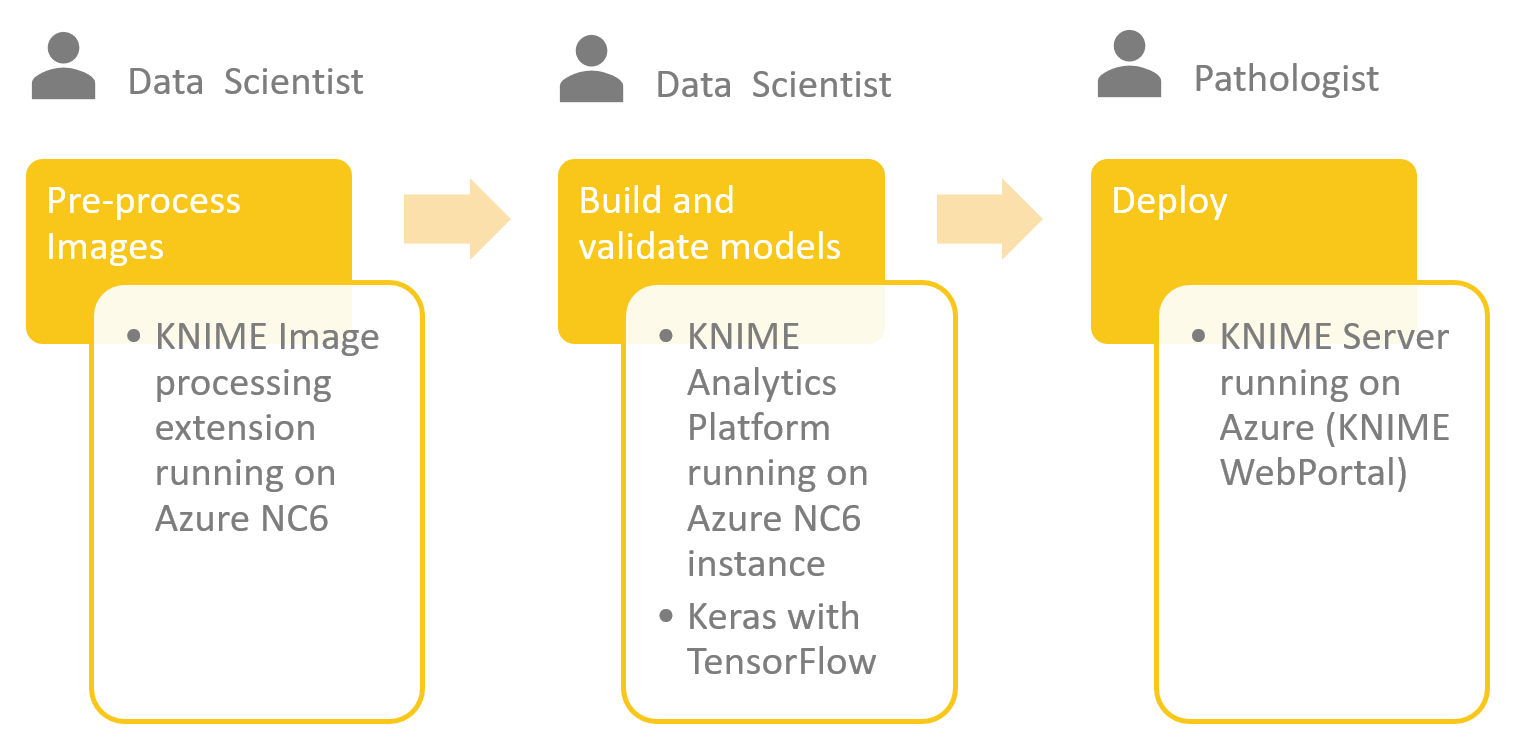
Right, back to the challenge. Malignant lymphoma affects many people, and among malignant lymphomas, CLL (chronic lymphocytic leukemia), FL (follicular lymphoma), and MCL (mantle cell lymphoma) are difficult for even experienced pathologists to accurately classify.A typical task for a pathologist in a hospital would be to look at those images and make a decision about what type of lymphoma is present. In many cases, follow-up tests to confirm the diagnosis are required. An assistive technology that can guide the pathologist and speed up their job would be of great value. Freeing up the pathologist to spend their time on those tasks that computers can’t do so well, has obvious benefits for the hospital, the pathologist, and the patients.
Getting the dataset
Since I just have my laptop and Keras runs really fast on modern GPUs, I’ll be logging into KNIME Analytics Platform hosted on an Azure N-series GPU. You could of course do the same using an AWS equivalent or a fast GPU in your workstation. Full details on how to configure the KNIME Deep Learning - Keras Integration are available here: https://www.knime.com/deeplearning
The full dataset is available as a single tar.gz file containing 374 images: https://ome.grc.nia.nih.gov/iicbu2008/lymphoma/index.html. I created a workflow that downloads the file and extracts the images into three sub-directories - one for each lymphoma type. Finally, I created a KNIME table file that stores the path to the image files and labels the image according to the class of lymphoma.
Preparing the images
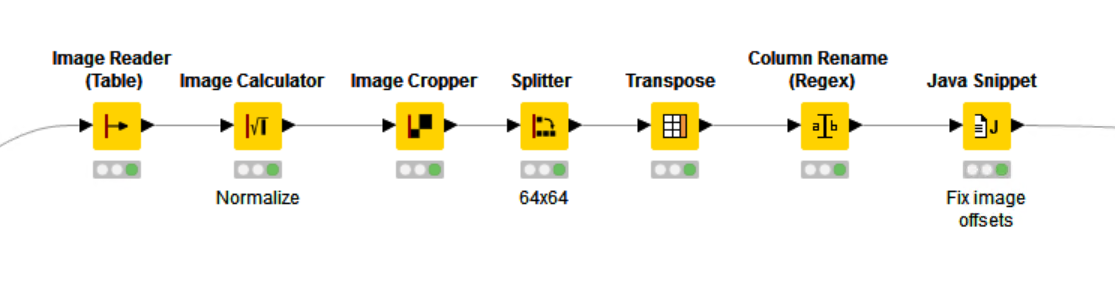
Each image has the dimensions 1388 by 1040px and the information required to determine the classification is a property of the whole image (i.e. it’s not reliant only on individual cells, which can be the case in some image classification problems). In the next step we’ll use the VGG16 CNN to train a classifier. This model expects image sizes of 64 by 64px, so we’ll need to chop the whole images into multiple patches that we’ll then use for learning.
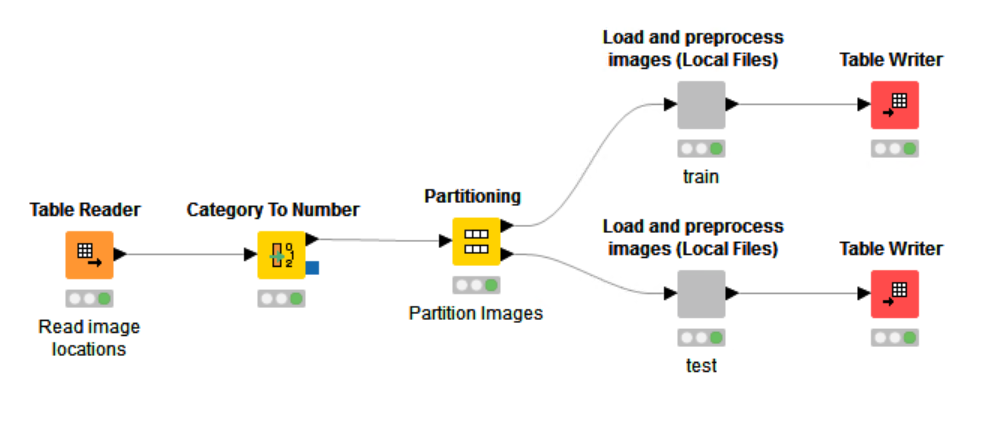
The general workflow just splits the input KNIME table into two datasets (train and test). Inside the ‘Load and preprocess images (Local Files)’ wrapped metanode we use the KNIME Image Processing extension to read the image file, normalize the full image, and then crop and split the image into 64 by 64px patches. Once again, we write out a KNIME table file, this time containing the image patches and the class information.
Training the model
Since developing a completely novel CNN is both difficult and time-consuming, we’re going to first try using an existing CNN that has been pre-trained for solving image classification problems. The CNN that we’ll use is VGG16, which was originally trained to predict the class of members of the ImageNet dataset containing 1000 different class labels.
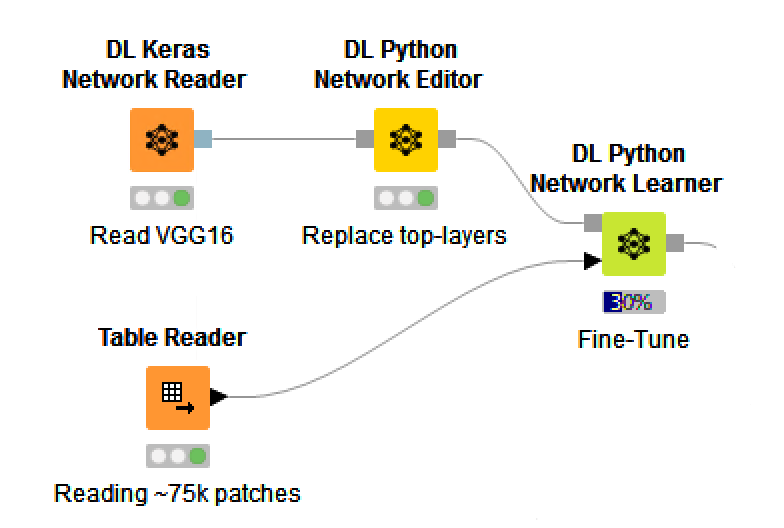
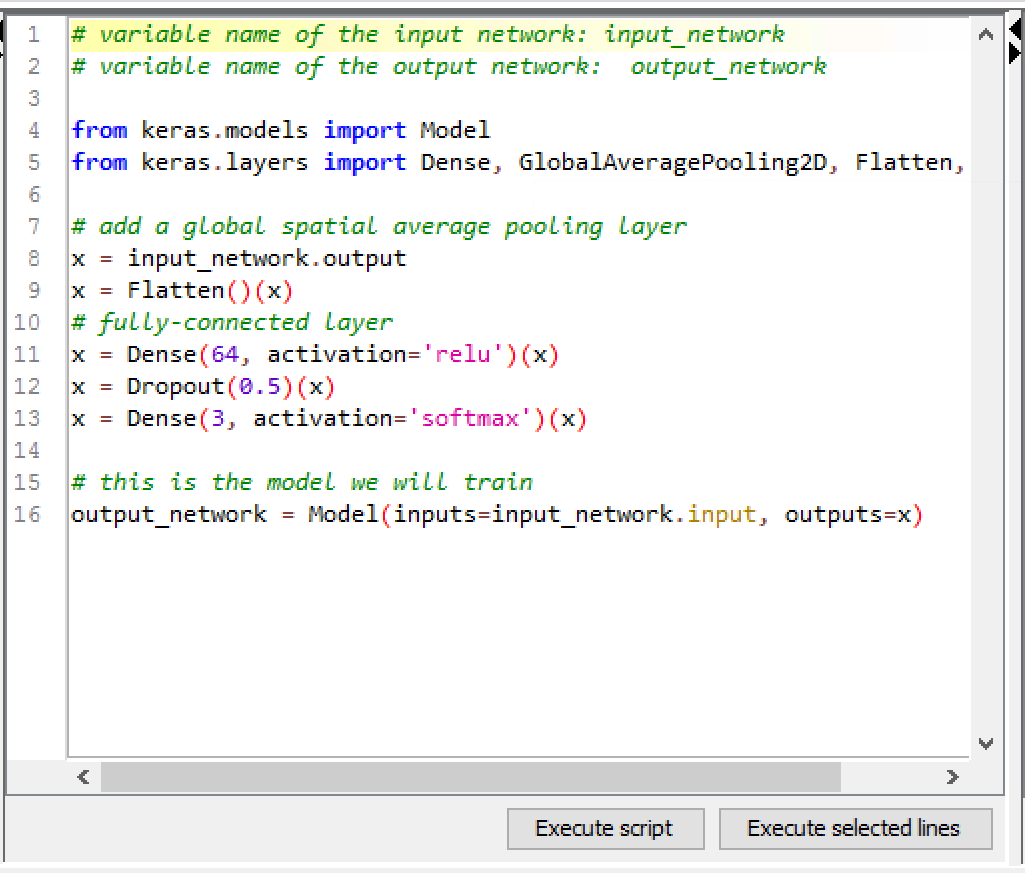
None of these class labels were the type of object that we were looking for, but we can easily replace the top layers of our model using the DL Python Network Editor node, and then fine-tune the resulting network for our problem using the DL Python Network Learner node and the ~75,000 patches created from the training set images.
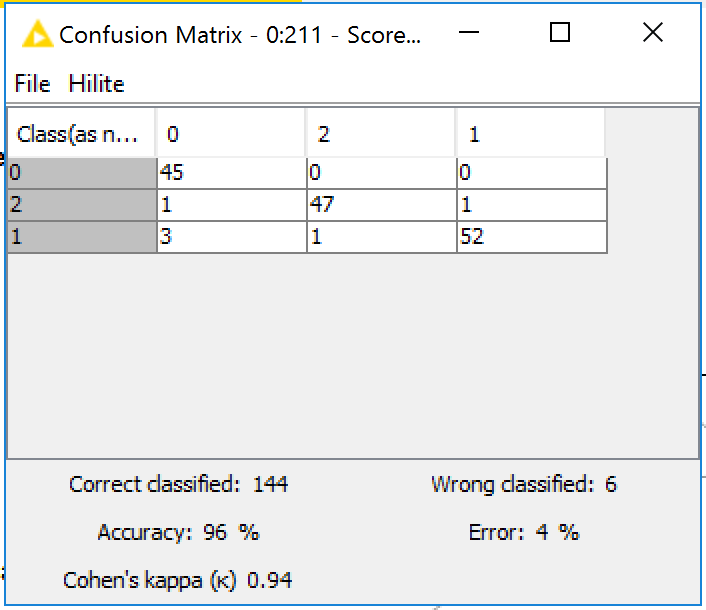
Once the model is fine tuned, we evaluate its performance on the test set images. To predict the class of an image, we generate predictions for each of the 64 by 64px patches we split it into, and then combine those predictions using a simple majority voting scheme. Using this approach we see that our classifier has achieved 96% accuracy (fine-tuning for a few more epochs can push the accuracy to 98%).
Note that executing this workflow could take around 12 hours. By editing the number of epochs used in the fine-tuning, you can decrease the amount of time required significantly, at the expense of classification performance.
Deploying the predictions to the pathologist
We put together a simple KNIME Server WebPortal workflow to allow a pathologist to access those predictions via a Web Browser.
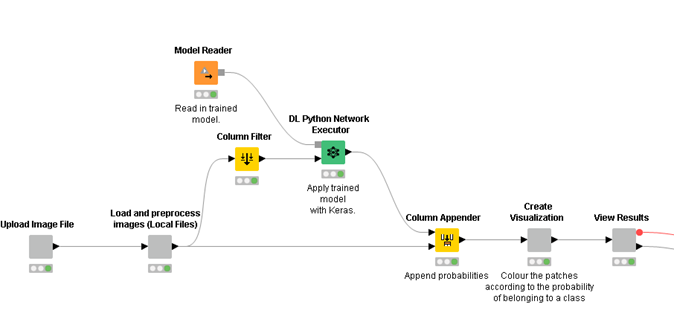
The workflow allows upload of an image file, which is then classified using the deployed model. Finally, the result of the classification is displayed on a page that summarizes the key results. That’s one simple way to deploy the results, but it would be equally possible to deploy the model as a REST API which would allow for simple integration into existing tools such as slide viewers.
Summary
The workflows presented here give you some idea of how you can tackle image classification problems using KNIME Image Processing and KNIME Deep Learning Keras Integration. There were some great talks at the KNIME Fall Summit 2017 in Austin which showed just how far you can go with image analysis in KNIME Analytics Platform. See for example the talks by Prabhakar R. Gudla (National Cancer Institute, National Institutes of Health) and Andries Zijlstra (Vanderbilt University Medical Center).
Here we also showed just how easy it is to take those models and deploy the results to multiple end users using the KNIME Server WebPortal.
Resources
- Workflows: https://hub.knime.com/knime/space/Examples/50_Applications/31_Histopathology_Blog_Post/_legacy_version/
- Dataset: https://ome.grc.nia.nih.gov/iicbu2008/lymphoma/index.html (description), https://ome.grc.nia.nih.gov/iicbu2008/lymphoma.tar.gz (data file ~ 2Gb)
- Research Article: Meng, Tao, et al. "Histology image classification using supervised classification and multimodal fusion." Multimedia (ISM), 2010 IEEE International Symposium on. IEEE, 2010, http://ieeexplore.ieee.org/document/5693834/
- Strata talk: https://conferences.oreilly.com/strata/strata-ny/public/schedule/detail/60618
- VGG16: http://arxiv.org/pdf/1409.1556
- KNIME Image Processing Extension: https://www.knime.com/community/image-processing
- KNIME Deep Learning: https://www.knime.com/deeplearning
- MNIST Keras Workflow: https://hub.knime.com/knime/space/Examples/04_Analytics/14_Deep_Learning/02_Keras/03_Train_MNIST_classifier
- KNIME Hub Deep Learning Workflows: https://hub.knime.com/knime/space/Examples/04_Analytics/14_Deep_Learning/
Requirements
- KNIME Analytics Platform 3.5+
- KNIME File Handling Nodes, Vernalis KNIME Nodes, KNIME Image Processing, KNIME Image Processing - Python Extensions*, KNIME Deep Learning - Keras Integration
- KNIME Deep Learning Setup Instructions: https://www.knime.com/deeplearning
- The workflows contain a Conda yaml file that will install most Python requirements, and the batch file to launch python.
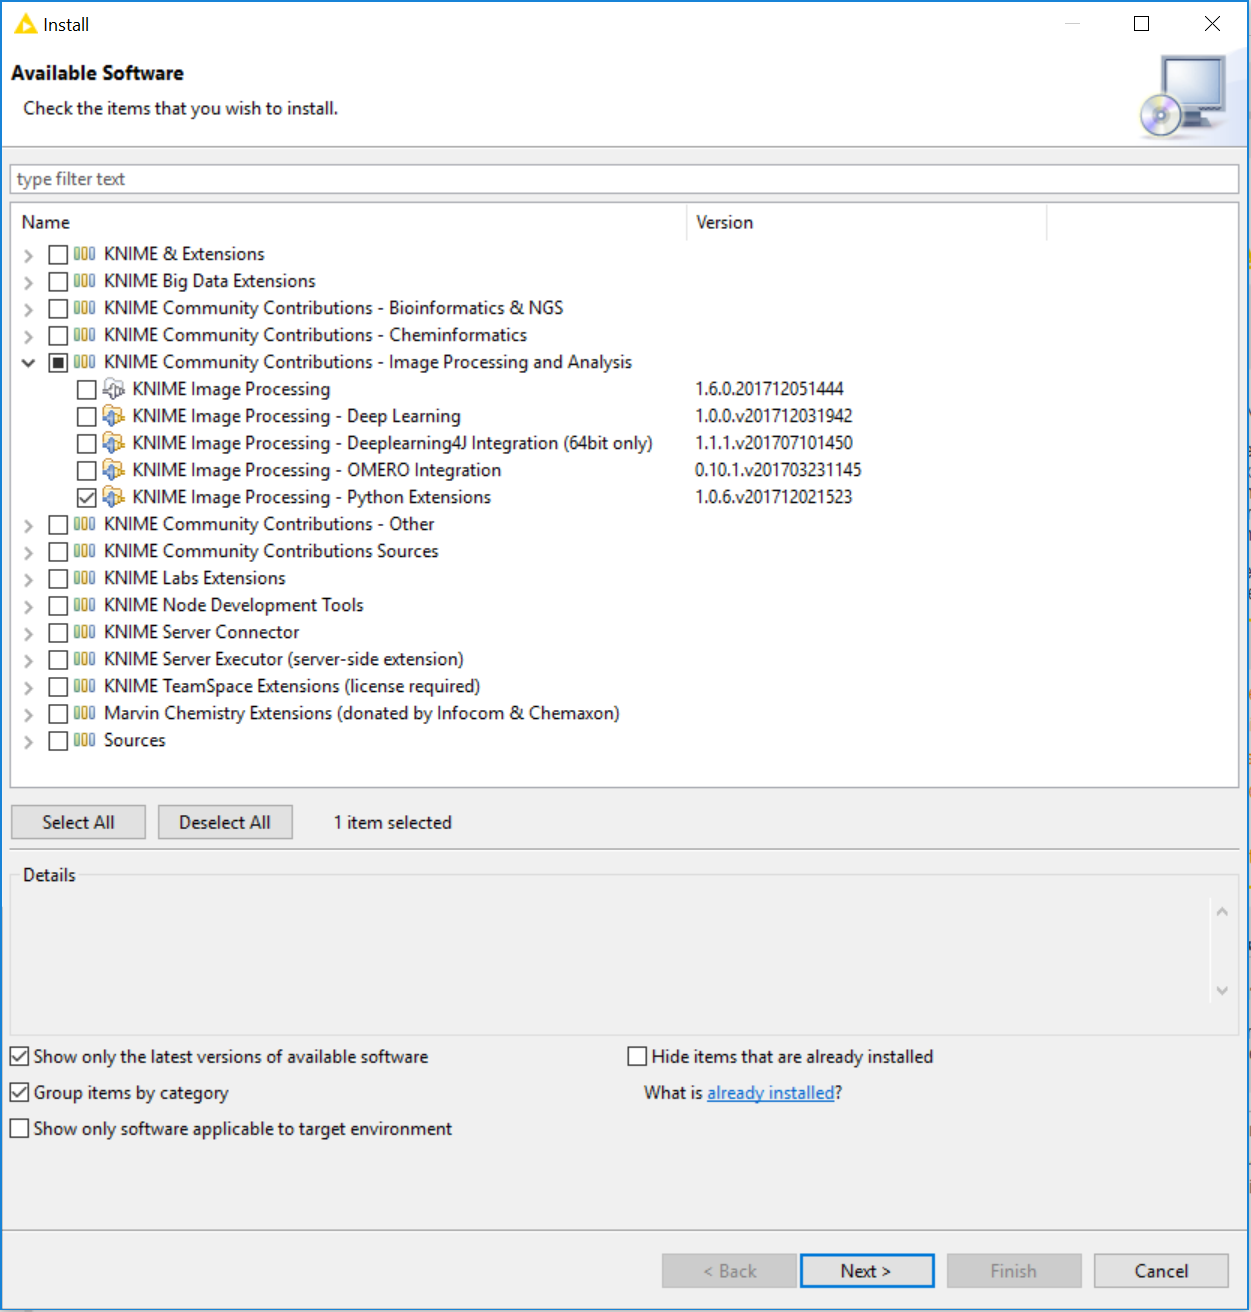
* Note that you won’t be prompted to install this required extension when opening the workflows. That means you’ll need to install it manually by choosing File → Install KNIME Extensions, and selecting KNIME Image Processing - Python Extensions (see screenshot below). The extension is used by the ‘DL Python Network Learner’ to read the ImgPlus cell type from KNIME Image Processing into a format that Keras and Python can use.
Figure 8. Installing the KNIME Image Processing - Python Extensions.
** The link will open the workflow directly in KNIME Analytics Platform (requirements: Windows; KNIME Analytics Platform must be installed with the Installer version 3.2.0 or higher)