
It's common for organizations to establish a central team of data experts who deal with requests from other teams to solve data problems. Emails or tickets might be sent through with requests like: “Can you please provide us with this customer's information?” “Could you please update this report with fresh data?” or “Can you run the model again on data from this week?” Data teams can soon be overwhelmed by so many requests. This bottleneck not only slows down the analytics process in general, it also distracts the data expert team from actually working on new cutting-edge projects, such as machine learning.
This problem can be relieved when KNIME Analytics Platform is adopted throughout the organization. Other team members can become self-sufficient and build reliable data pipelines by themselves, via drag and drop operations. They can create a reusable system that queries databases, filters columns/rows and creates charts without having to request assistance from the central data experts team.
Sometimes, however, the operation is complex because of the nature of the data problem. When a member of the finance or marketing team wants to take a workflow to an advanced level, for example to compute a complex KPI metric or train a ML model, the data expert team might get requested, once again, to build workflows for them. And then that same old bottleneck is back. What now?
Bundle Functionalities to Share in Reusable Components
Using KNIME, the data expert team can package recurring workflow segments in components and share them with other teams. The workflow that handles that complex KPI metric or trains that ML model can be bundled into a reusable component. This enables any other team to simply drag, drop, connect, configure and execute tailored, advanced functionalities to their needs. Data experts, instead of building new workflows each time, can point other teams to the right component. Fewer requests will come through to the central data team and the organization's analytics processes scale rapidly!
Note. Components really are KNIME nodes that you create with a KNIME workflow. They encapsulate and abstract functionality, can have their own dialog, and can have their own sophisticated, interactive views. Components can be reused in your own workflows but also shared with others: via KNIME Server or the KNIME Hub. Michael Berthold June 27, 2019. Read more about how Components are for Sharing.
Since 2019, data scientists at KNIME have built over 100 verified components for many different fields and industries: Automation, Data Manipulation, Financial Analysis, Guided Analytics, Life Sciences, Model Interpretability, Text Processing, Time Series and Visualizations.
We call these components “verified” because we take special care in testing, documenting and releasing them on a monthly basis. To do this we use a verification process, where we peer review each other's components. Based on all this experience, building and reviewing verified components, we’ve put together a list of best practices for building your own components.
Note. The KNIME Community learns fast and since 2019 over 800 components have been shared on KNIME Hub! We scout through them every season and highlight the most interesting ones on our blog. Check out the previous Community Components Collections for Winter 2021 and Spring 2022.
Build Your Own Components with these Best Practices
Any team of data experts could in theory follow a similar procedure and start building and sharing their components privately within the organization or publicly for the entire KNIME community. Below you can find best practices to ensure your components are reliable. For a detailed guide on component building check our latest documentation in the KNIME Components Guide.
1. Expose the Right Level of Abstraction
Any workflow can become a component. Despite this, a truly reusable component should not require its users to change any node settings on the inside when adopting it. To become reusable to other users, a component needs to adopt Configuration nodes.
Configuration nodes, not to be confused with Quickforms legacy nodes, allow you to create a dialogue for your component that works identically to the one offered by standard nodes. Each Configuration node inside the component becomes a setting on the outside dialogue. You can adjust their order using the toolbar button “Node Usage and Layout” and also define defaults, instructions and possible range of values using each node setting.
The more nodes there are inside the component, the harder it is to decide what to expose as a setting on the outside component dialogue. The more settings you offer in the component dialog, the easier it will be for your users to customize the workflow’s execution to their needs, but bear in mind that too many choices could be overwhelming for the user.
As a rule of thumb, first consider adding those settings without which the component could not be reused if the input data were slightly different. For example, multiple Column Selection Configuration nodes might be mandatory to make sure the component also works if you want to enable the user to select different column names. Other examples of required settings could be the Credentials Configuration and the String Configuration, when log-in credentials or a simple API key are required to connect to an external service.
After adding this type of required setting, you can start adding other optional settings. The Single Selection Configuration can be adopted to offer different modalities of execution, when it is known that only one way to execute the component will only satisfy the needs of a minority of its users.
2. Apply User Settings Smoothly with Flow Variables
As soon as the configuration nodes are within the component, their settings appear in the external component dialogue. In most cases this however does not mean the user preferences are automatically injected into the workflow on the inside.
Some configuration nodes, like for example the Column Filter Configuration, simply manipulate the input data and their output should be simply connected downstream to see those settings applied. Most Configuration nodes output flow variables, which pass on the user-selected settings to the next instance in the workflow.
To have those settings applied, you can inject them into the data flow with an Inject Variables node or simply connect them directly to the node they are supposed to dynamically reconfigure. Next, you need to specify which setting should be controlled in the downstream node flow variable tab. The KNIME Flow Control Guide is a useful resource with detailed information on how this works.
3. Control Which Nodes Should Execute Inside
Often component settings are not about changing how nodes inside execute, but rather which nodes execute, and which should not. Adopting Rule Engine Variable and Case Switches let you decide with freedom which workflow segment should execute based on user preferences, or simply based on an automatically detected conditions.
4. Automate Procedures Without Errors
Even powerful nodes for simple operations have their limitations. A GroupBy, for example, always takes the full input table to perform an aggregation. A Row Filter on the other hand can only take one column at a time into account to filter data. If you need to apply simple nodes on different partitions/columns you can theoretically duplicate them in the same workflow. This naive approach unfortunately does not always apply. Sometimes your component has to process data in an iterative manner to become reliable.

When you’re building components that are supposed to apply a simple sequence of nodes a dynamic number of times, you can use loop nodes. While iterating nodes dozens of times with different input and settings, a failure might be encountered. The benefit in this kind of situation of applying try/catch nodes is that the iterations never stop and all the progress is saved, as well as any failure reports, at the component output. If, at a later point in time, you want to retrieve a workflow segment within one of those iterations you can use capture nodes instead.
Establishing a workflow logic as complex as an actual coding algorithm is often not necessary, but as you can see it is possible. After all, KNIME’s visual programming framework is Turing complete.
5. Adopt User-friendly Error Messages
Sometimes components are meant to fail. This is due to the user providing wrong settings, or a wrong input table. In those cases no matter how sophisticated the workflow on the inside of the component is, the component is going to fail. By default, the component shows to its user the error generated by nodes on the inside. In the vast majority of cases these error messages are too detailed for the user to understand the error. The user might even confuse his own input/settings error for a bug in the component, blaming who built it.
To avoid such confusion the component should display in such cases a custom error message providing clear assistance to its user on what should be fixed. Examples are “Please provide a non-empty input” or “Include at least one column to be processed” or “Too many missing values detected”.
When the user error is based on wrong settings, configuration nodes, such as the Column Filter Configuration and the String Configuration, offer extra validation settings. Configuration nodes in general compare the settings provided by the user with the allowed range. Some of them also let you enter a custom error message to be displayed when the user setting does not match what is expected.
When the user error cannot be detected via configuration nodes or it is simply not based on wrong user settings, you can use a Breakpoint node downstream. Based on its settings, the node fails on purpose when a precise condition is met, displaying on mouseover the error phrase you provided both inside and outside the component. In many cases the only way to detect a complex user error is adding a Rule Engine Variable and/or a CASE Switch before the Breakpoint.
6. Visualize Results by Combining View Nodes
In most cases the users who adopted your component (and successfully executed it on their data) would like to understand its output. When simply opening the output table and scrolling through the rows is not enough, you can offer your users a set of combined charts and graphs best suited to visualize the results, that is a dashboard.
To let your users interactively explore the results, you can add Plotly views, KNIME views and interactive widgets inside the component. By default those nodes populate the composite view of the component and are interconnected: data points selected/filtered in one view/widget are also highlighted in the other views sharing the same table. Make sure to place upstream of your view nodes the Color Manager node for consistent colors throughout different charts. Read more on this topic in the article, Build a Data App: Create an Interactive Dashboard in Three Steps.
7. Control Component Execution via Widgets and Buttons
KNIME Components can offer much more than dashboards. By adding more widgets and buttons, alongside the views, your component users do not need to limit themselves to explore only the last execution results. They can for example change settings and update the results in real time from a user-friendly interface. You can build a fully functioning and ready to be deployed data app without any coding. Read more in the article, Deliver Data Apps with KNIME.
Borrowing a few concepts from software architecture: the workflow inside the component can be all considered as a backend, except for view and widget nodes which represent the frontend. Then, a subset of the widgets define the re-execution logic, controlling the backend from the frontend. Consider that the component needs to fully execute before the frontend of the data app is generated. Because of this, to build a component implementing a data app there are these fundamental steps:
-
Define mandatory user settings through configuration nodes. You have to add all those settings where defaults cannot be fixed, for example Column Selection Configuration. All settings which the user can ignore and leave default values can also be added in the component dialogue, and/or they can be shown later as frontend interaction points.
-
Implement the backend workflow that processes the data, based on settings from configuration nodes, and execute it on sample data to output results.
-
Implement the interactive frontend visualizations by simply adding view nodes and interactive widgets to visualize results. Initially the results are based exclusively on settings from configuration nodes.
-
Implement the frontend interaction points by adding standard widgets. Those are the settings you want to expose to the data app users.
-
Define the re-execution logic, by adding upstream refresh buttons or enable re-execution when available in a generic widget setting. Read more in the articles, The Wonderful World of Widgets!” and Eight Data App Designs with the New Refresh Button.
-
Improve the frontend user experience (UX) by designing the layout of the user interface (UI). Basically you can decide which view and what widget gets to display where in the component view. You can do this via the “Node Usage and Layout” panel as shown in the animation below. Also consider adding clearly styled instructions via the Text Output Widget node.
Note. For details on how to deploy a data app on KNIME WebPortal, see the docs page: KNIME Data Apps Beginners Guide.
8. Keep the Workflow Clean by Nesting Components
KNIME Analytics Platform allows you to create a component within a component and so forth. This strategy helps you compartmentalize further as the main component workflow increases in complexity. Nested components or metanodes can abstract specific recurrent functionalities within the component and also help visually to keep the workflow cleaner. In the article, Metanode or Component - What's the Difference?, you can read more about the main differences between metanodes and components. Here, I would like to focus on two important differences:
-
Input Deactivation: When a nested component has at least one input on a non-activated workflow branch, it deactivates all nodes inside it. Under similar circumstances, metanodes deactivate only partially. When your workflow logic increases in complexity, it is important to efficiently deactivate downstream branches from the switch as early as possible. For this you can use nested components.
-
Nested Composite Views: When view nodes are placed in different nested components, you can also compartmentalize the main component interactive view for easier maintenance. Furthermore, different layout options, visualizations, UI sections can be activated and deactivated based on user settings and interactions.
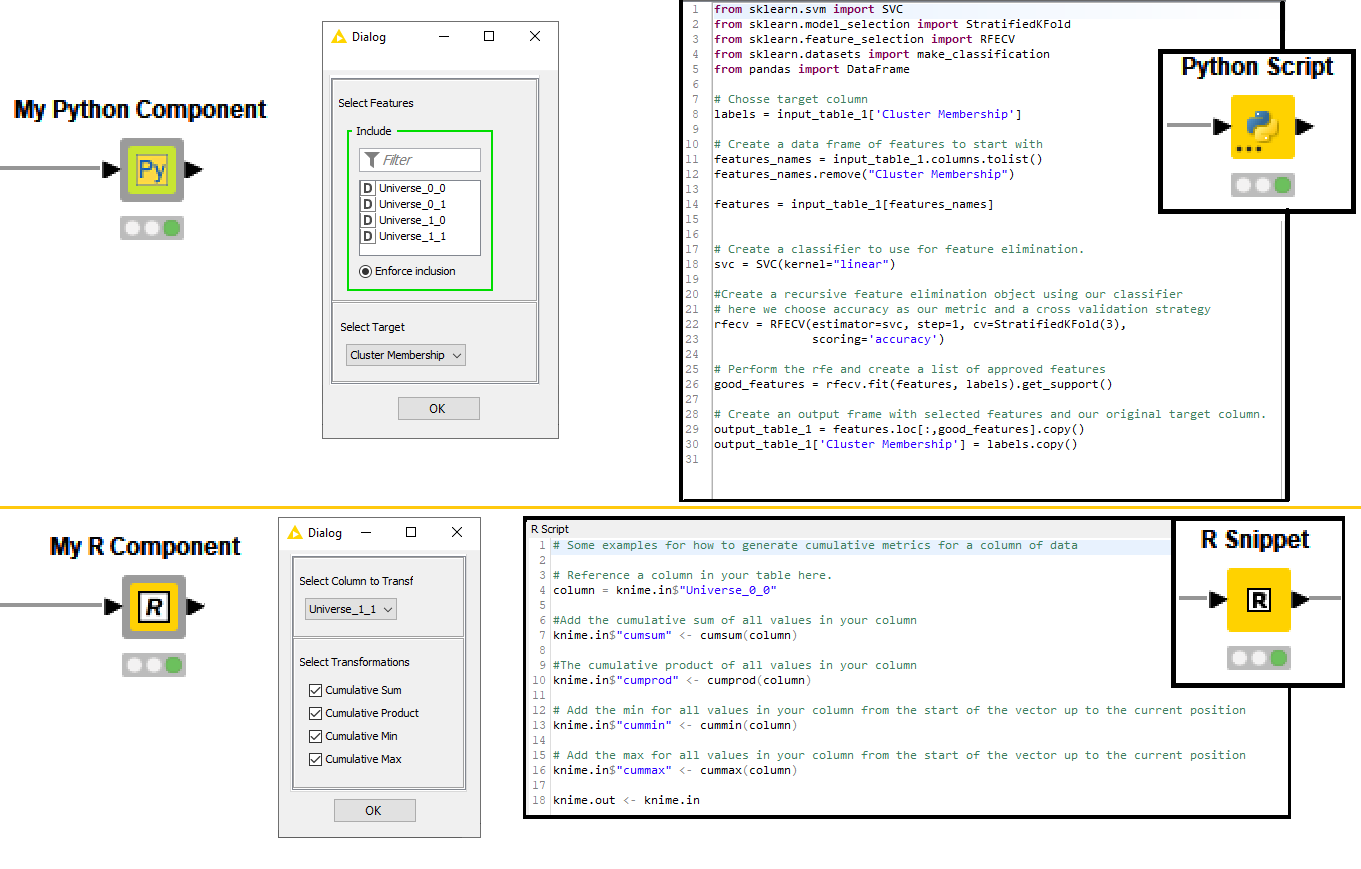
9. Avoid Dependency Issues with Scripted Components
Building components instead of developing nodes does not have to be a no-code solution. If you want to adopt an external library or simply code your way through, you can adopt Python, R, Conda, Java, JavaScript and more scripting nodes.
To learn more about how to build a component with a Python script and Conda environment to be shared with other KNIME users take a look at the article, Share Python Scripts in Components: Faster Collaboration. This strategy allows your users to drag in, configure and execute your component just like a node without worrying about dependency issues! A similar strategy works for R as the Conda Propagation node also supports R installation and its libraries.
To learn more about integrating a JavaScript library and using it in your component interactive views, take a look at the article, Interactive Choropleth World Map using Google GeoChart Visualization and From D3 example to interactive KNIME view in 10 minutes. See this Animated Bar Chart example on KNIME Hub to learn how to reliably import the external JavaScript library via a GET Request node within the component.
10. Test Component Properly before Sharing
While building the component it should come natural to test that it actually works on different settings and data samples. This can be done manually but if repeated after each new edit of the component, it can quickly become error-prone and time-consuming. You can build testflows with the dedicated KNIME Testing Framework UI Extension. During component building you should share the component draft with an overwrite, always adopting the same safe location. If you don’t have access to a KNIME Server, consider sharing the latest component edits on a private space on KNIME Hub. Then drag the component from this safe location to the testflow.
Every time a new version of the component is going to be overwriting the previous one, the testflow should prompt for updates once opened. You can build many branches in the testflow executing the latest component shared instance on different settings and datasets. To check the output does not differ, you can save in the workflow data area the expected output of a trustworthy execution and compare it with the current one via the Table Difference Checker node. Read more in the article, Testflow in KNIME Analytics Platform. Proper verification should not come entirely from your own tests. Consider sending the component to another expert to collect feedback and truly test if it works for someone who was not involved in building it.
11. Documentation is Key
It does not matter how reliable and reusable your component has become, if it is not properly documented. If you users do not know how to use your component or what its function is, they are not going to adopt it. KNIME Analytics Platform offers a dedicated panel to customize from inside the component its color, logo, description, settings and ports.
Furthermore the best way to understand your component is probably to see it in action. Build an example workflow, annotated and also documented, with attached data using relative paths, adopting a shared instance of the component. The component in the example workflow should be connected and configured to be executed on the fly and inspected by your users. All the documentation and example workflows are going to appear on the component KNIME Hub web page once published.
Wrapping-up: Components are for Sharing
Once your component is finished, consider sharing it with the KNIME community. The KNIME Hub is the perfect place. Connect your KNIME Analytics Platform to your KNIME Hub mountpoint, create a space dedicated to your component project, add contributors if any and a description, and share the component. Then, drag it into any example workflow you would like to share and also share it in the space. Your users are going to find your component through the Hub Search and can easily drag and drop in their workflow canvas and automatically install all the required extensions.
Feel free to reference the public space or the single component and workflows in any publication or documentation you plan to write afterwards. Need to change the component or its workflows after it was made public? No problem, but – and here comes our final recommendation: Make sure you always overwrite and never delete anything before re-uploading it. By overwriting the component or workflow, the page link will stay the same and any workflow already adopting your component will be able to get the latest updates.